

About MindNode Next
About MindNode Next
Every great idea starts with a single thought. And another. And a million more. Whether you’re sipping coffee or lying on a beach — MindNode Next helps you capture those ideas and turn them into a clear visual.
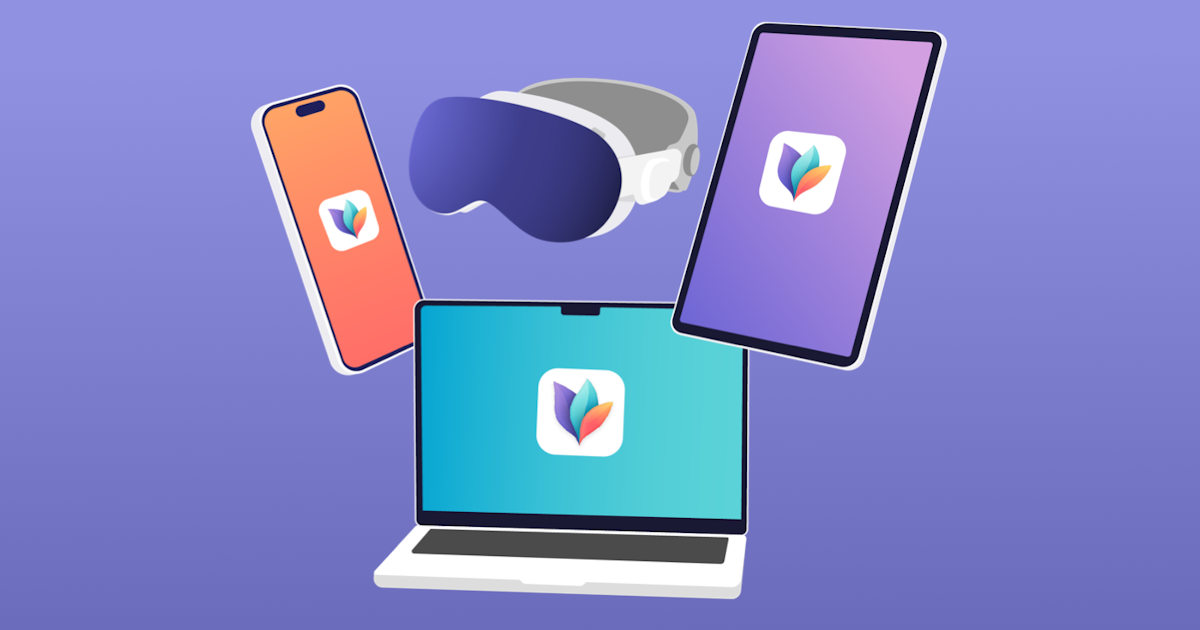
This brand-new version of MindNode is built for the new age of spatial computing and collaboration. MindNode Next is built on a new foundation that allows for conflict-free document syncing. Now, documents are managed directly in MindNode Next using iCloud and are no longer stored in files on disk or third-party storage locations.
This User Guide is for the MindNode Next app.
You can download the User Guide for MindNode Classic: here.
(Note: MindNode Next and MindNode Classic do not yet have feature parity. Find our roadmap for MindNode Next here.)
Requirements
MindNode Next for Mac requires a Mac running macOS Sequoia 15.0 or later.
MindNode Next for iOS/iPadOS requires an iPhone or iPod touch running iOS 18.0 or later or an iPad running iPadOS 18.0 or later.
MindNode Next for Apple Vision Pro requires an Apple Vision Pro running visionOS 2.0 or later.
Languages
MindNode Next is localized in 15 languages: Arabic, Simplified Chinese, Traditional Chinese, Dutch, English, French, German, Italian, Japanese, Korean, Portuguese, Russian, Spanish, Swedish, and Thai.
Support
Check out our Support Articles and read the answers to the most common questions. You can also email us at support@mindnode.com.
Glossary
Node: a space where you can add text and images — each representing a thought, topic, or idea.
Node well: where you create a new node (represented by a + symbol).
Main node: the central idea or topic of your MindNode mind map.
Child node: a thought/idea that is connected to another one.
Sibling nodes: thoughts/ideas on the same branch at the same level.
Parent node: the initial thought/idea that connects sibling nodes.
Branch: a group of thoughts/ideas related to one another.
Connection: an alternative way of connecting thoughts/ideas on the same or different branches.
Canvas: the area outside nodes, the background, so to speak.
Stickers: visual illustrations you can add to your MindNode mind map to make things more fun.
Notes: a way to expand on your thoughts/ideas without them always being visible.
Tags: a way of making nodes (aka. thoughts and ideas) searchable, no matter where they are located on your MindNode mind map.
Collaboration: Sharing and co-creating mind maps with others seamlessly in the app.
What is Mind Mapping
What is mind mapping?
Many ideas or projects start with a spark of inspiration or thought. Then another and a million more follow. Suddenly, your head is spinning, which is when it can get challenging to keep track and stay focused. Mind maps are a visual tool to untangle the idea knots in your head and gain visual clarity. And MindNode Next is a simple yet powerful tool based on this very concept. This User Guide will walk you through the idea of mind mapping and every step of creating a MindNode Next mind map from start to finish.
Mind mapping: this is how it works
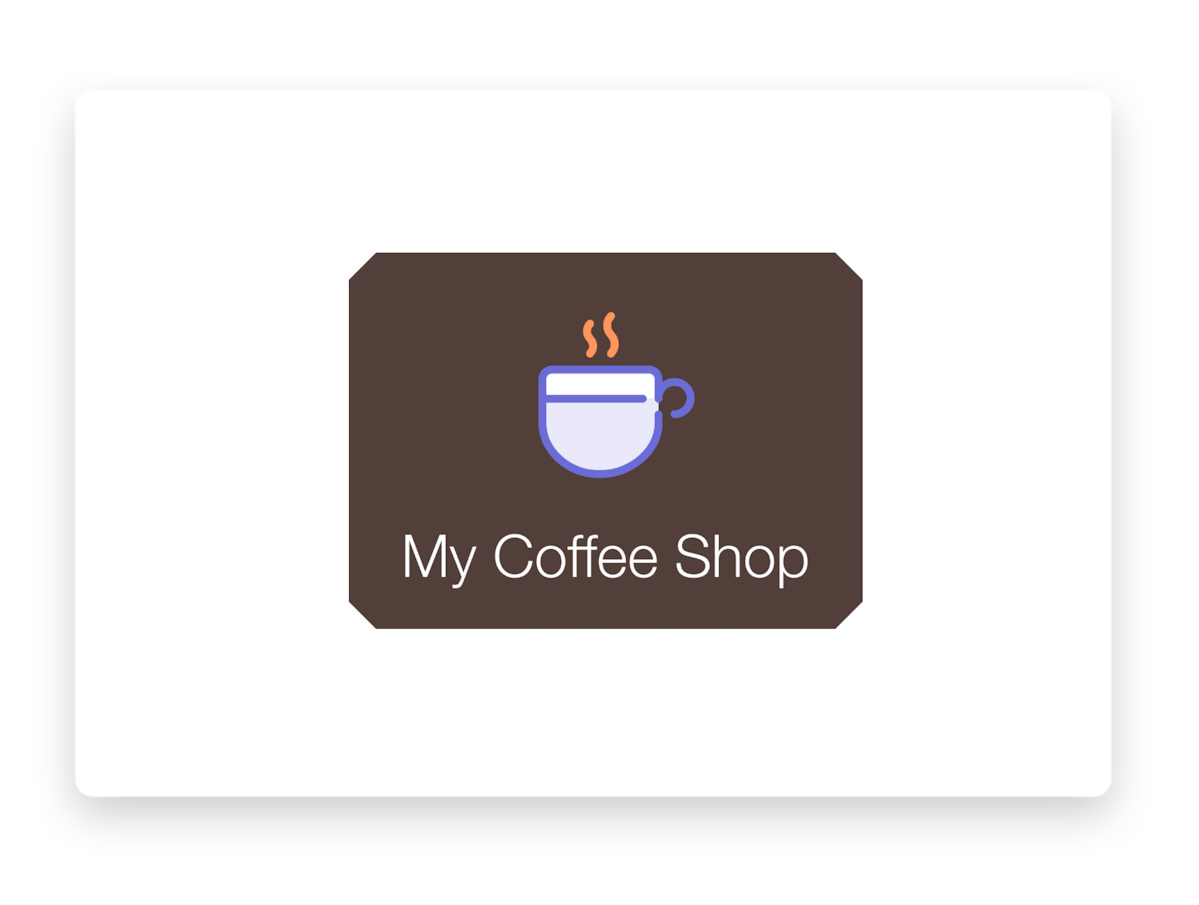
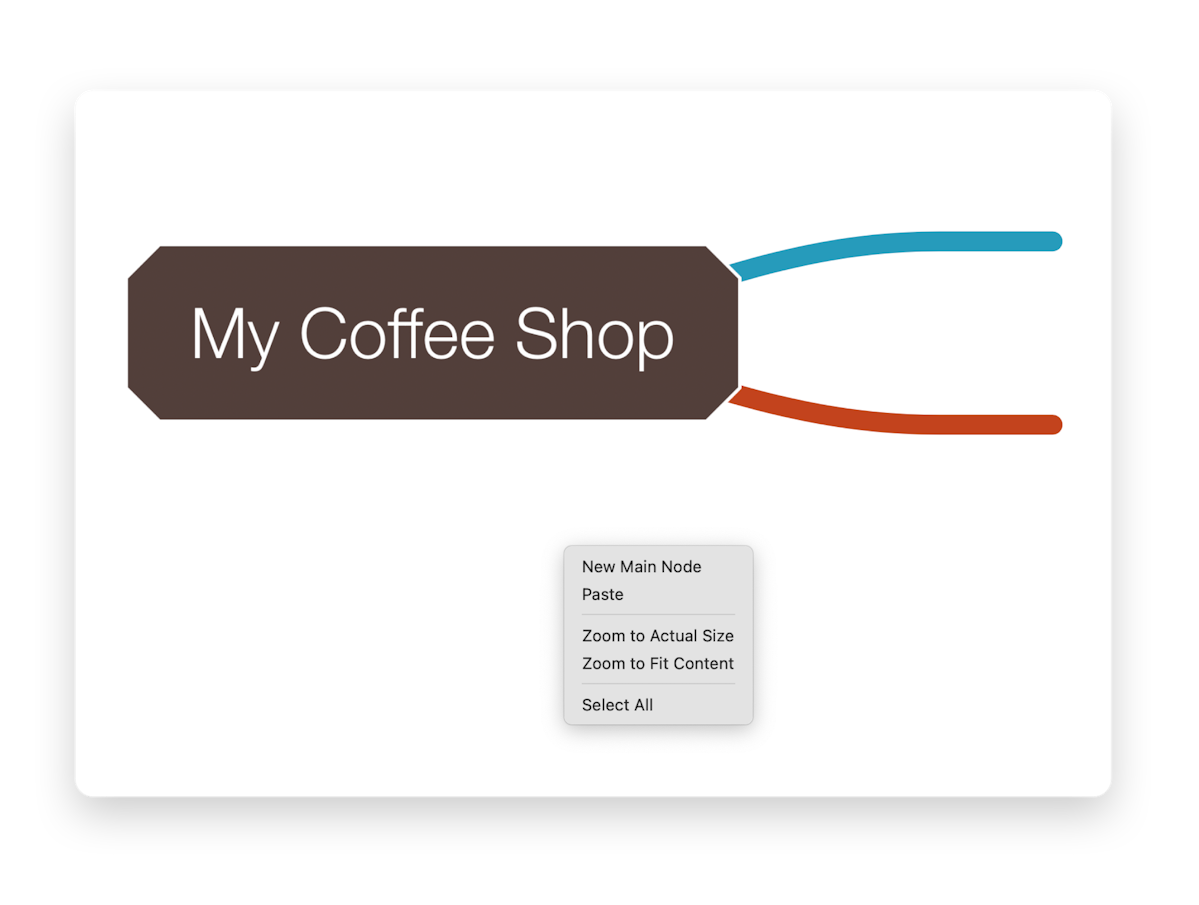
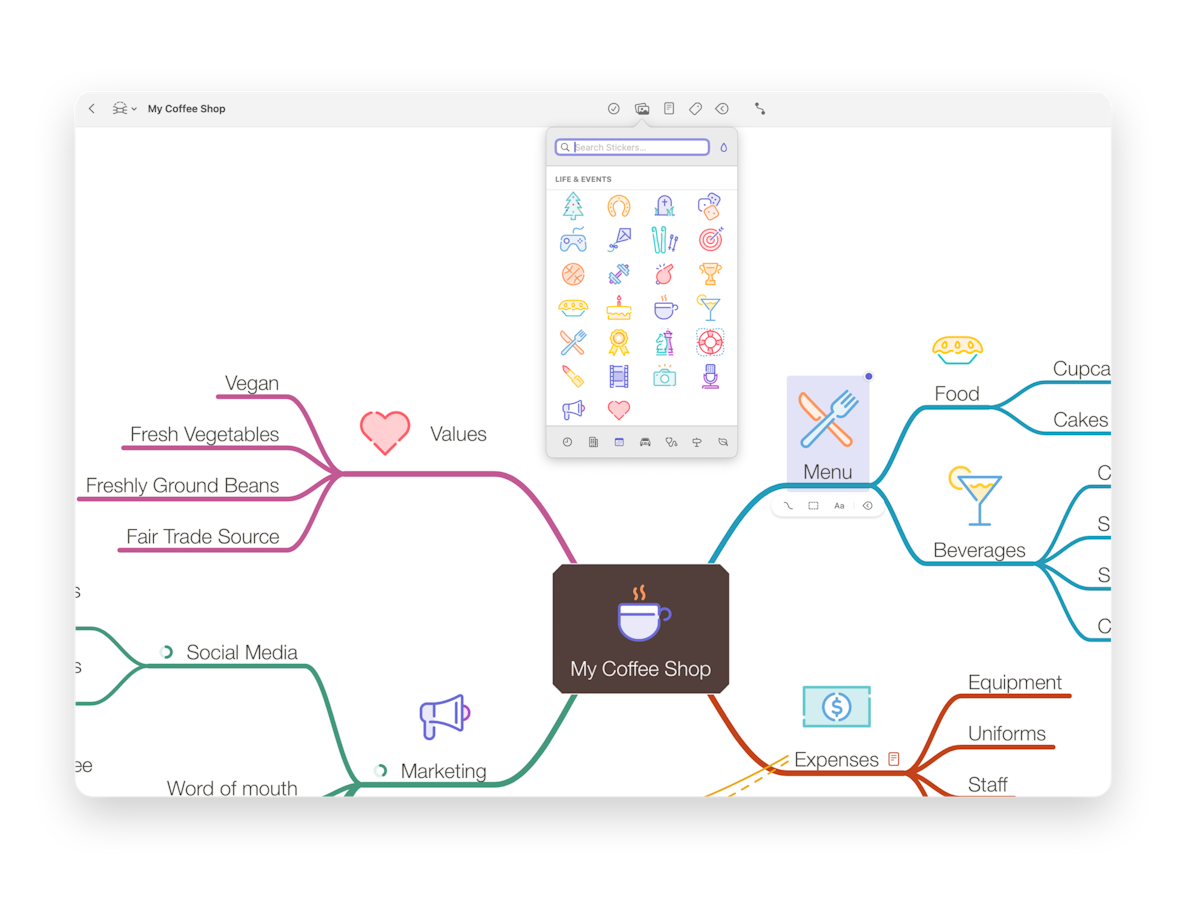
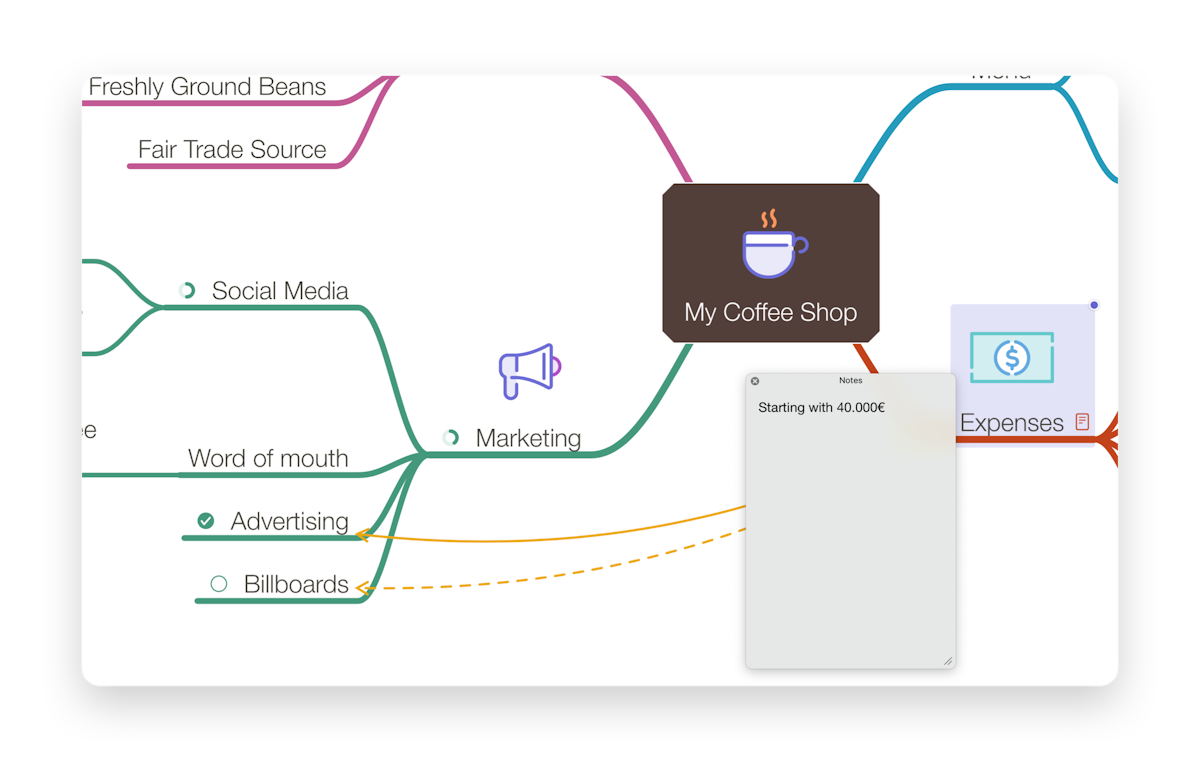
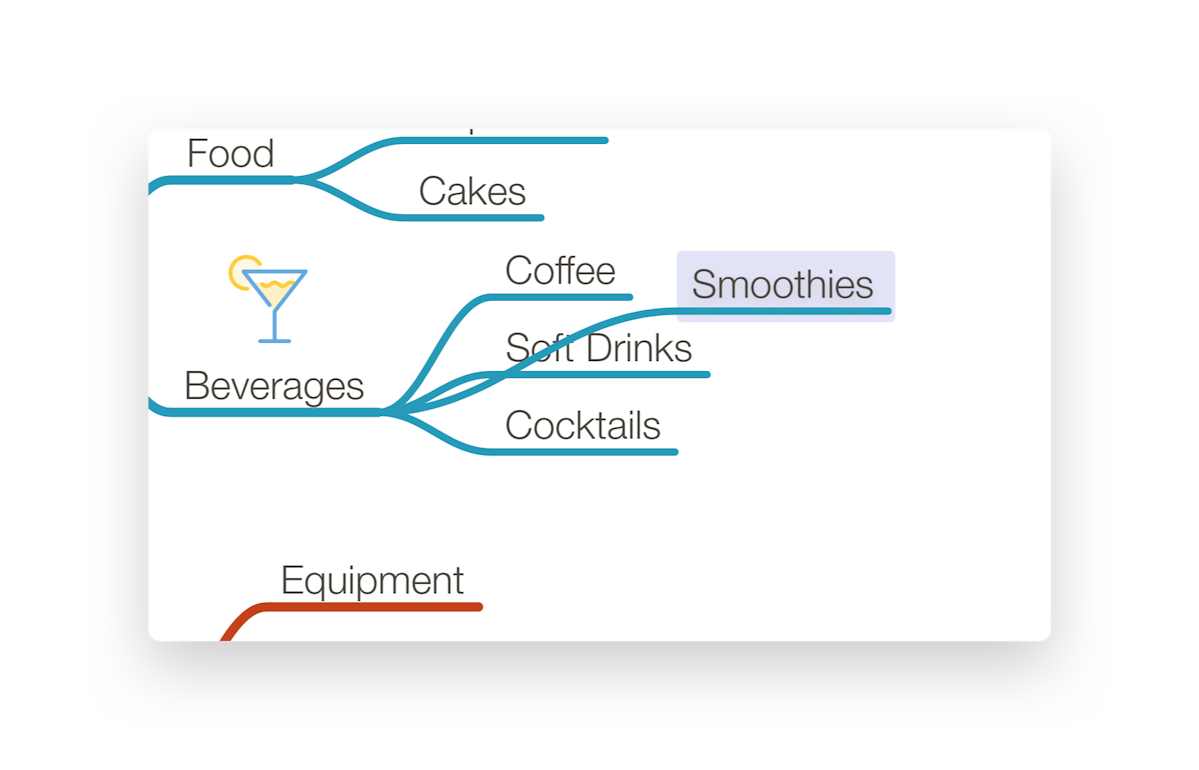
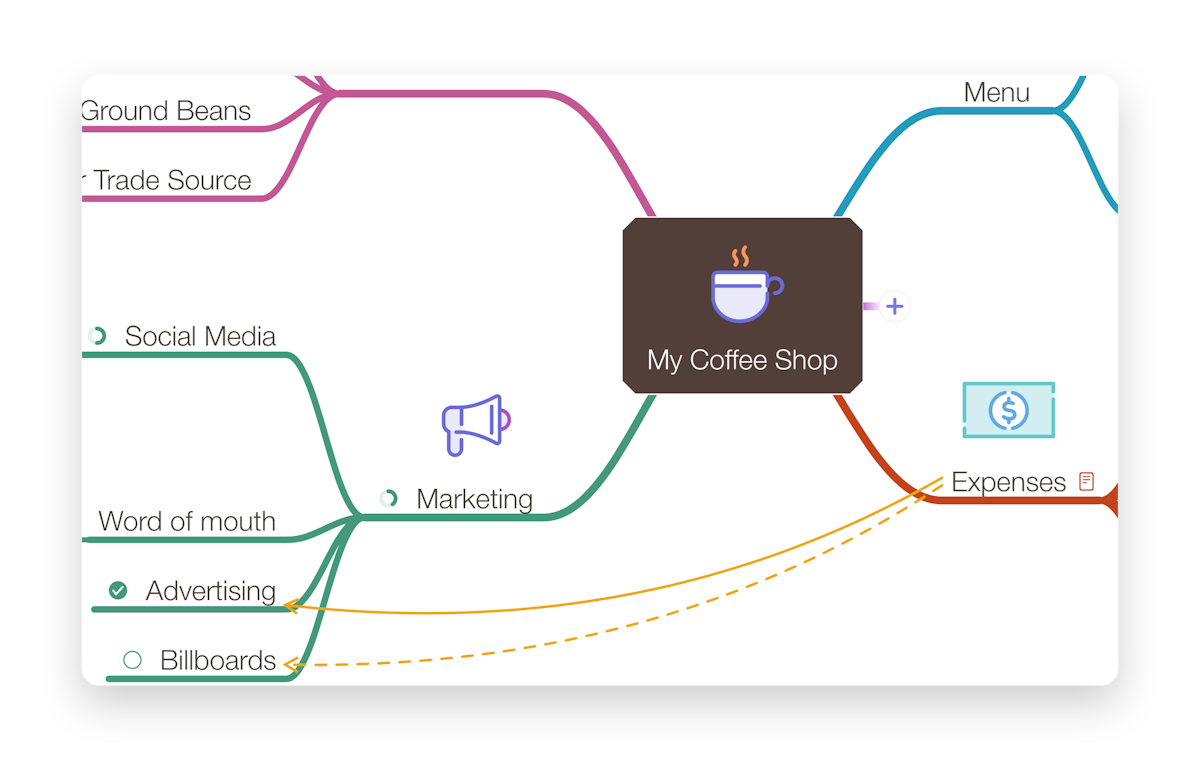
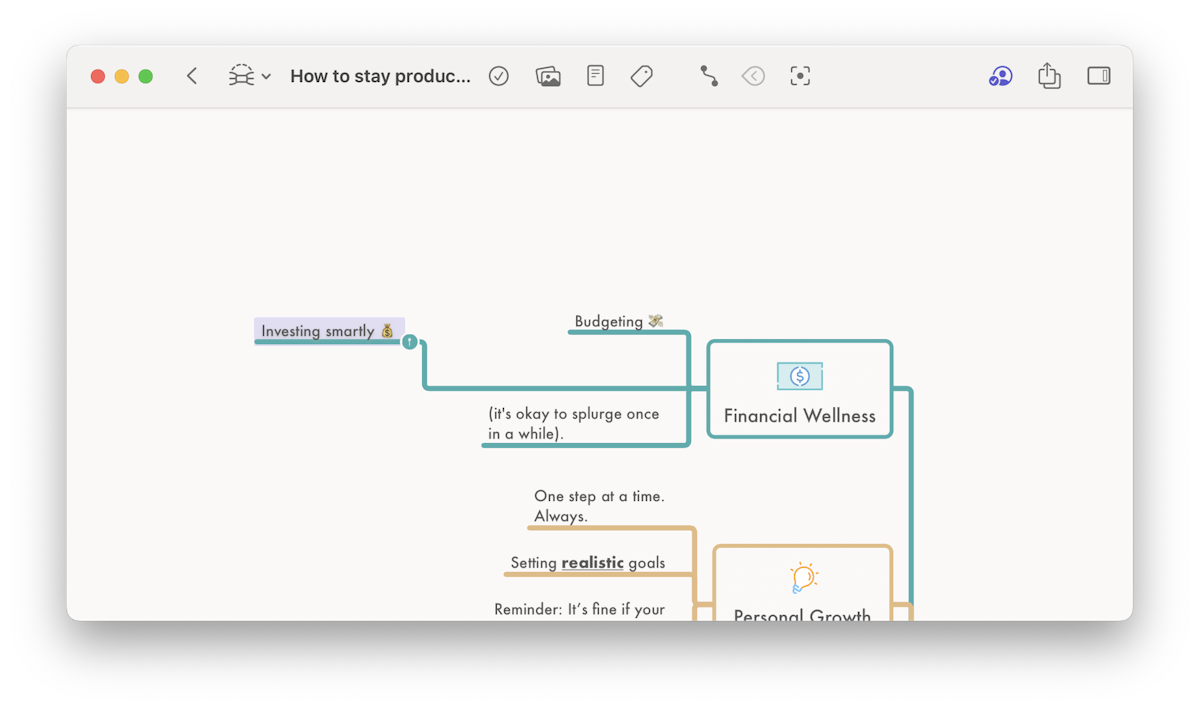
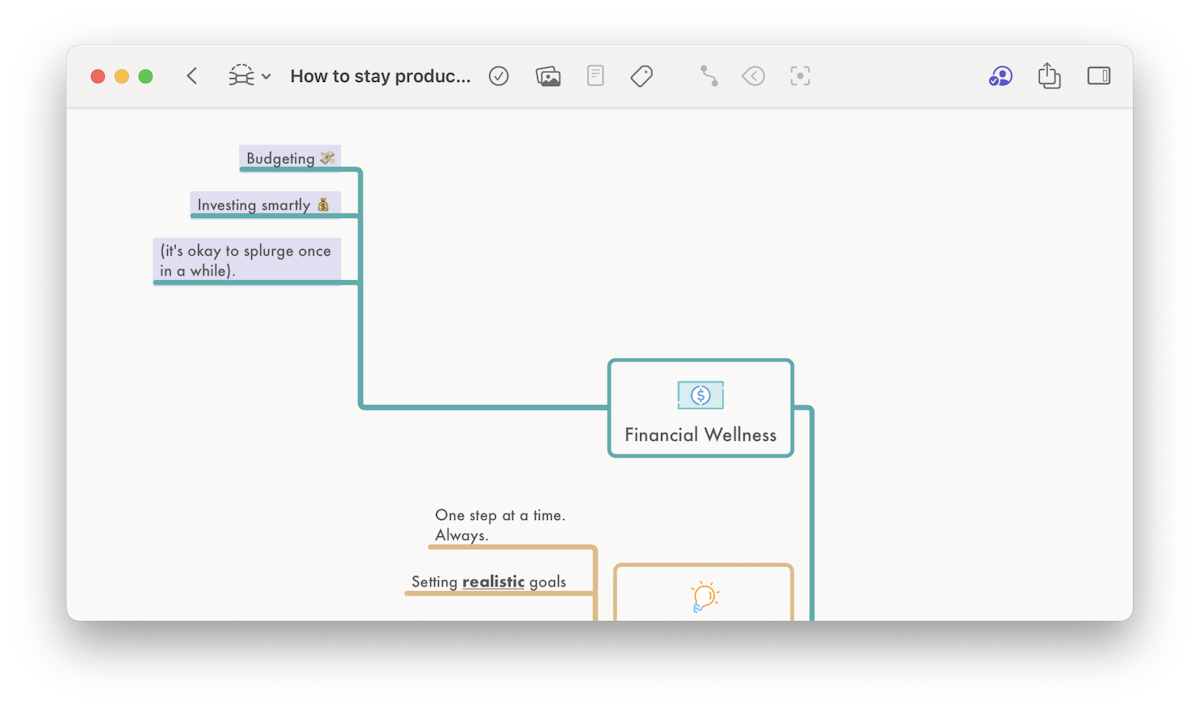
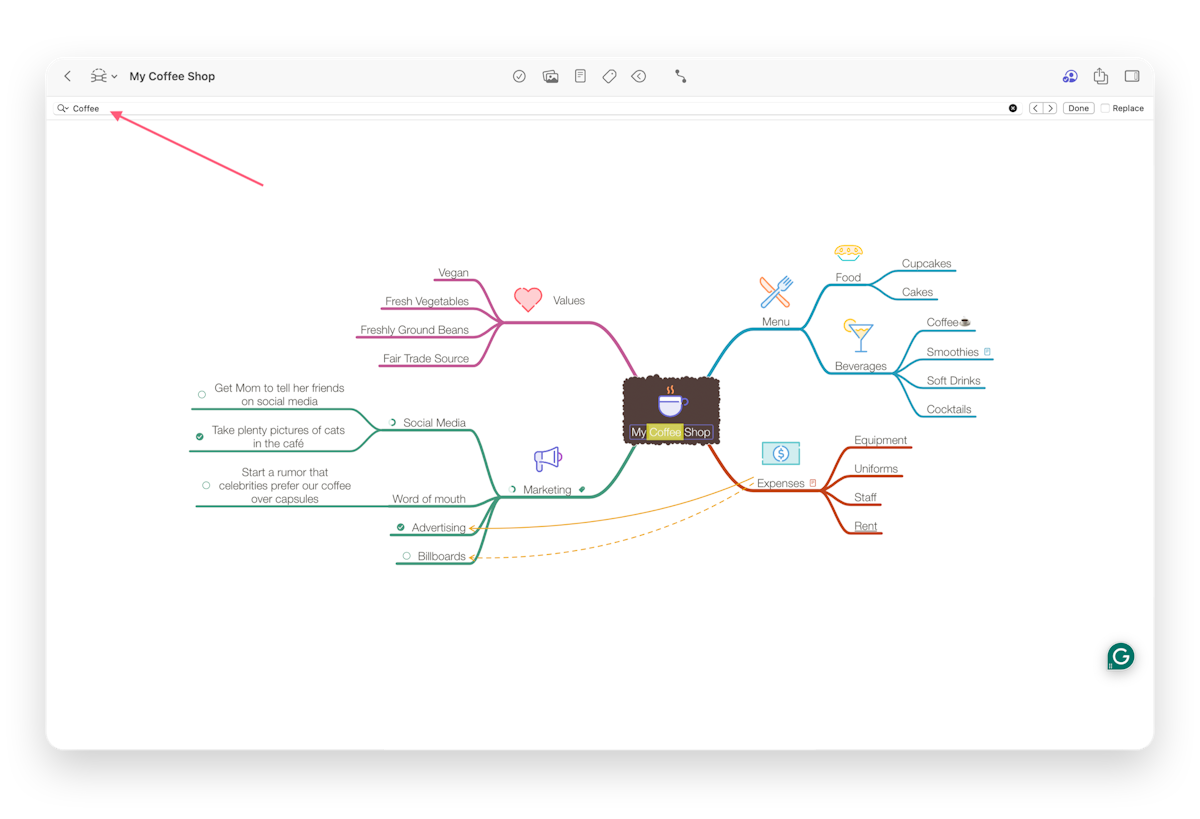
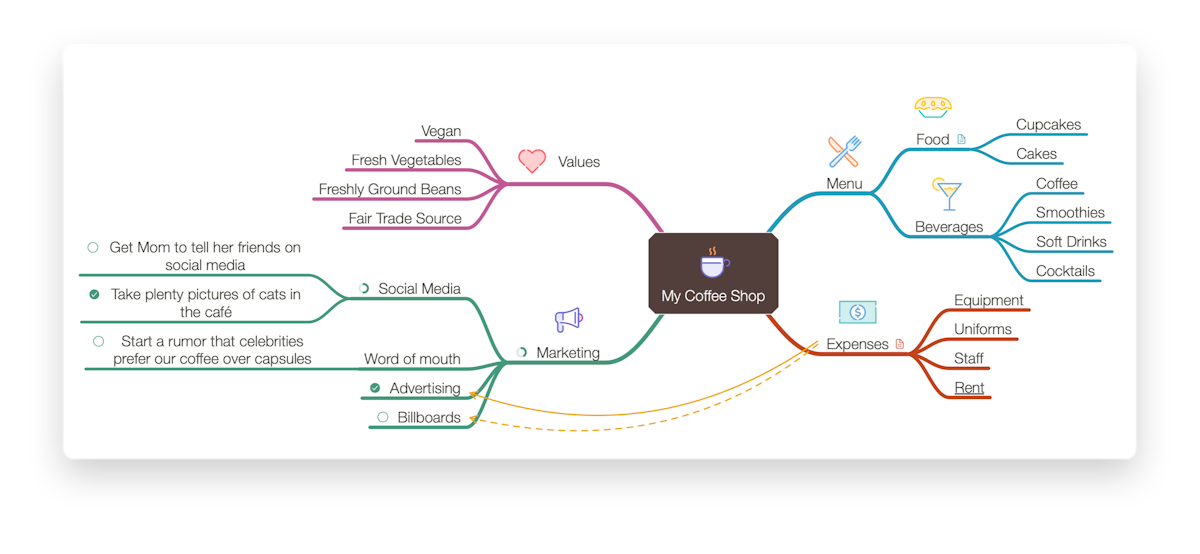
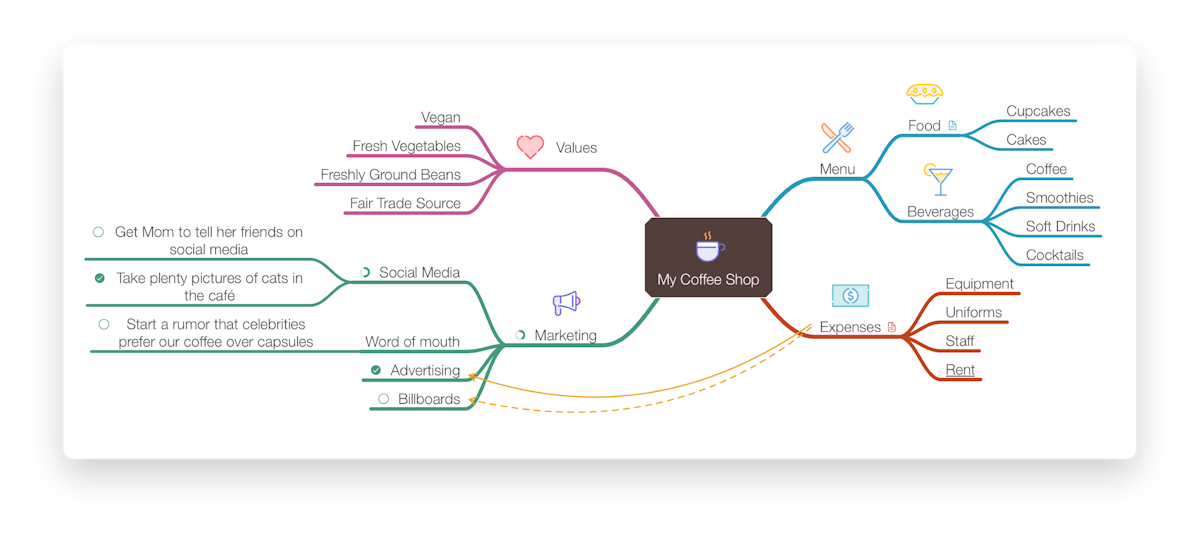
Let's say you want to open up your own coffee shop. It's been on your mind for quite some time, but it's such a big move — you just don't know where to start. This is the perfect time to brainstorm and get clarity using a MindNode Next mind map. Every mind map begins with a central idea or topic, called the main node. You decide to name it "My Coffee Shop" — to make things a little more visually appealing, you could also add a coffee mug sticker.
Coffee is, of course, the first thing you think of, so you might go ahead and add that as a so-called child node. But, thinking of coffee, you might also want to serve milkshakes. And what about your family-favorite muffin recipe? That needs to go on the menu too.
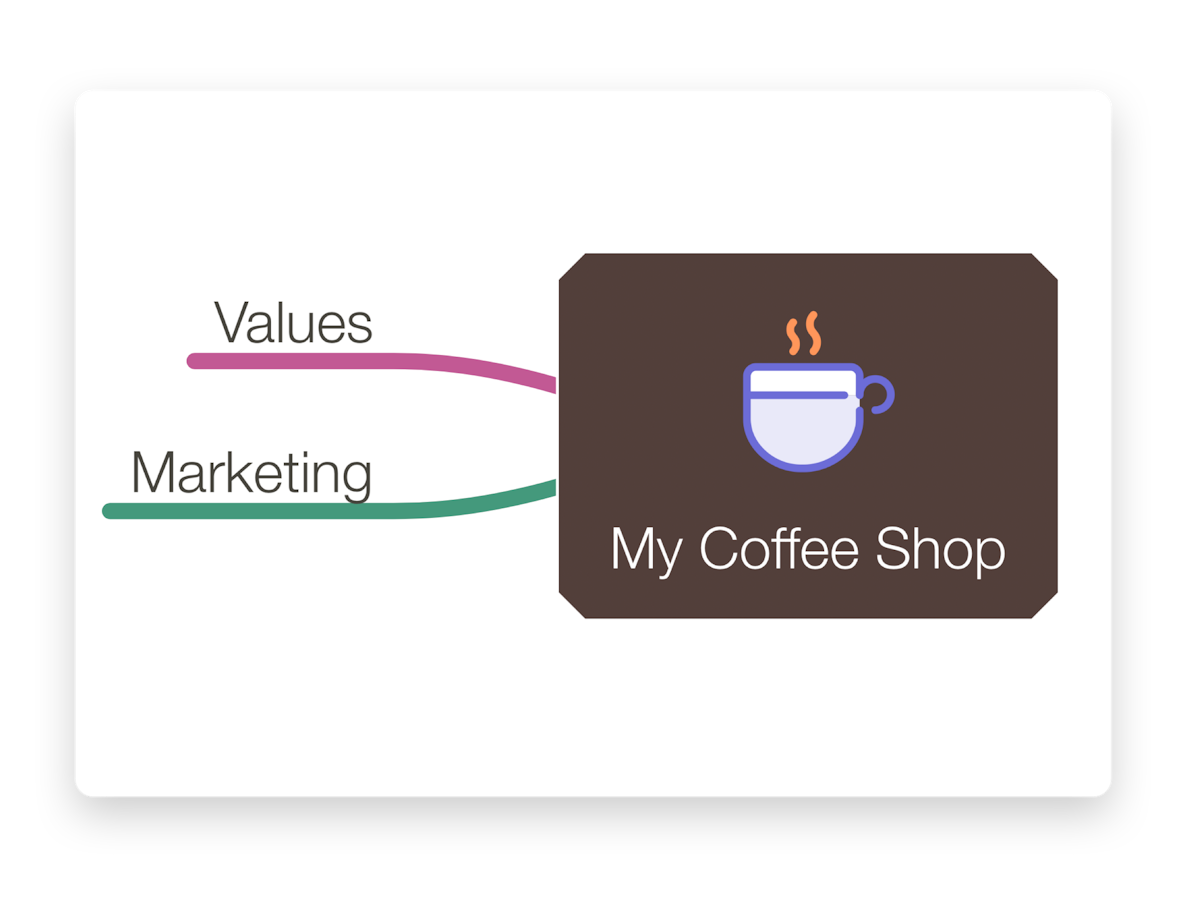
Thinking about muffins, you just realized that many of your friends are now living plant-based, so having vegan options is a no-brainer. And based on your core values, it's pretty clear that you want to source fresh, organic coffee beans.
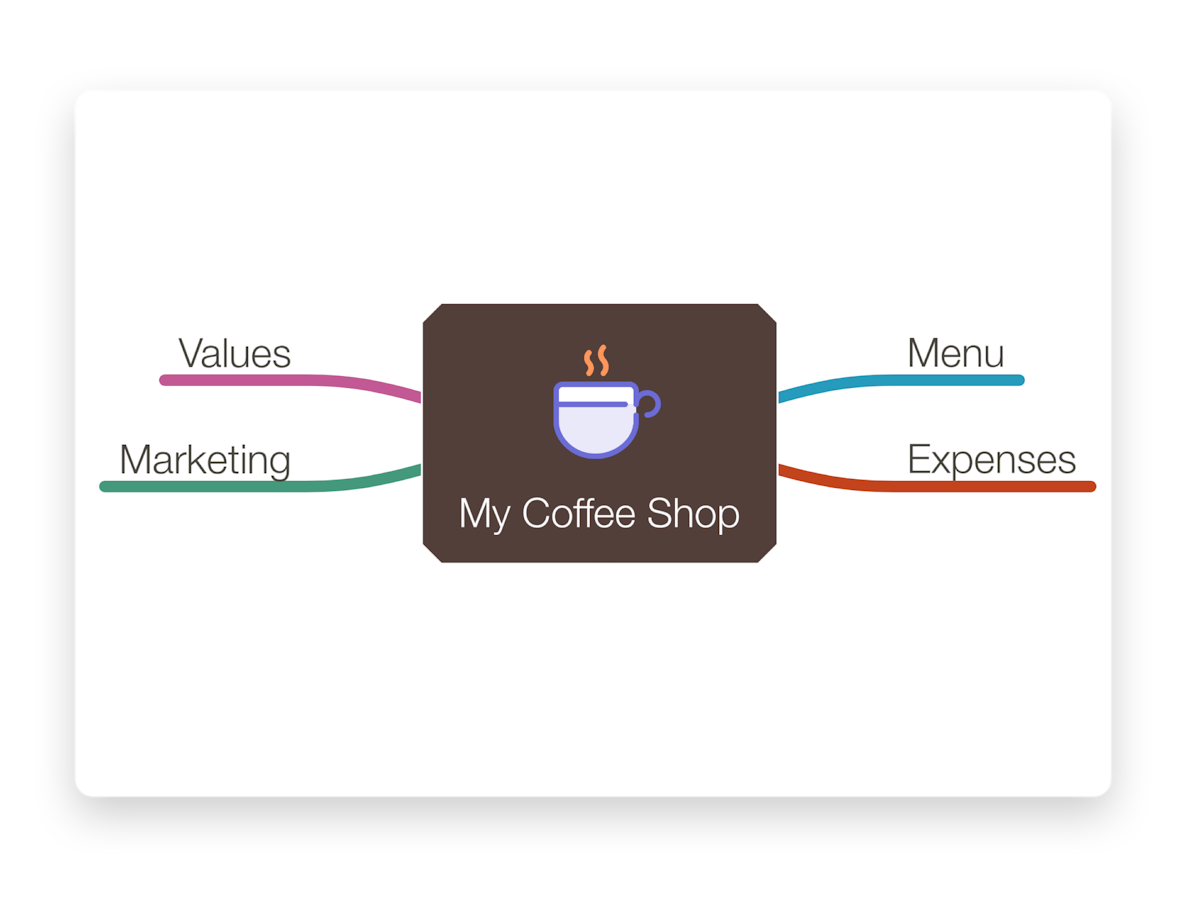
The MindNode Next mind map is starting to get a little busy. So, it's time to create a hierarchy. So you decide to group values and the menu into new branches.
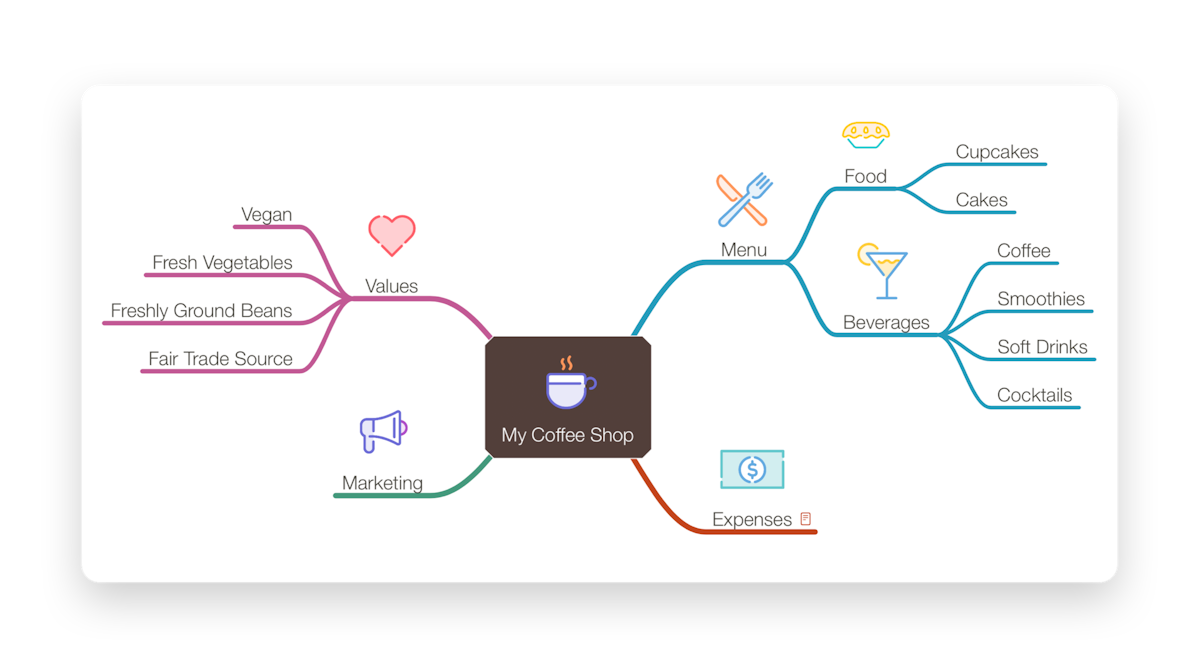
Step by step, your mind map grows and takes shape. You continuously add new items and move things around. This aspect is the beauty of digital mind mapping: everything seems chaotic at first, but slowly it transforms into a clear visual.

When to use MindNode Next mind mapping?
There are endless use cases for MindNode Next mind mapping, and each one is as unique as you are. You can use it to create a new website, visualize and improve a process, or even plan your wedding together with your spouse. If you can think of it, you can MindNode Next it.
Step-by-Step Guide
Step-by-step guide
Now that we've covered the basics, let's jump right in and help you get started with your first MindNode Next mind map on your device.
We'll start simple. You'll learn how to capture your thoughts by writing them down and connecting them. Afterward, we'll dive into features that will help you structure and re-organize them so that you can gain even more clarity. Last but not least, we'll talk about advanced features like optimizing your workflow, using gestures, and more.
You can follow the instructions on your Mac, iPhone, iPad, or Vision Pro. MindNode Next works similarly on all devices, and if not — we'll point it out.

Your (First) Thoughts
Your (first) thoughts
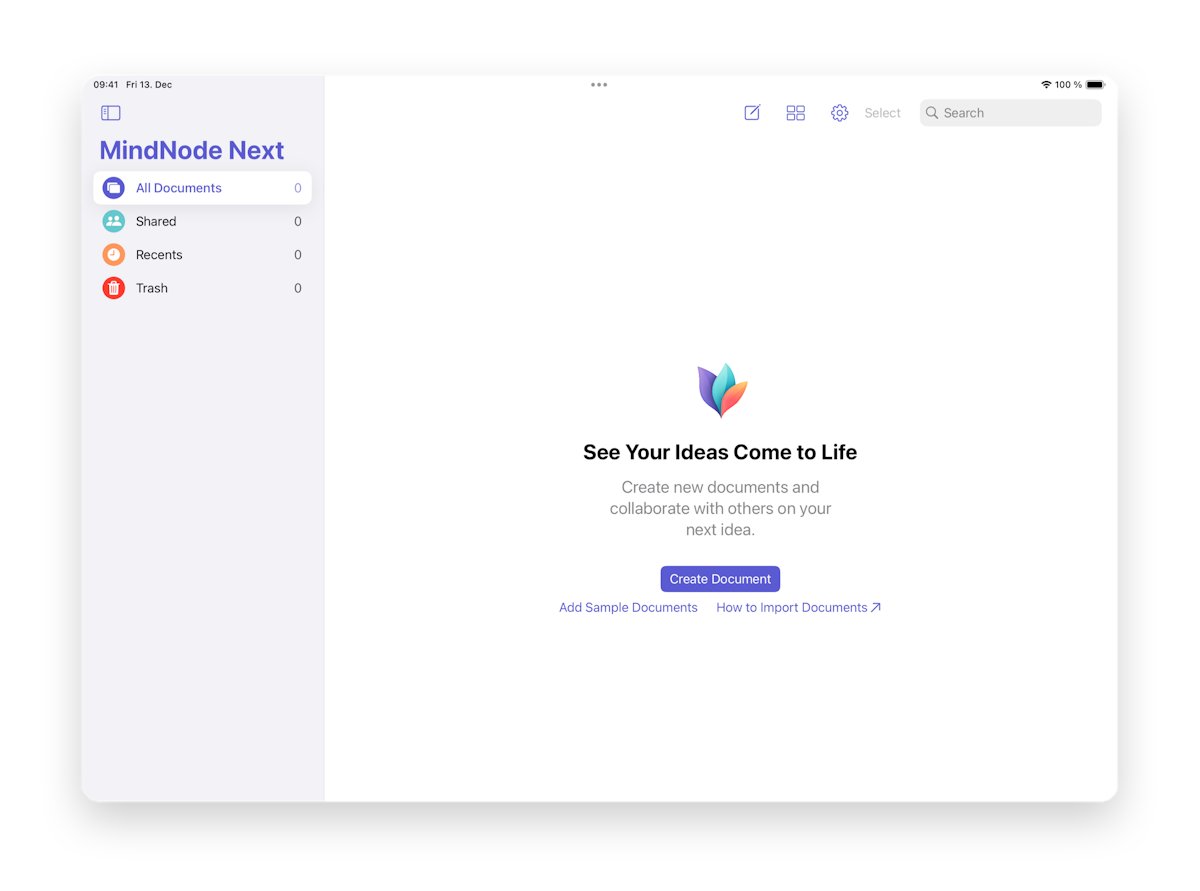
Go ahead and launch MindNode Next on your device. If you're launching MindNode Next for the first time, the app will let you decide whether you'd like to start your own document or add sample documents.
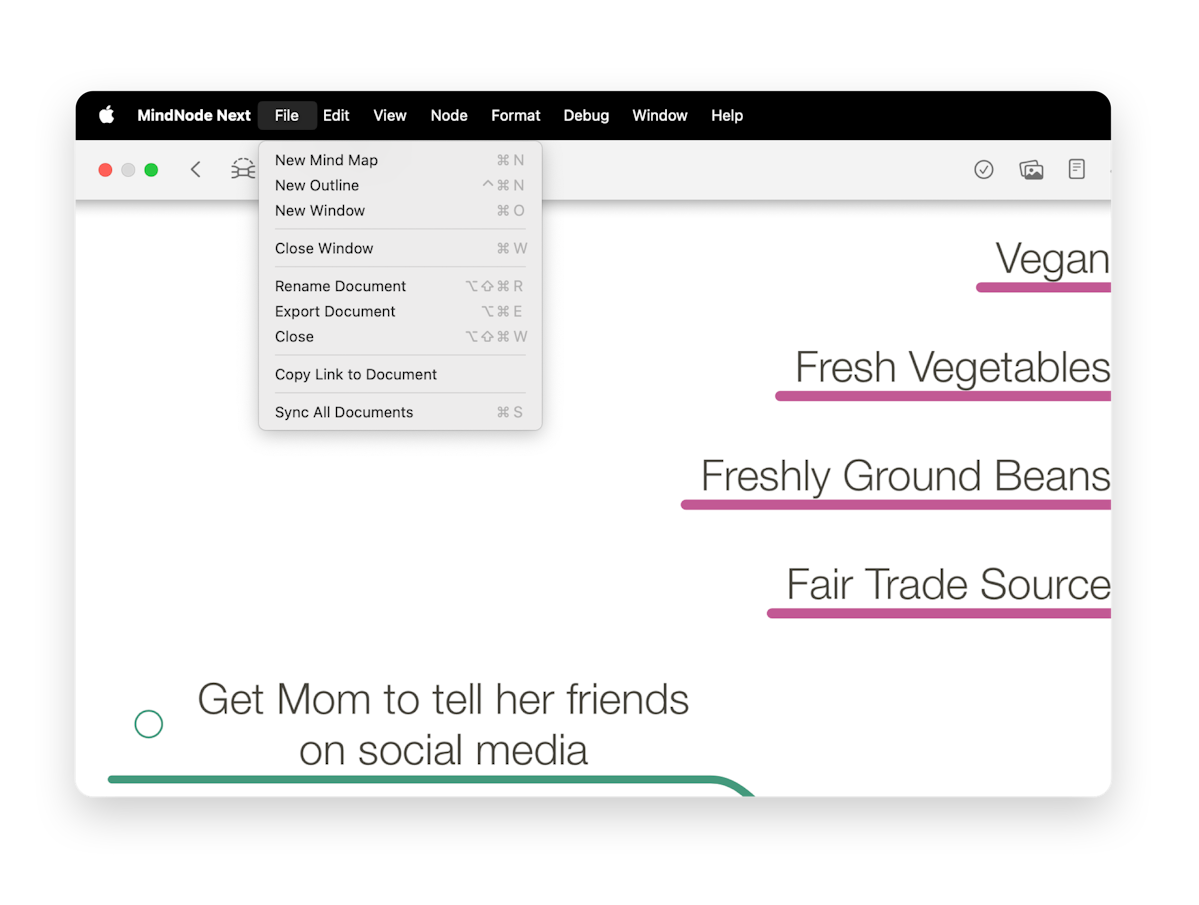
Create a new document on your Mac by selecting File > New Mind Map or New Outline from the main menu at the top of your screen.
On iOS, tap the New Document icon (paper and a pencil).
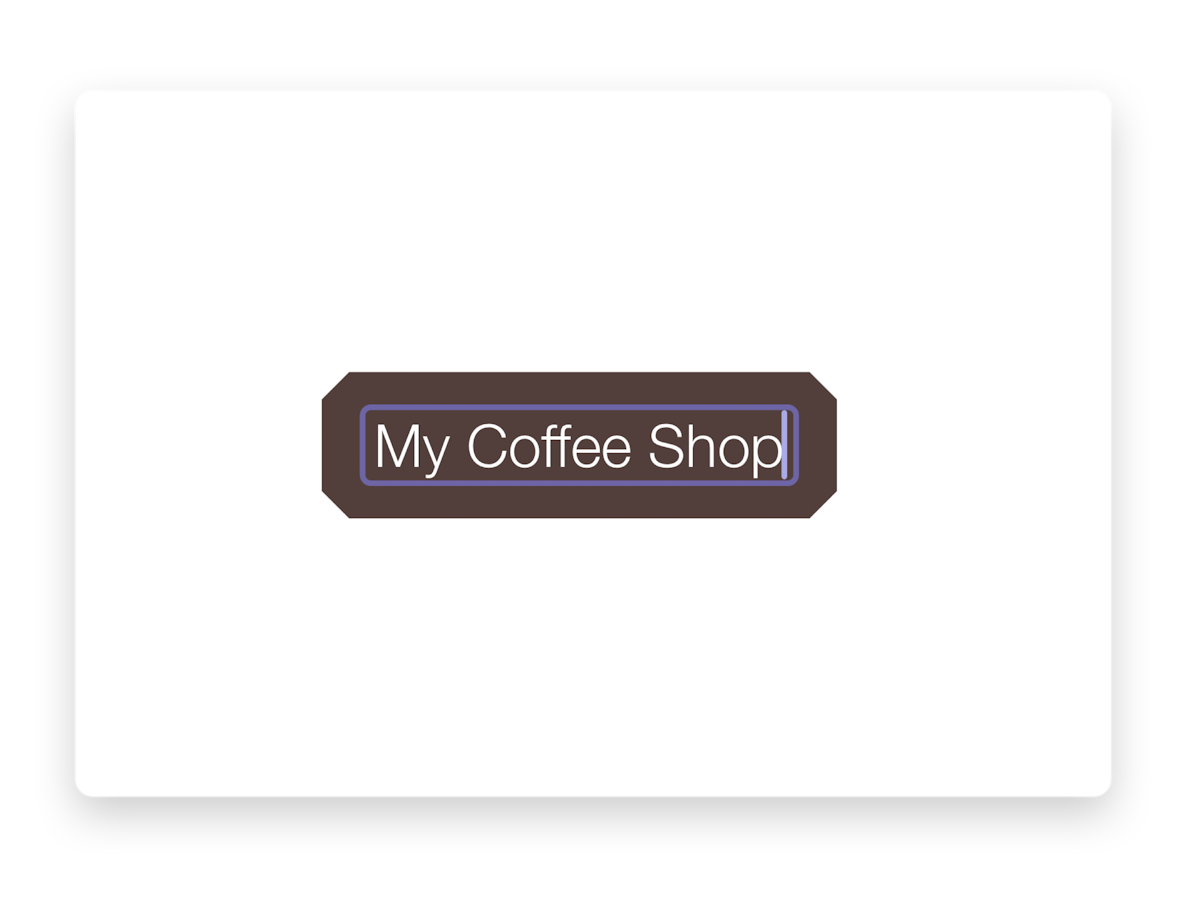
MindNode Next will automatically create a new main node to get you started. Double-click or double-tap it to start adding text to it. Go ahead and add your first idea here. If you want to follow our example, type in "My Coffee Shop".
Should you want to add text in the following line of the node, press Option ⌥ + Enter on a hardware keyboard or hit Enter on the software keyboard.
You can end editing the text in the node by clicking or tapping on the canvas (outside the node) or pressing Enter on a hardware keyboard.
Now, we will create a new child node. On a Mac, use your cursor to hover over the main node and reveal the node well (a plus-shaped button next to the node). On iOS, the node well will automatically appear when a node is selected. On visionOS looking at the node will reveal the node well. You can select a node by clicking or tapping on it. Then, click or tap on the node well to create a new child node.
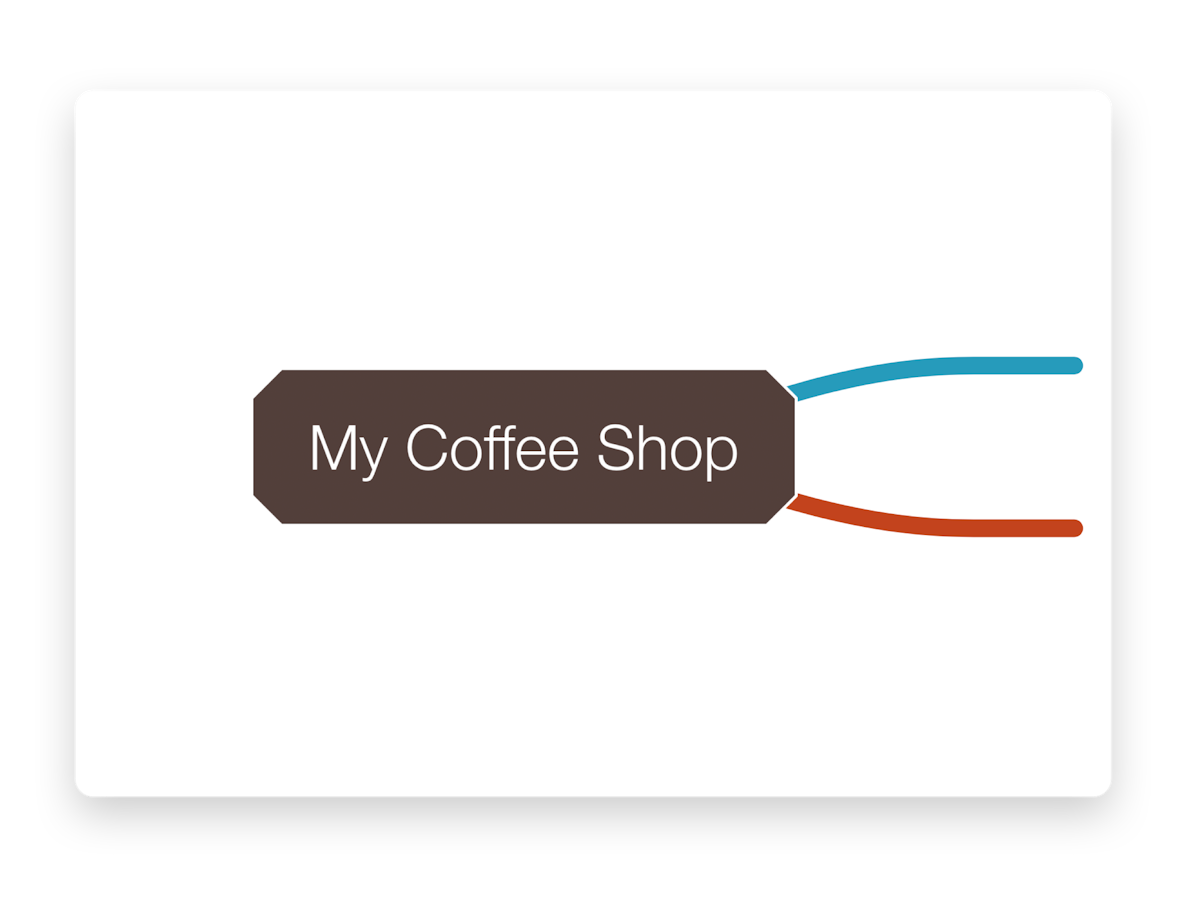
Continue brainstorming by adding new child nodes. Another way to do so is by pressing the Tab ⇥ key when a node is selected.
To create nodes at the same level, aka sibling nodes, press Enter with a node selected. On iOS, tapping Enter three times on the software keyboard creates a new sibling node, and tapping Space three times will create a new child node.
To add a node before a node — a parent node — press Shift ⇧ + Tab ⇥.
A new main node might be good for free-floating ideas or big topics. Press Shift ⇧ + Enter to
create one or click/tap on the canvas and select it from the context menu.
To delete a node, you can now press Backspace ← or select Delete Node from the action tab in the panel on iOS, or the context menu, which also deletes all child nodes. If you just want to remove that node press Option ⌥ + Backspace ← or select Delete Single Node from the action tab in the panel on iOS. Its child nodes will reconnect to the node before it.
Stickers
Adding stickers
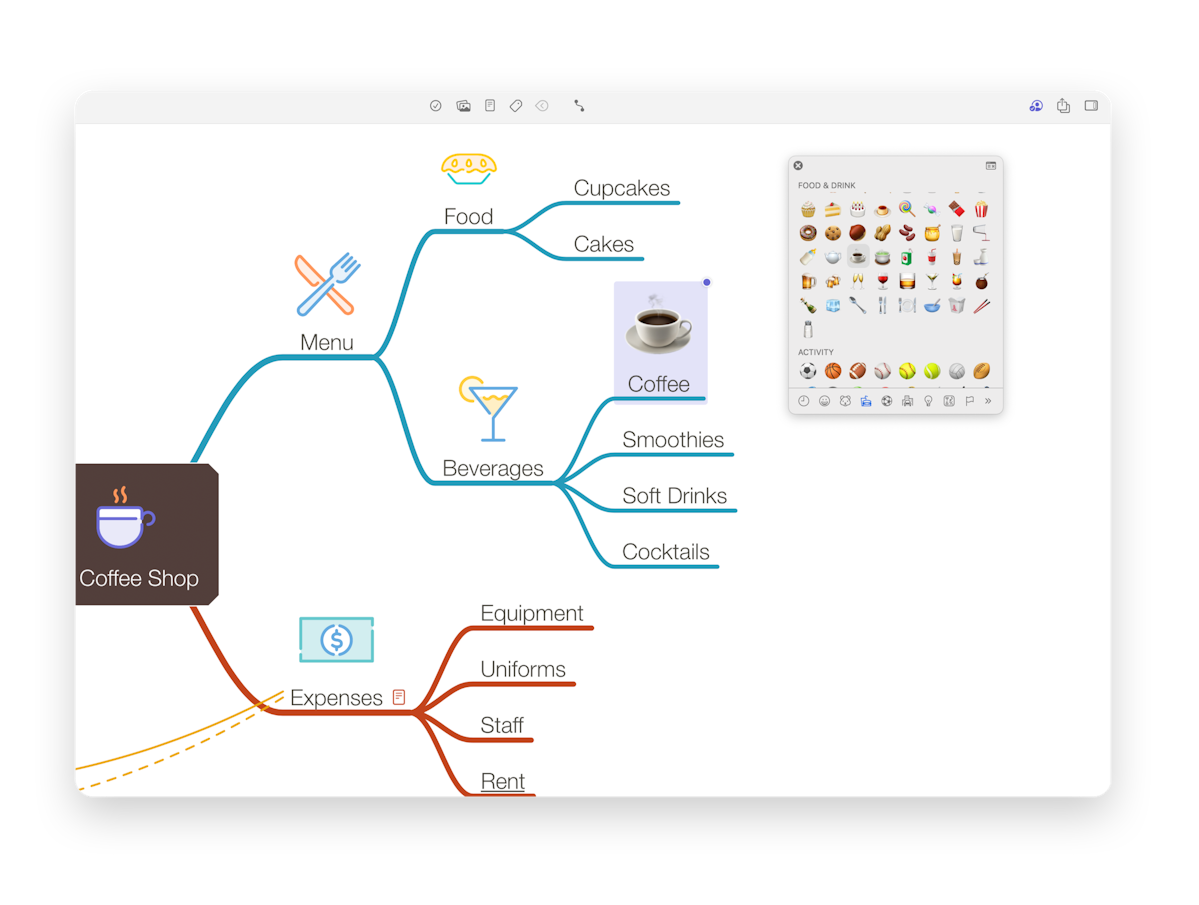
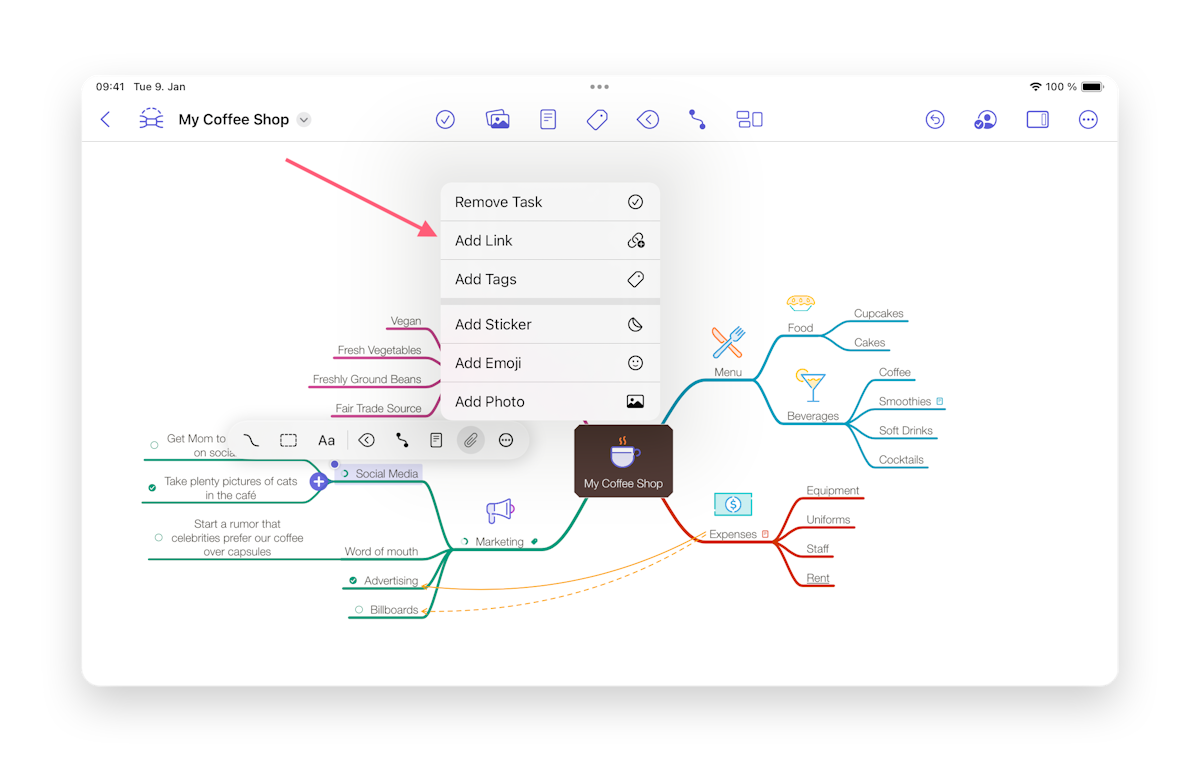
Working with stickers makes mind mapping a lot more fun, visually appealing and also means you can let your style and personality shine through. To add a sticker:
- Go ahead and select a node.
- Now, locate and select the Images icon in the toolbar at the top of the screen and choose Stickers (Mac). On iOS, tap on the attachment symbol in the inline inspector > select Add Sticker.
- Scroll through the stickers or use the search bar to look for one you like.
- If you want to keep the colors in your MindNode Next mind map more consistent, you can choose between colored or tinted stickers at the bottom of the sticker/image picker (Mac) or by tapping the drop icon at the top right (iOS). Tinted stickers will automatically match the color of the node you have selected.
- Click or tap on a sticker to add it to your node.
Emojis
Adding emojis
Just like adding stickers adding emojis makes mind mapping a lot more fun, visually appealing and also means you can let your style and personality shine through. To add an emoji:
- Go ahead and select a node.
- Now, locate and select the Images button in the toolbar at the top of the screen (Mac). On iOS, tap on the attachment sign and select "Add Emoji".
- Scroll through the emojis or use the search bar to look for one you like.
- Click or tap on an emoji to add it to your node.
Photos
Adding photos
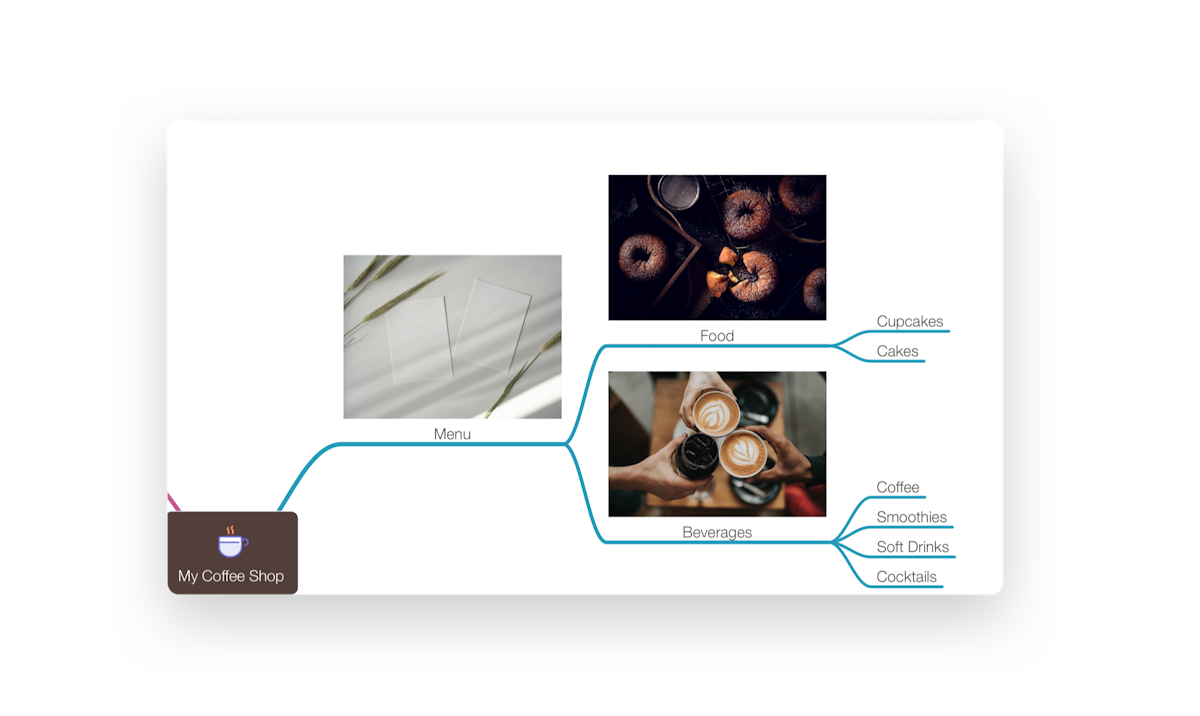
Images are also a great way of layering even more personality into your MindNode Next and giving more context and information at first glance. To add a photo:
- Go ahead and select a node.
- Open the image picker via the toolbar.
- Next, select the image you want and it will be added at the top of the node. You can also drag and drop photos from anywhere else on all devices.
- Note: To add a PDF as an image to a node, press Option ⌥ and drag & drop the PDF onto the node.
Delete photos
You can delete an image via the context menu once you've selected the node.
Side note:
Images are stored directly in the MindNode Next document. PNG, JPEG, HEIC, and PDF are imported as they are, all others supported by the operating system are imported as PNG or JPEG.
Notes
Adding notes
Notes are a great way to add additional information to a node, that you don’t need to see at first glance. Think of the node text as the title of your thought and the note as its description.
- Go ahead and select a node.
- From the toolbar open the notes pop-over.
- Add text into the text field. A small note symbol will appear in your node as soon as you’re done. This symbol indicates that additional content is attached to this node, and if you tap/click it, you can open the notes pop-over. With an external keyboard, you can also use the keyboard shortcut: Shift ⇧ + Command ⌘ + K.
Links
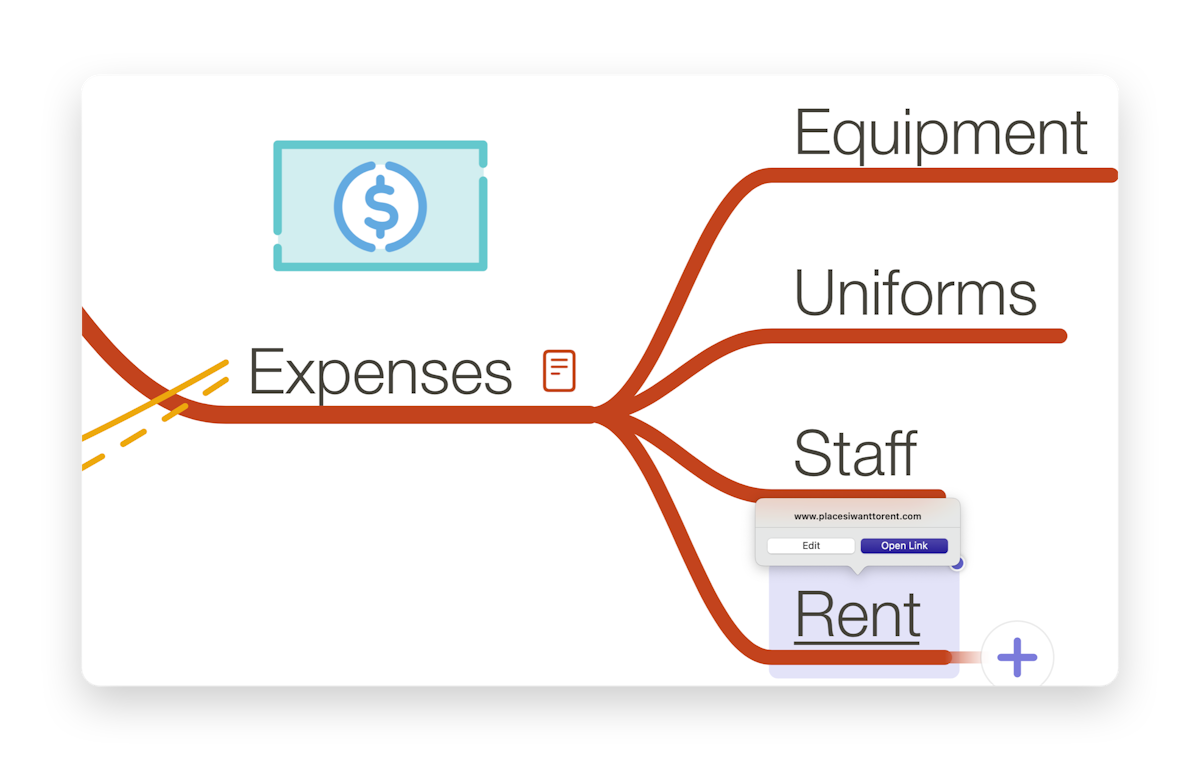
Adding links
By this point, you'll have learned how to add more and more depth to your mind map. Links are a great way to take this process a step further.
- As usual, first, go ahead and select a node.
- Now, if you want to hyperlink the text, you can keep the whole node selected or you can select a portion of the text and click Add Link from the Context menu (Mac) or go to the inline inspector paperclip button > Add Link (iOS). Keyboard shortcut: Command ⌘ + K.
- This will bring up the link pop-over. Here you can edit the node text and copy/paste or type in the link.
- To finish click/tap Add Link.
Clicking/tapping a node with a link will bring up a pop-over to choose from whether to edit or open the link.
Linking to other MindNode documents
On your Mac, navigate to the menu bar on top of your screen and select File > Copy Link to Document. On iOS, tap and hold the file in MindNode Next to open the context menu and select Copy Link to Document. Then, paste the link wherever you need it.
Keep in mind that the document is not imported into your MindNode document. These documents are also not available to other users. For this use MindNode Next's document sharing and live collaboration features.
Linking directly to a Node in a MindNode Next document
By opening the context menu on a specific node you'll be presented with the option to Copy Link to Node. Now you can paste that onto either another node in the same document, into a different MindNode Next document, or even another app where you might need it.
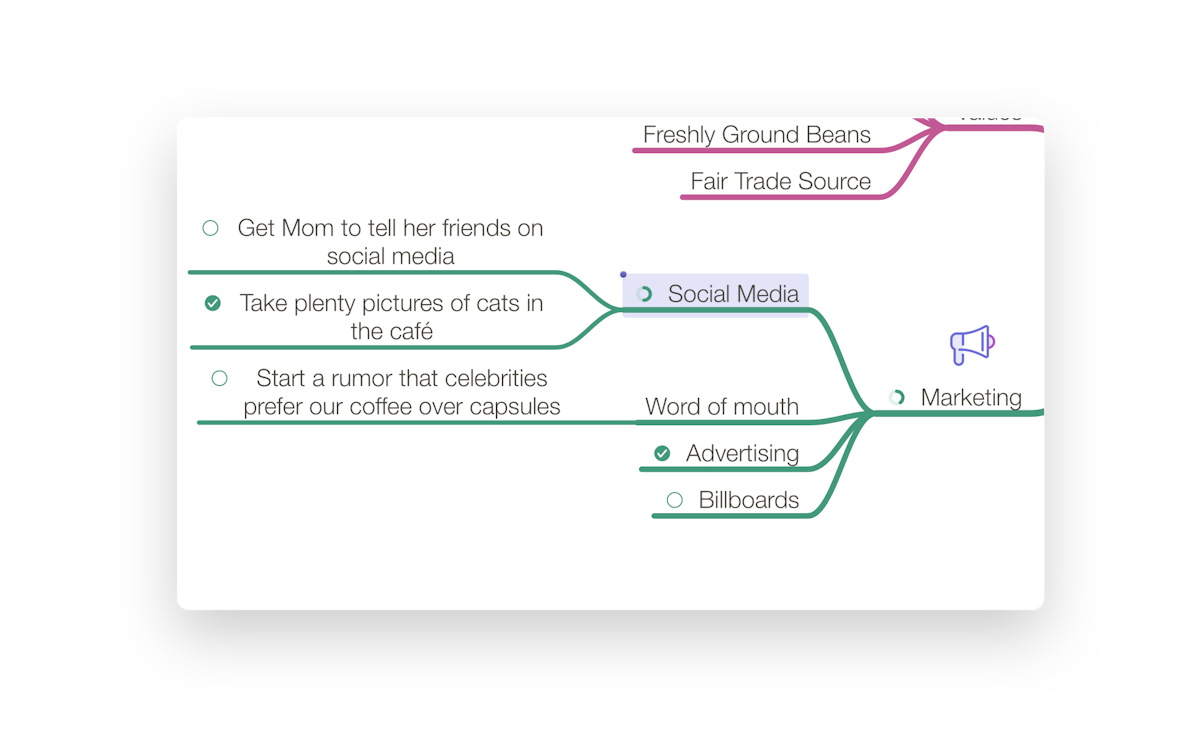
Tasks
Adding tasks
A mind map can show your ideas and related tasks to achieve a specific goal. Here's how you can create tasks with MindNode Next.
- Select the node that’s meant to be a task.
- Now, locate and select the task icon (check box) in the toolbar.
Keyboard shortcut: Shift ⇧ + Command ⌘ + T.
Only the nodes on the last level will become tasks.
If the selected node has multiple child nodes, these will turn into tasks, and the parent node will now show a progress indicator.
Complete tasks
Click/tap the circle on the node once the task is complete. If you click/tap the progress indicator of a parent node, you’ll get a clickable/tappable pop-over suggesting: Complete All Child Tasks. Keyboard shortcut: Control ⌃ + Command ⌘ + T.
A parent node can have both task children and non-task children.
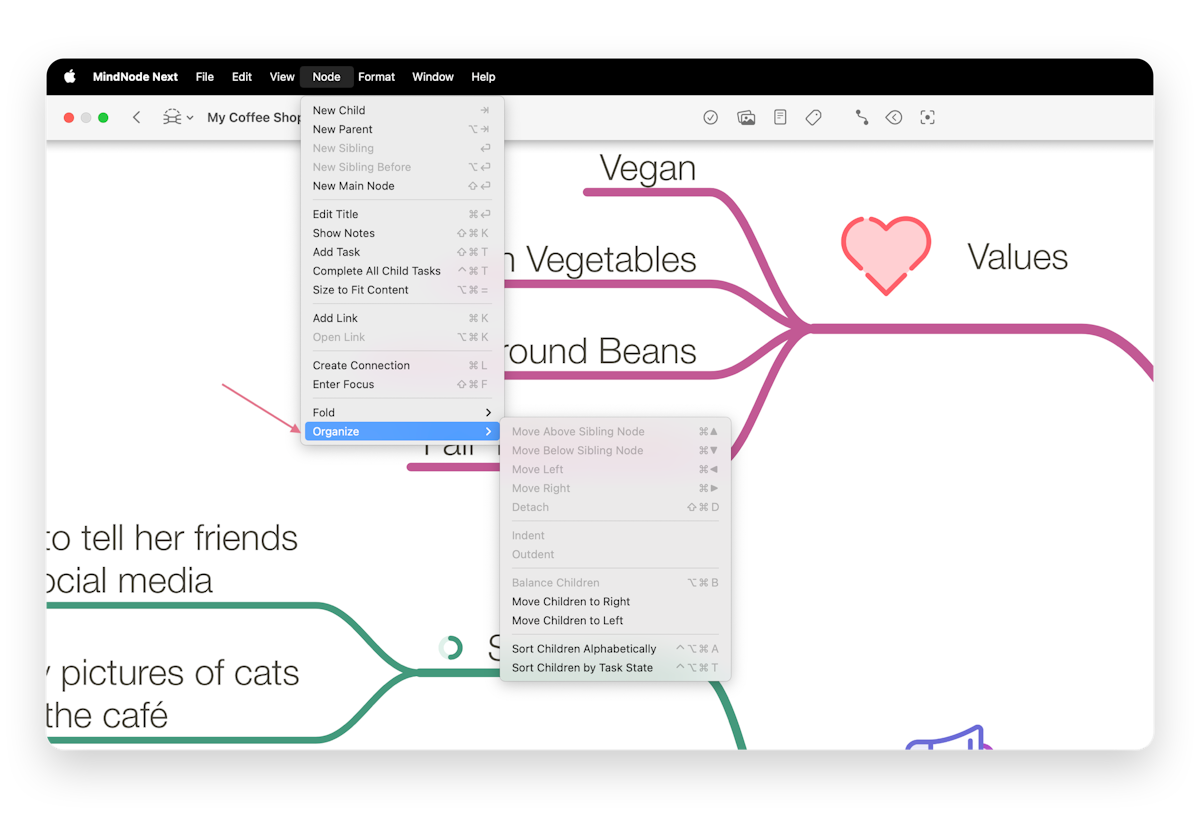
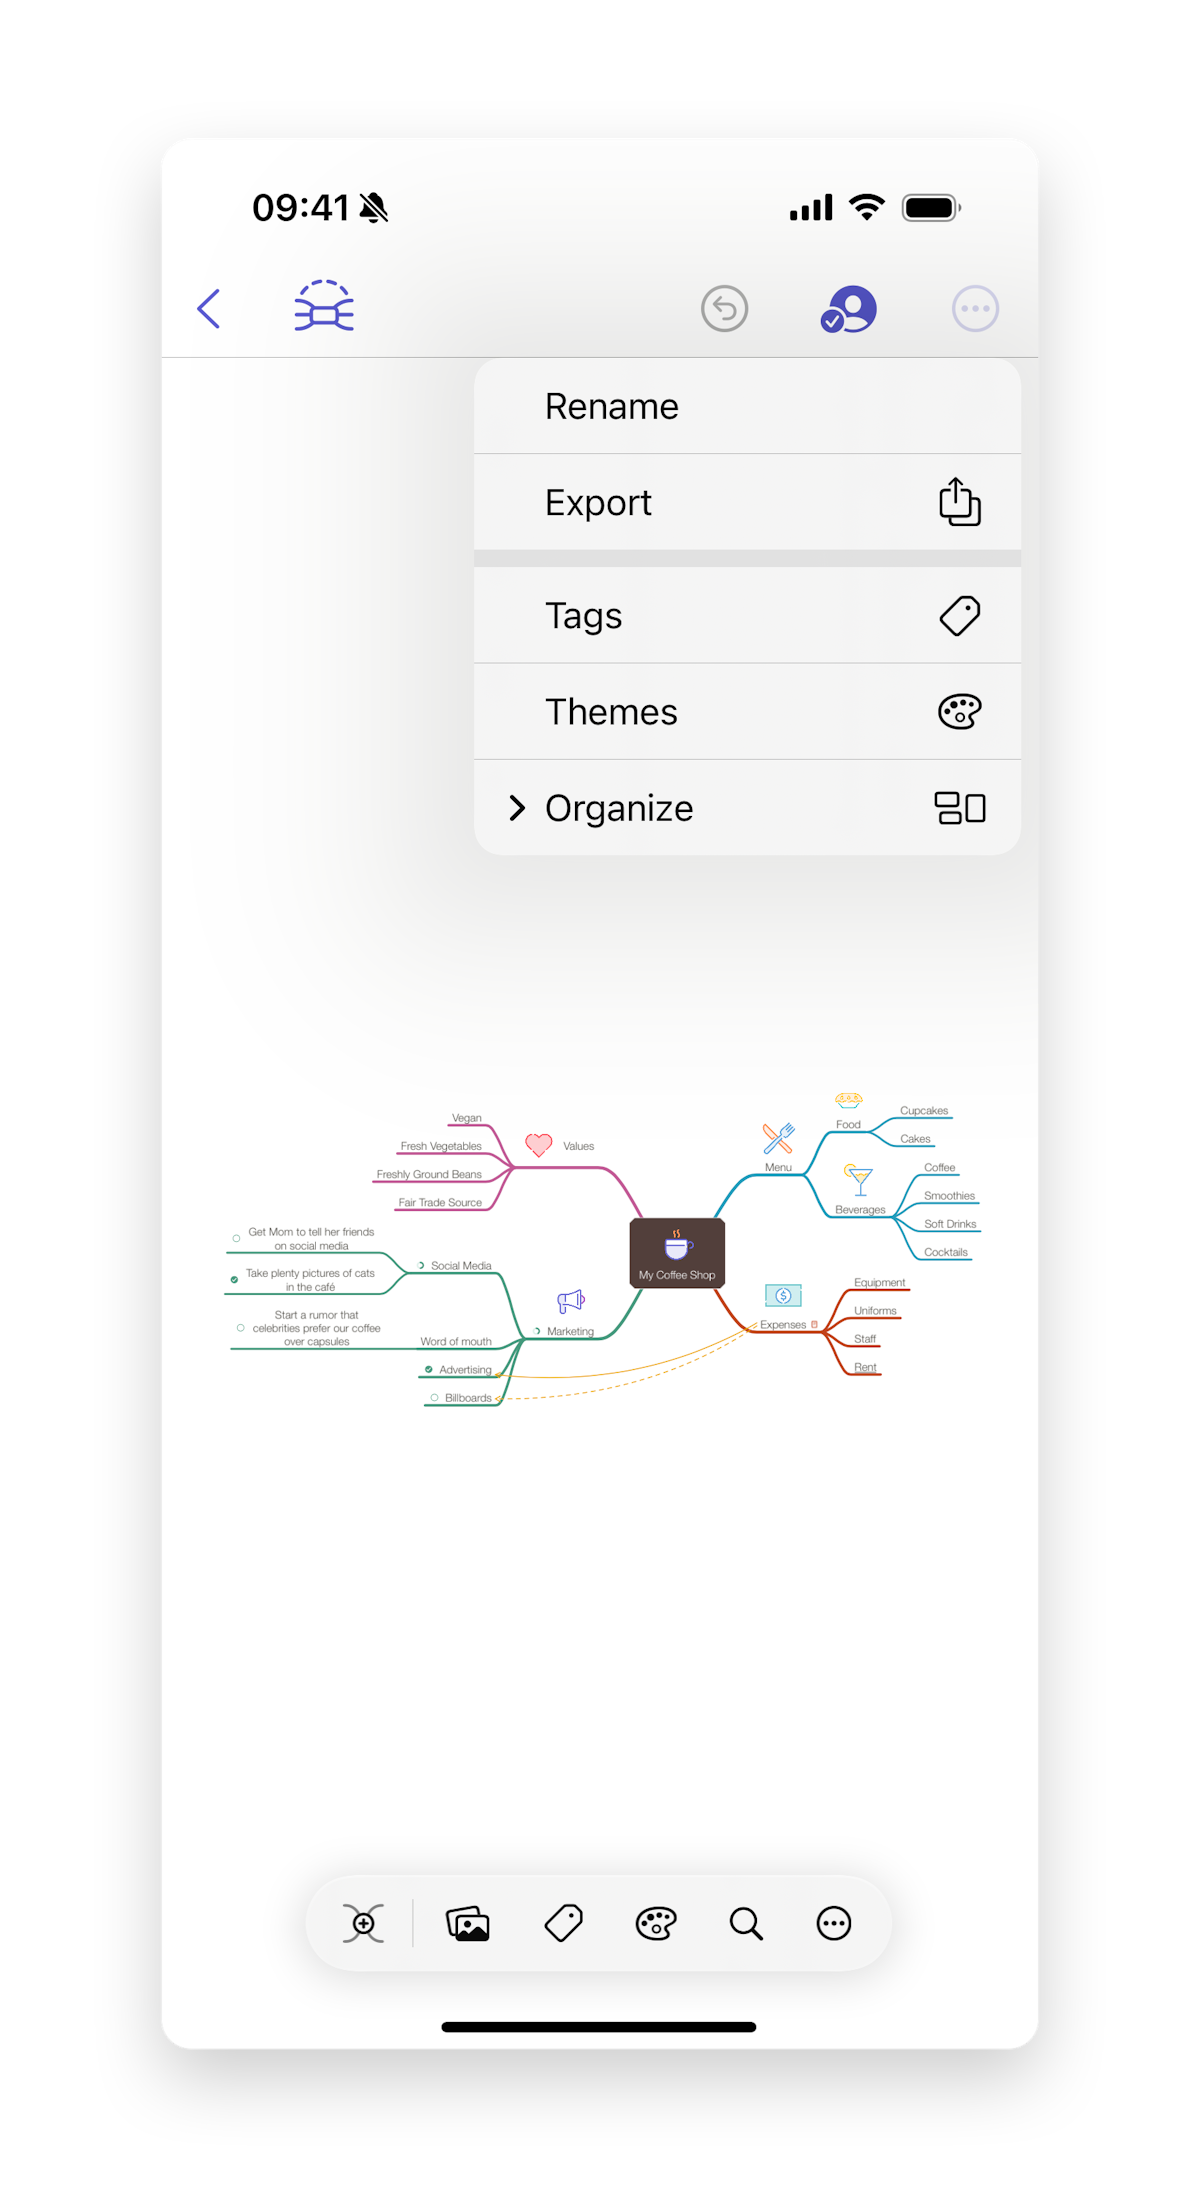
Organize
Organize
Now that you’ve captured your thoughts, it's time to take a closer look. MindNode Next has plenty of features to rearrange and organize your ideas and thoughts so that you can gain even more clarity. Let’s dive right in.

Reconnect & Navigate
Reconnecting nodes & navigating through a mind map
The great thing about digital mind mapping (rather than putting pen to paper) is that you can easily change and rearrange the structure and hierarchy — without starting from scratch. We like to call this reconnecting.
To reconnect nodes:
Click/tap and hold a node then start reconnecting by dragging the node on top of another node. Once you lift your finger, the node (and all of its child nodes) will attach to the new parent node and match the style (unless you customized the node's style).
If you want to change the order of your nodes, you can drag a node to its new place relative to other existing nodes and release it there.
You can also do this by using the Command ⌘ + Arrow keys.
When you’ve selected a node, use the arrow keys to navigate/select another node.
To select multiple nodes at once, you can do one of the following:
- Click/tap the canvas and drag your mouse/finger across the nodes you want to select via rubberband.
- Command ⌘ + click/tap: press down Command ⌘ and click/tap the nodes you want to select.
- Shift ⇧ + Arrow keys: press down Shift ⇧ and expand the selection via the Arrow keys.
Now, you can drag and drop or edit the selected nodes in whatever way you like.
If you want to detach a node/whole branch, select the nodes you want to detach. Then use the keyboard shortcut Shift ⇧ + Command ⌘ + D on your Mac; on iOS, you can use the action menu (circle with three dots) in the toolbar. Now select Oragnize > Detach.
Fold & Unfold Branches
Fold and unfold branches
When your structure gets more complex, it can be super helpful to hide parts of your mind map that you might not need to see right now but want to come back to later.
To fold and unfold branches, follow these steps:
- First, go ahead and select the last parent node you want to see.
- On your Mac or iPad with the mouse or pointer, press Option ⌥ and hover over the node well, and an icon with an arrow will appear. Once you’ve decided where you want to fold, go ahead and click. You’ll now see that once the branch is folded, there’ll also be a folding indicator next to the node that lets you unfold the branch again.
On iOS, you can fold or unfold a node via the action toolbar. Or you can tap and hold the canvas, which will turn the node well into a folding indicator. - Also, feel free to use the keyboard shortcut for folding & unfolding: Option ⌥ + . period.
Folding and unfolding are also very helpful when presenting a MindNode to others, and you just want to focus on discussing a specific area.
Connections
Connections
Creating connections
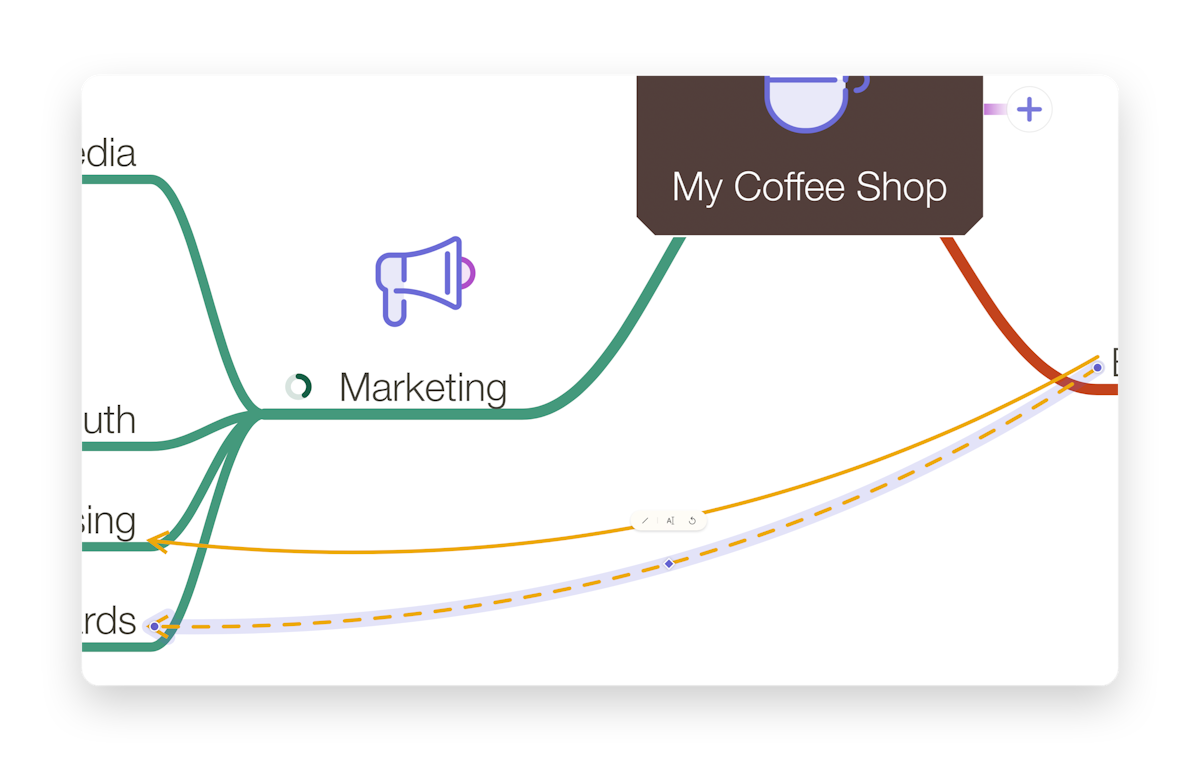
So far, we've only worked with a branch structure, but sometimes you might want to connect thoughts in different parts of the mind map. To do this, you can create a connection line between two otherwise unrelated nodes. Here's how:
- Select a node you want to start a connection from.
- Locate the connection icon on the (action) Toolbar and click/tap on it.
Keyboard shortcut: Command ⌘ + L. - Click or tap on another node to create a connection between these nodes.
- Alternatively, with the mouse or pointer on your Mac or iPad, you can hold Shift ⇧ and drag the cursor from one node to another to create a connection.
Editing connections
- Tap/click a connection to select it.
- Grab the waypoint in the middle of the connection and drag it to give it the curve you need for your mind map.
- To straighten the connection, double-click/tap the waypoint.
- Double-tap/click the connection to add a connection title or select Edit Title from the inline inspector.
Note: You can also edit the connections in the Sidebar Menu on the right.
Tags
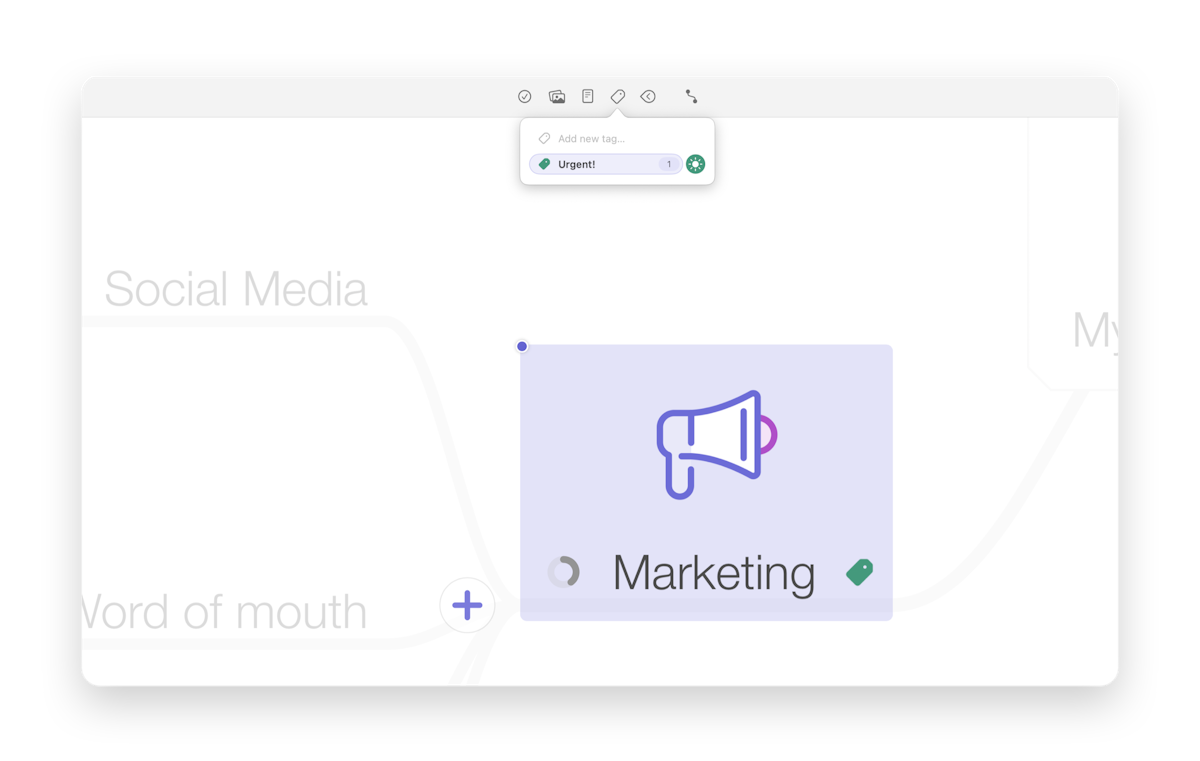
Tags
Another way you can show non-hierarchical relationships between nodes is by using tags. They help you categorize your ideas and add more context to your thoughts.
Create & edit tags
To create tags:
- Locate the tag icon on the (action) Toolbar, and click/tap on it.
- Now you can start typing the tag's name you'd like to create at the top of the pop up. Once you're done press enter.
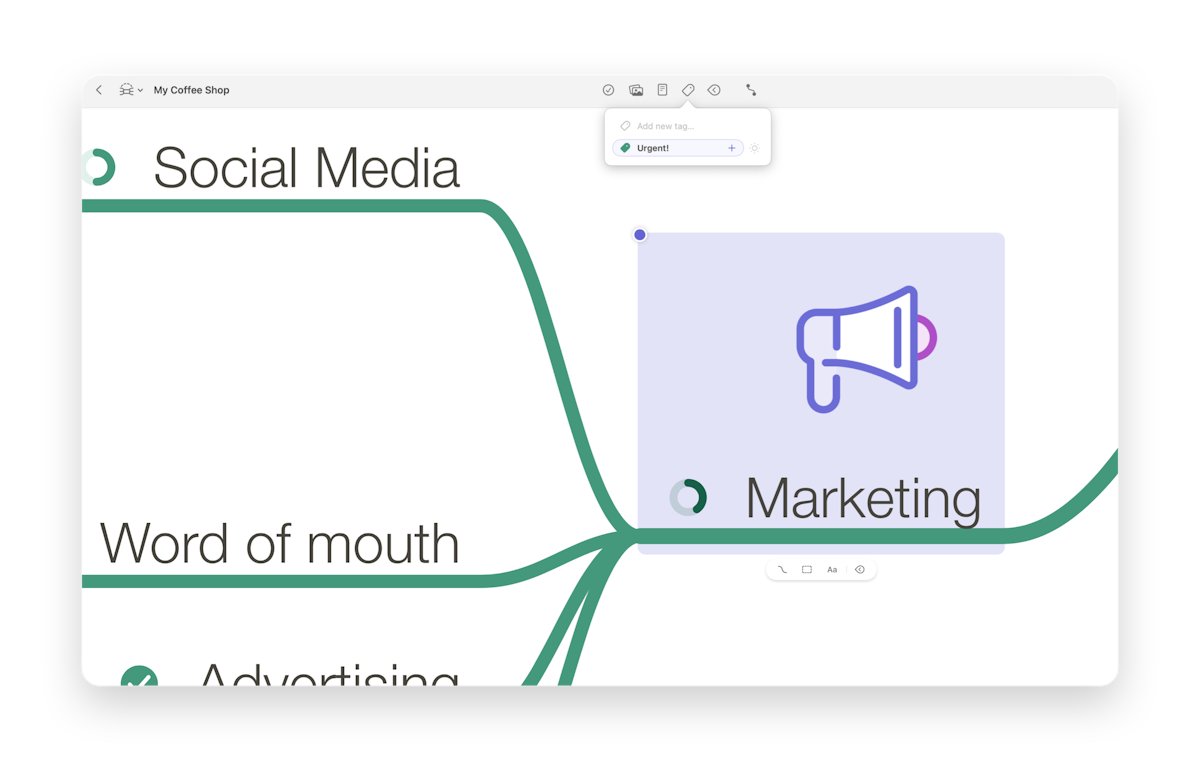
To change the color of the tag, tap/click the color label right next to the tag's name.
To edit the name of an existing tag:
- On iOS, tap and hold the tag to open the context menu and select Rename.
- On your Mac, right-click the tag to open the context menu and select Rename.
To delete a tag:
- On iOS, swipe left on the tag and tap Delete.
- On your Mac, right-click on a tag to open the context menu and select Delete.
Reorder tags:
Tap/click and hold the tag then drag it up or down in the list of tags.
Apply & remove tags
Now that you have created tags, you can add them to existing nodes. Go ahead and:
- Select a node by clicking on it.
- Then tap/click a tag in the tags pop-up.
You can remove a tag from a node the same way. Another way to remove a tag from a node is to tap/click the colored label that indicates the tag on a node. A pop-over will appear; on your Mac, right-click on the tag in the pop-over to open the context menu and select Remove; on iOS, you can delete the tag by swiping left on it in the pop-over.
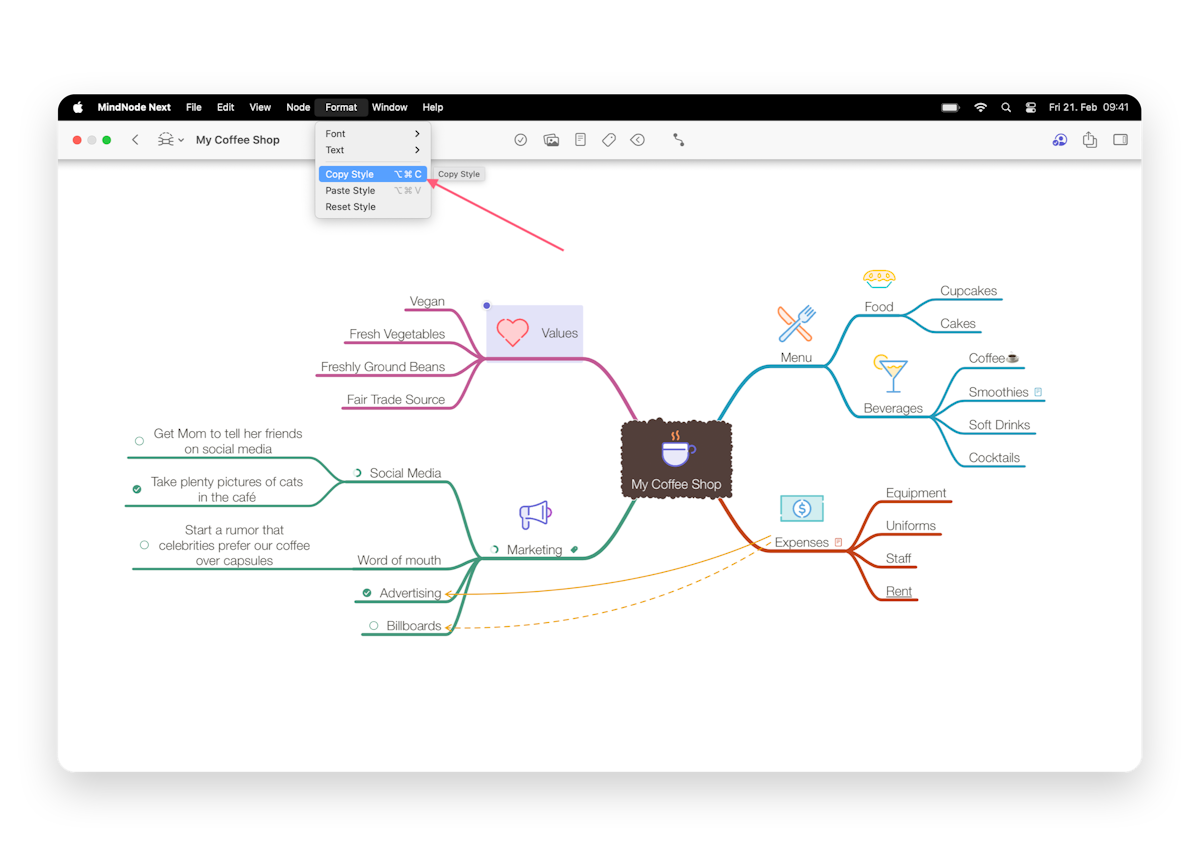
Styles
Styles
Now that you've captured and organized your thoughts, it's time to start making your MindNode Next documents more visually appealing and add that personal touch by switching up styles.
On your Mac and iPad, you can use the Selection and the Canvas tab in the sidebar. On iPhone and Vision Pro, use the bottom ornament and inline inspector.

Style Nodes
Styling single nodes
First, let's take a look at how you can style one single node:
Once you've selected your favorite style in the Styles tab, you have the option to apply it either to just the currently selected node (which happens automatically) or also to your child nodes, sibling nodes, entire mind map, or nodes on the same level.
They're in the main menu at the top of the screen on your Mac under Format > Copy Style.
Styles: shapes & borders
You can now play around with your nodes' shapes and borders — turn them into colored clouds, hexagons, and much, much more.
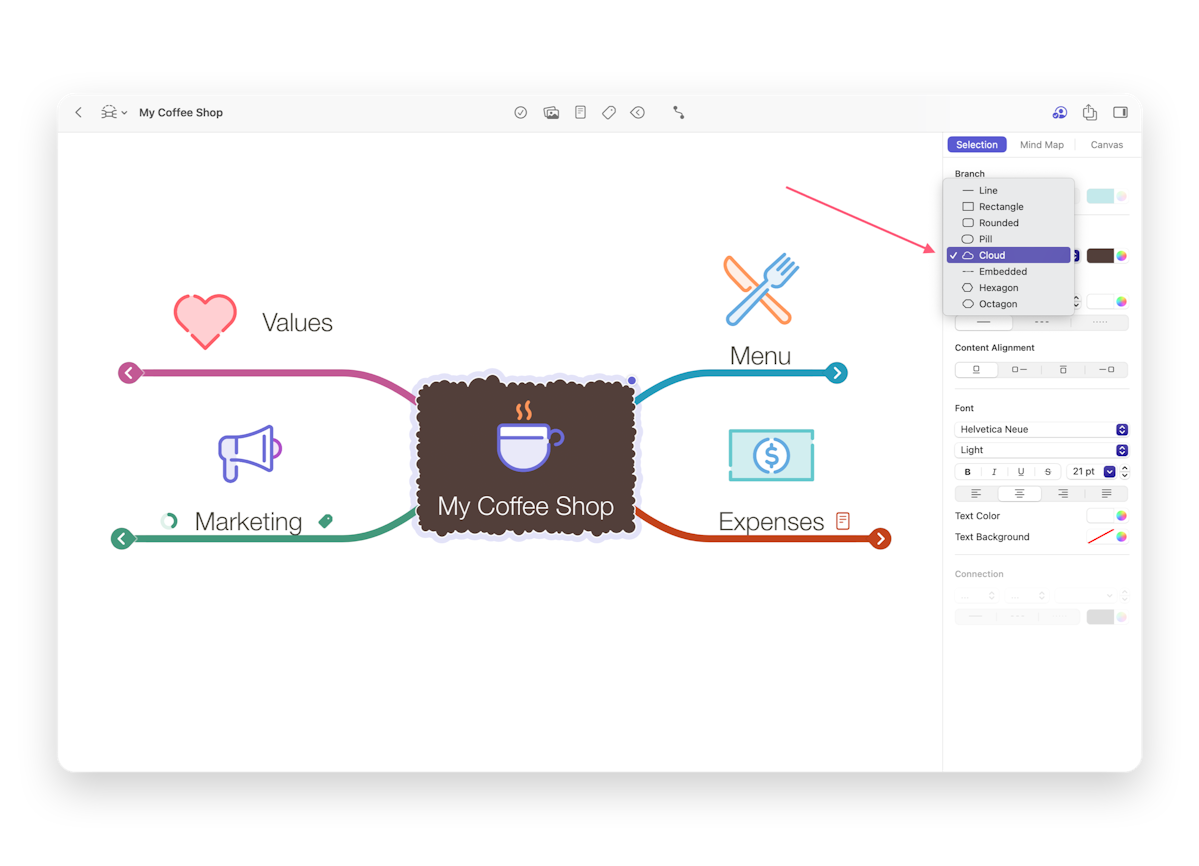
Start by selecting a node or multiple nodes.
In the Styles tab (brush icon) and Shape, you can choose whether you’d like your node shape to be: Line, Embedded, Rectangle, Rounded, Pill, Cloud, Hexagon, or Octagon.
Here you can also choose the background color of your node.
The node width adjusts to the length of the node text, with a maximum of around 320pt.
If you prefer to define your own node width:
You can check Manual Width on your Mac. You can deselect Shrink node width to fit content in the Preferences to change the default.
On iOS, you can change the width using the stepper or long-press the width and enter the chosen width.
You can also change the node's border, including line type, thickness, and color.
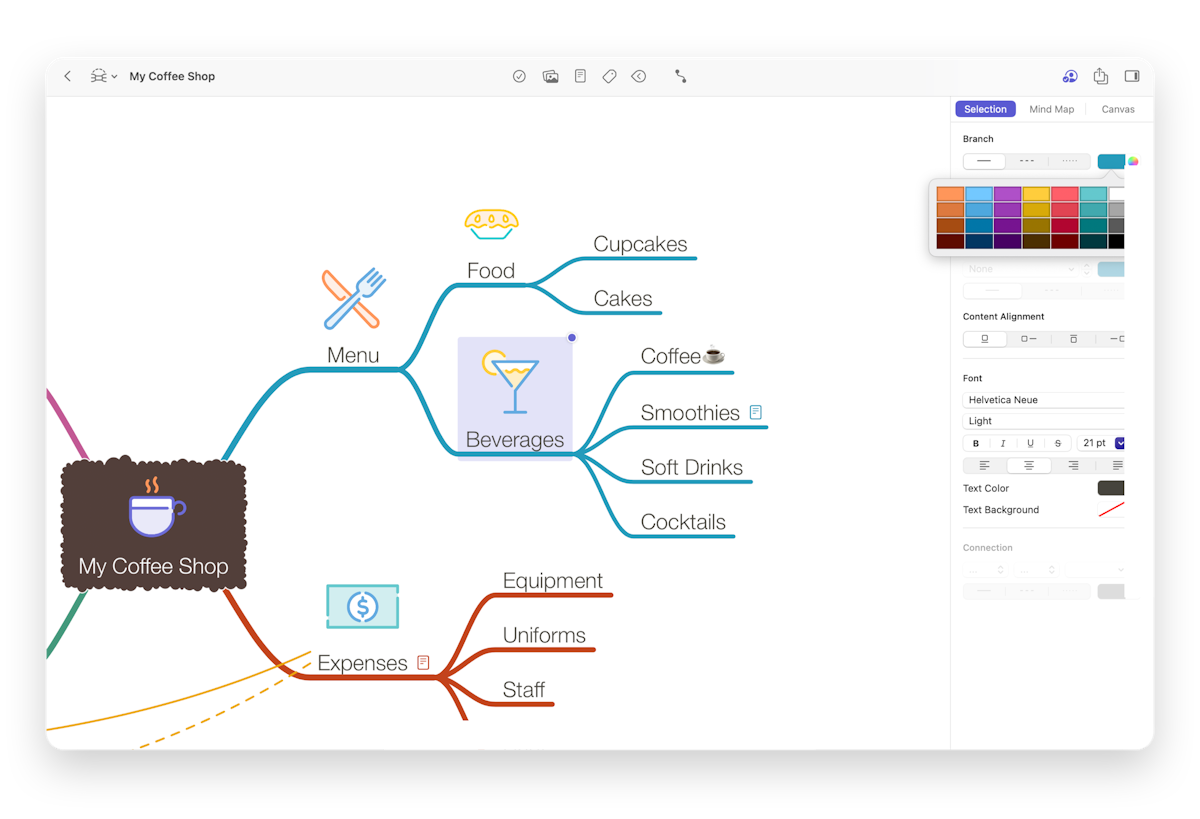
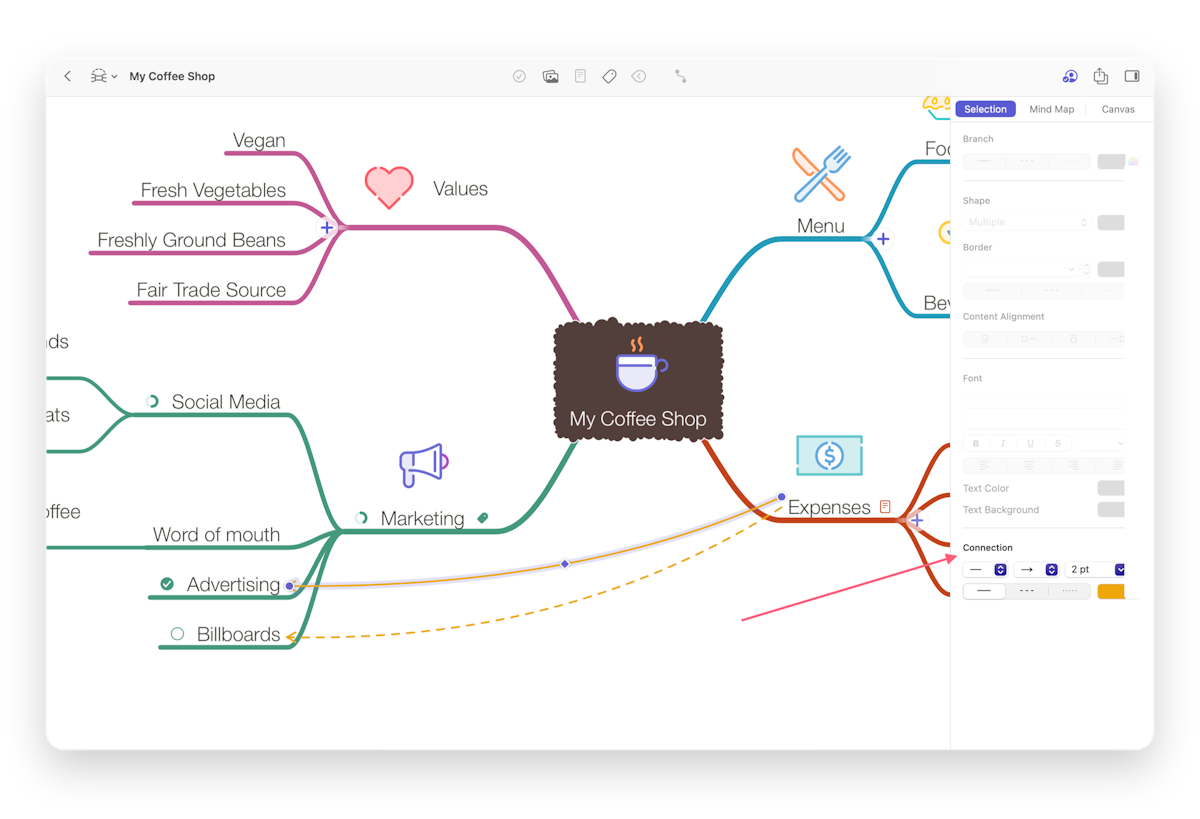
Branches & connections
You can change the style of a branch or a connection by selecting the node it's attached to.
For the branch, you can change:
- Line type
- Color
- Thickness. MindNode will automatically select this by default. You can move the slider to choose your own branch thickness. You can select everything by clicking and dragging across the entire MindNode mind map. If you adjust the width on the slider now, it will be applied to the whole mind map.
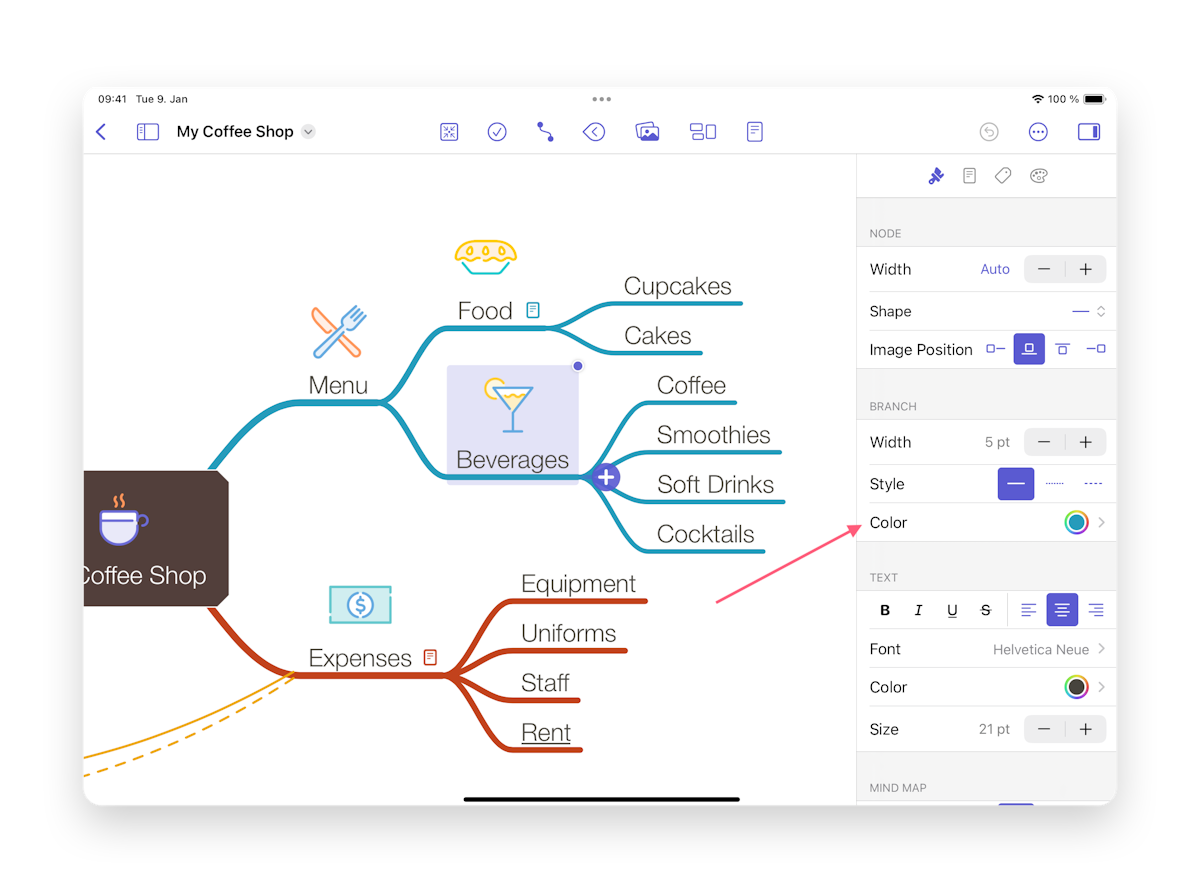
For connections, you can choose:
- Start- and end-point styles
- Line style
- Thickness
- Line color. The connection title background will have the same color as the connection.
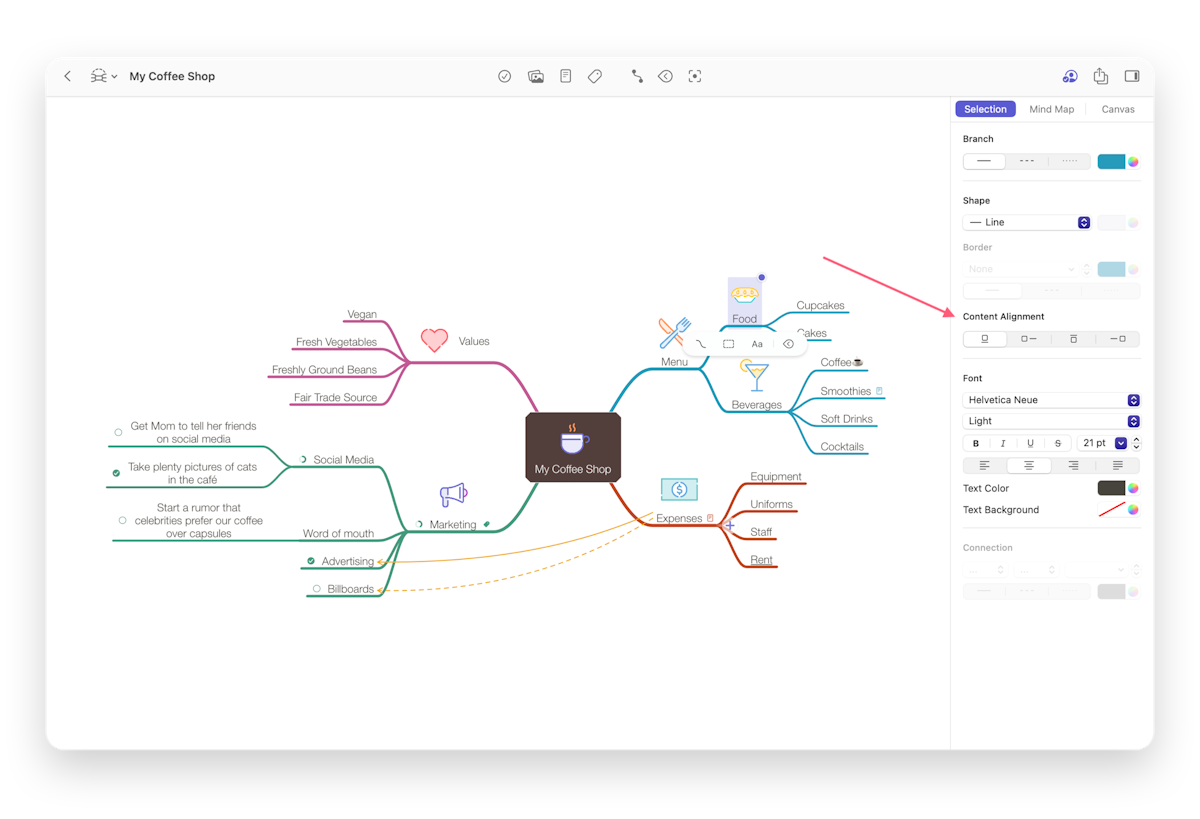
Text
In the Font section, you can change the look of the text in the node title or the connection label, including its:
- Type
- Appearance (i.e., italic, bold, underlined, strike-through, and so on)
- Size
- Color
- Positioning
Image positioning
MindNode will place your images above the node title by default.
By choosing one of the four options in the sidebar/panel you can, however, change the image position to:
- Underneath the title
- In front of the title
- Behind the title
Style Mind Maps
MindNode mind map styling
Now that we've talked about styling individual nodes let’s move on to styling the entire MindNode Next mind map.
Layouts
The most important thing to watch out for when it comes to the readability of your mind map is bound to be the layout. How you arrange your info determines how easy it is to understand. Here's how you can easily change the layout:
- Choose between two Branch Types; Rounded and Angular.
- Select either the horizontal (left and/or right) layout, the vertical (top and/or down) layout, or the compact layout (e.g. for organizational charts).
- Decide on narrow, default, or wide spacing between your nodes.
You can apply these layout styles individually for each main node.

Instead of having a separate manual mode, MindNode Next allows you to move any node freely while keeping its relative position to its parent node. This ensures that adding and repositioning nodes results in a consistent and predictable structure.
You trigger the behavior by starting to drag a node. When the node has reached a certain distance from its parent node, an indicator will appear on the branch, letting you know that the node will no longer snap back to its original position. You can also override this default behavior by holding the Option key on your keyboard (Mac or iPad only).
During dragging a node, a shadow will indicate where the node would snap to:
When the node is dragged further away, an indicator will appear when the node will be placed at an offset:
Position any nodes freely, while retaining automatic layout for all nodes:
Helpful actions while determining the layout of your mind map include Balance Mind Map, Move All Node Left/Right or Top/Bottom, and Reset Position, which you can find under Organize.
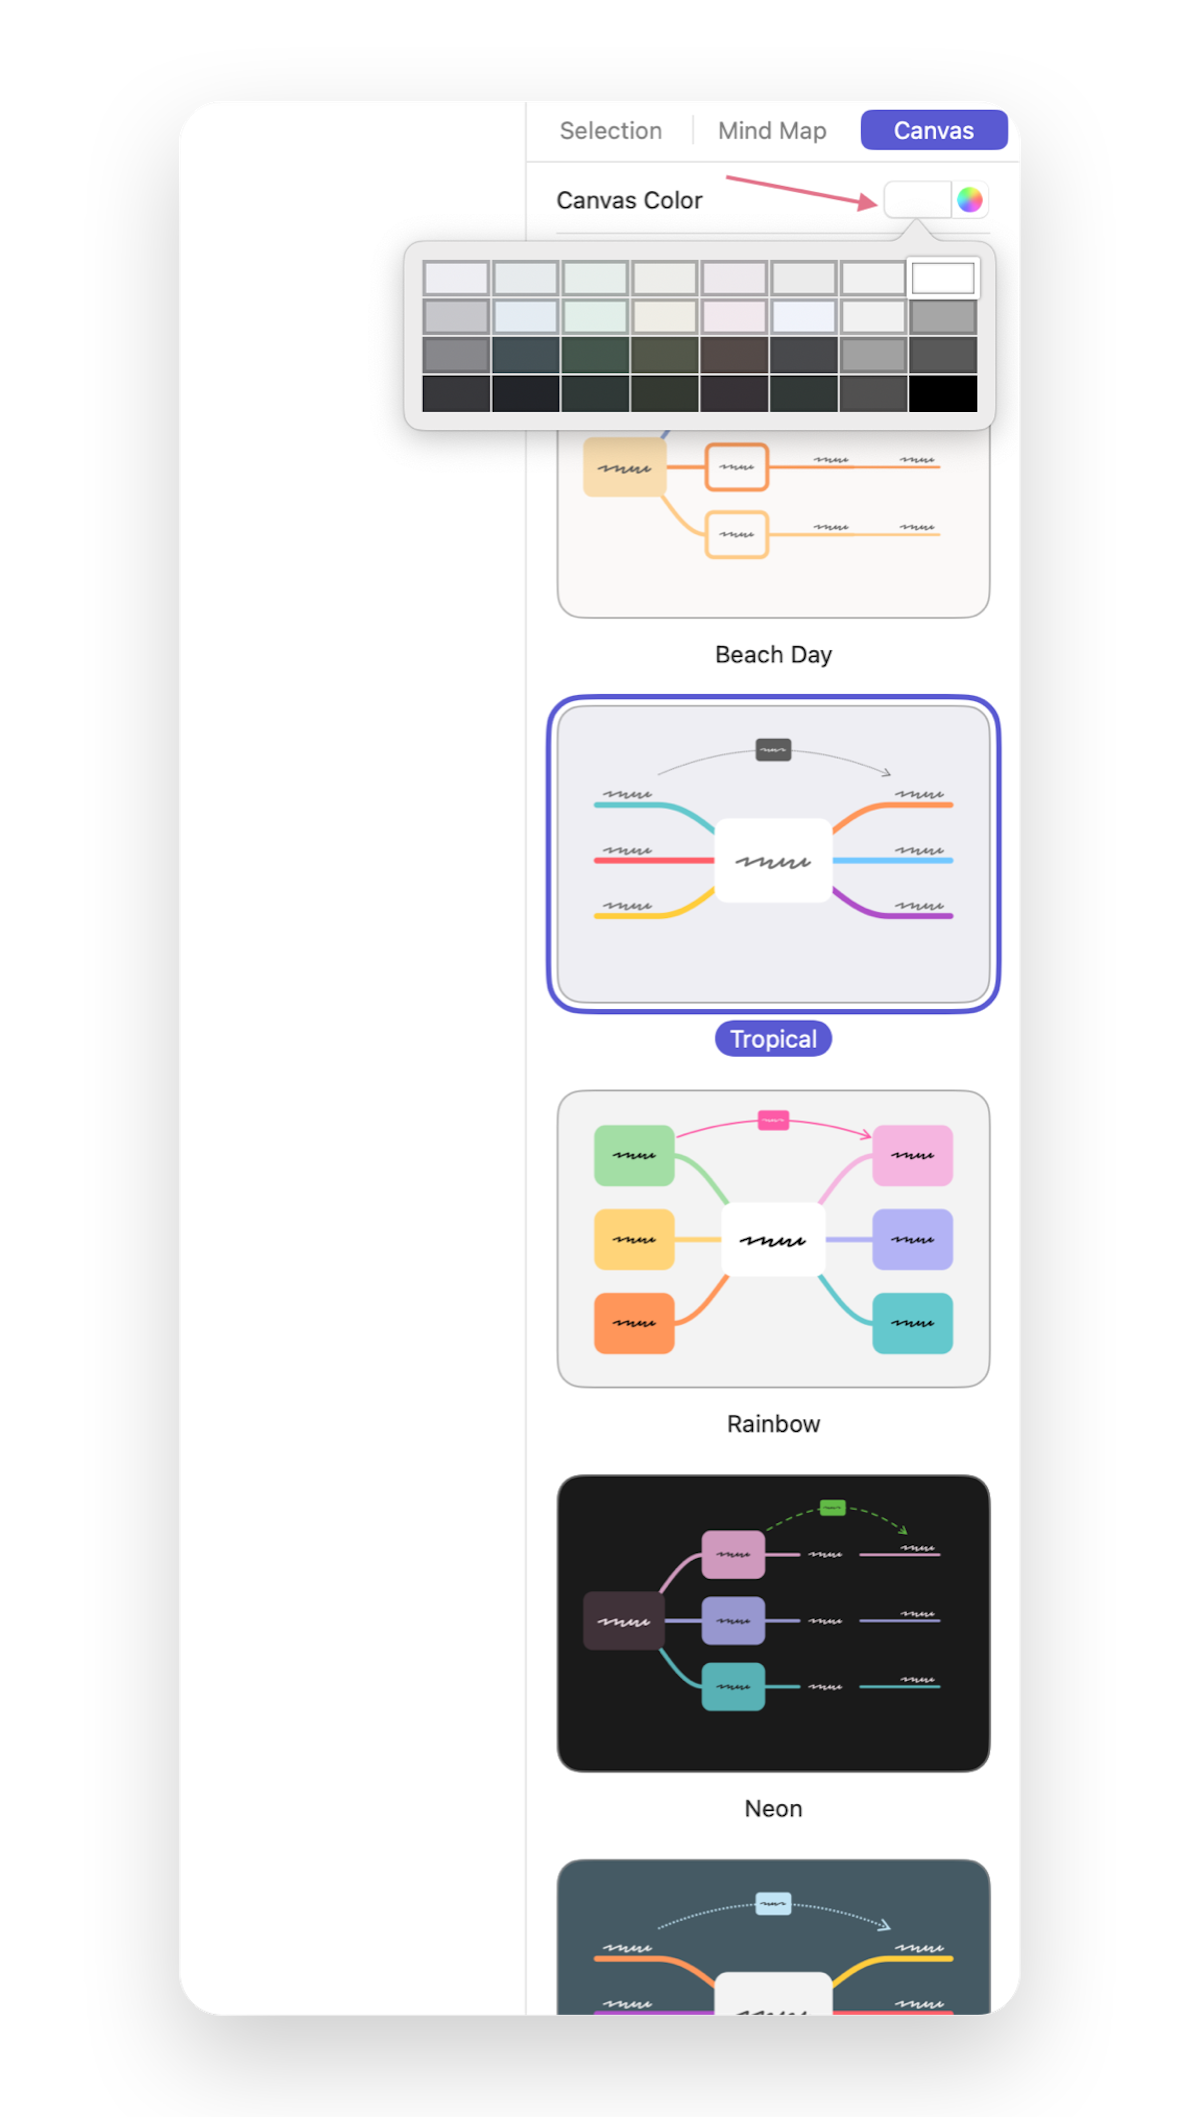
Canvas
The canvas, essentially, is the background behind your mind map. You can change its color at the top of the Canvas sidebar (Mac/iPad)/bottom of the Themes tab in the panel (iPhone).
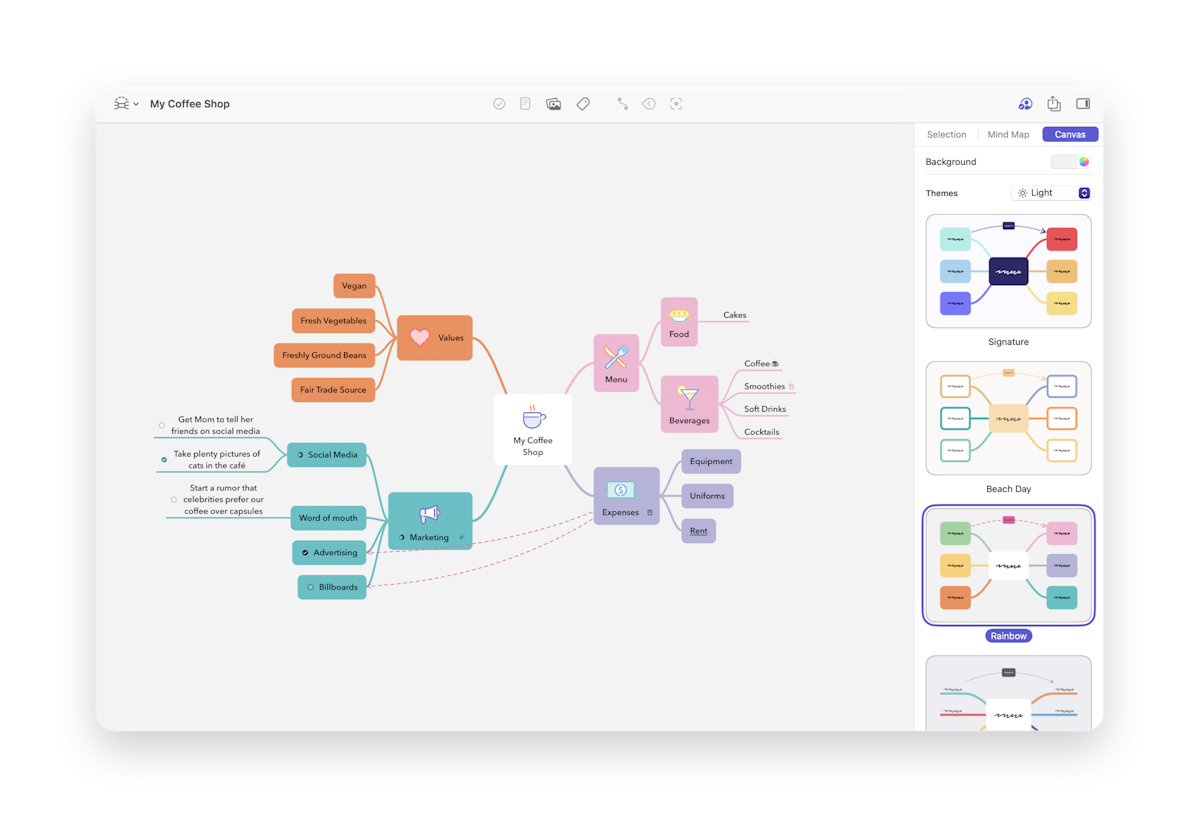
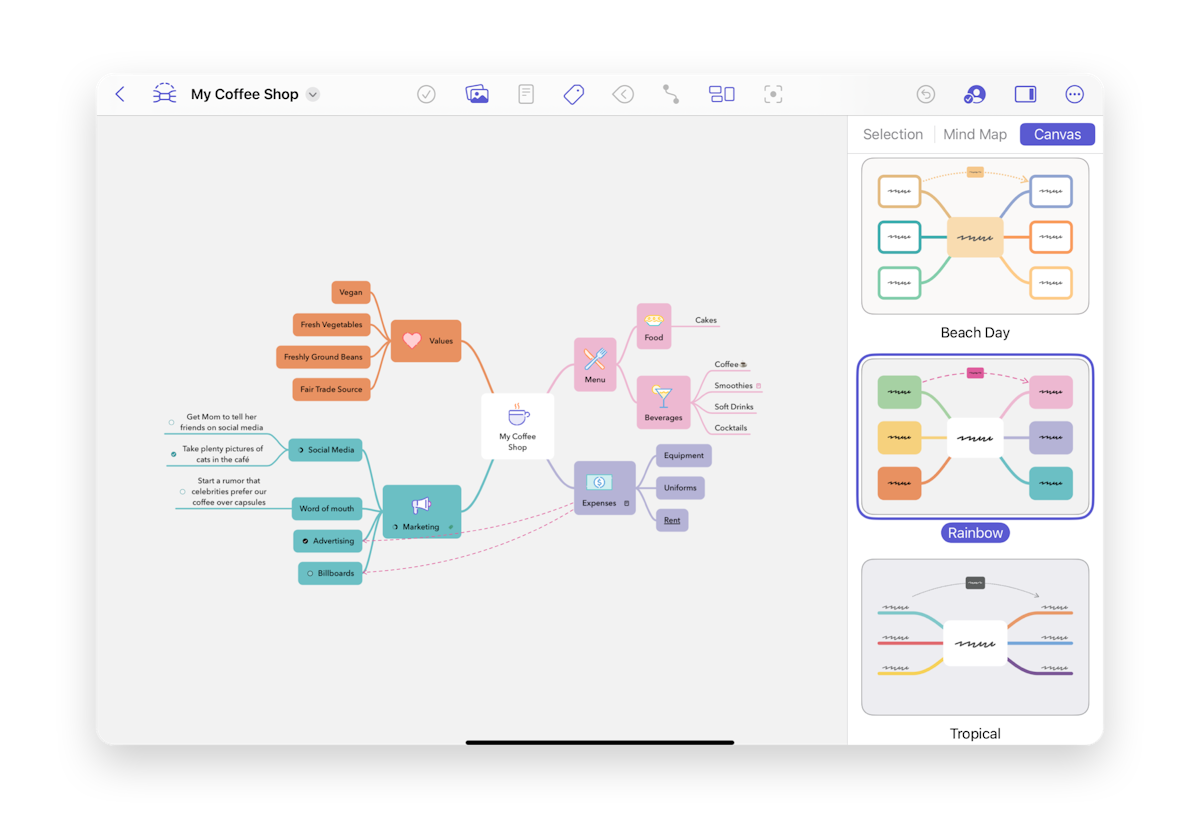
Themes
To make creating visually appealing mind maps as easy as possible, MindNode Next comes with a bunch of themes for your documents.
To apply a theme to your document, open the sidebar on Mac & iPad, the Themes panel on iPhone, or the Themes sheet on Vision Pro, and tap/click on the Theme you like.
The last used theme gets synced between your devices via iCloud.
With Dynamic Themes, your documents now automatically adapt to both light and dark mode — just like your device. When your system switches to dark mode, your documents will follow suit. We’ve updated all built-in themes to support this seamless, dynamic experience. For this, select Auto on top of the listed themes in the drop down menu.
Discover & Dive Deeper
Discover and dive deeper
By this point, you have captured, organized, and styled your thoughts and ideas. Now, we'll show you some of MindNode Next even more advanced features, which can help you dive deeper into your ideas and thoughts.

Outline
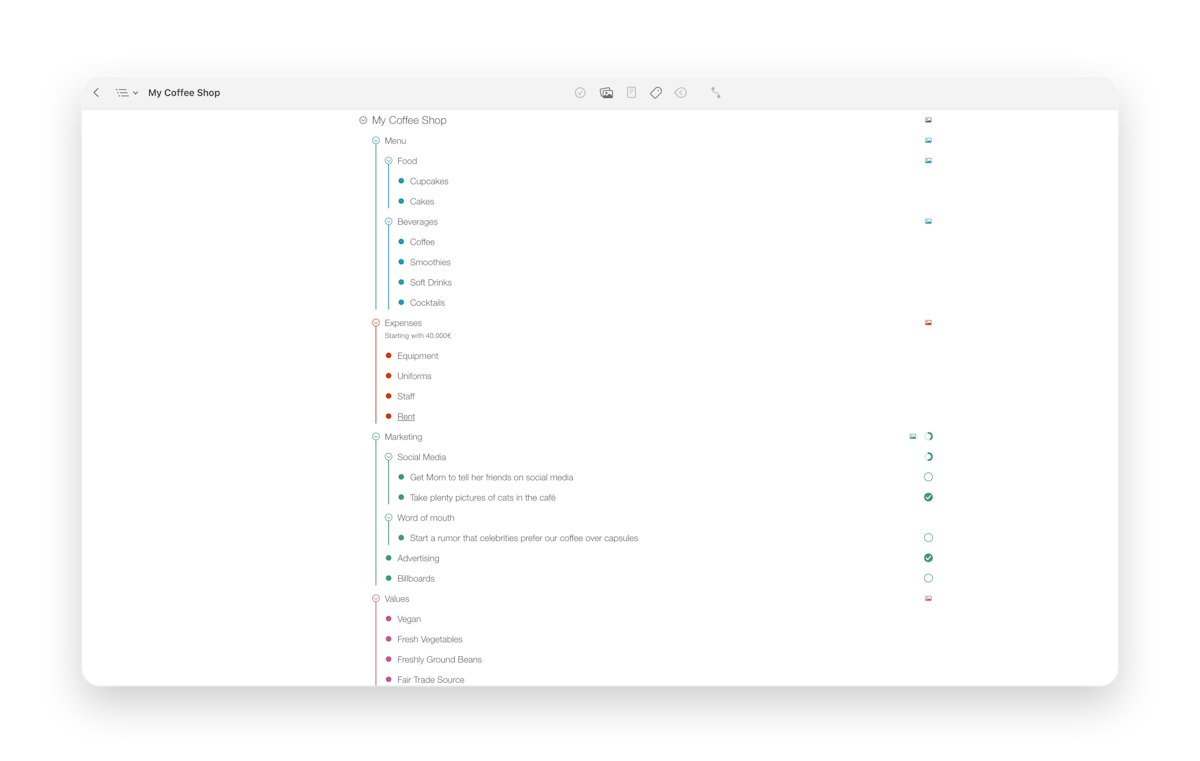
Outline
Different thoughts need different perspectives. So while mind maps create a great visual of a topic or idea, it can sometimes be helpful to see it more linearly — like a list — which is why we've integrated outlining.
You can view the outline by clicking on the View icon in the top left-hand corner of your Toolbar.
How the mind map translates into the outline: The first level child nodes of the mind map are arranged clockwise around the main node. They’ll be listed in the outline following this pattern. Each level of child nodes after that follows a top-down logic.
Nodes folded in your mind map will be folded in your outline and vice versa.
Tasks are shown to the right of the nodes in the Outline in their current state of completion. You can also toggle them there.
Notes can either be shown inline or marked with the same symbol you’ll find on your mind map.
Stickers, emojis, and images can also either be shown directly in the outline or as a symbol.
Show tags, notes, and images if you want more context, and show content indicators if you want more information about what the node contains by enabling/disabling it on the right side of the filter bar at the top (iOS)/bottom (Mac) of the outline. Here you can also change the sizing of the outline or choose to Show only open tasks.
Selecting & organizing nodes in the outline
If you want to rearrange the structure of the outline, here is how you do it:
- To select a node in the outline, click/tap on it once.
- You can use the up and down arrow keys to navigate the outline. For example, press Shift ⇧ + up/down arrow key to select more than one node.
- Pressing the down arrow next to the node's name will fold its child nodes. Once you've done this, the arrow will turn to the right.
- Press the arrow (now pointing to the right) again to unfold the nodes' child nodes.
- Delete a node by pressing Backspace, also deleting its child nodes.
- To remove a node and reconnect its child nodes to the above parent node, press Option ⌥ + Backspace.
- To change the order of your nodes in the outline, you can drag them to their new position relative to other existing nodes and release them there.
- Or, you can use Command ⌘ + up/down or left/right arrow keys to move them around.
Editing nodes in the outline
You can now, of course, also edit and change the content of your outline:
- Click/tap directly onto the node title in the outline or press Command ⌘ + Enter ⏎ to edit a node.
- To add a line break within a node, press Option ⌥ + Enter ⏎.
- Split a node into two by pressing Enter ⏎.
- Or, if you want to merge two neighboring nodes, press Backspace at the beginning of the second node.
- To create a new node on the same level, press Shift ⇧ + Enter ⏎ or just Enter ⏎ at the end of a node.
- You can delete a node while text editing by pressing Command ⌘ + Backspace.
- To end the editing, click somewhere outside the node title or press Esc.
Tag Highlighting
Tag highlighting
With MindNode's tag-highlight mode, you can focus on specific tags and discover how certain thoughts and ideas connect. Highlighted tags will highlight the relevant nodes while fading the rest into the background.
To highlight nodes that have a specific tag, tap/click the highlight icon (sun) next to it in the tags panel (iPhone)/pop-over in the toolbar (Mac/iPad).
End highlighting by tapping/clicking the sun icon again.
It also works directly on the node; when you click on the tag, a pop-over appears. You can now click on the sun icon to start/end highlighting.
If you highlight more than one tag, MindNode will display all the tags in unison. But if you only want to see the tags that intersect with each other, switch the control at the bottom of the tag pop-over. There you can also end the highlighting of all tags.
Search & Filter
Search and filter
Sometimes finding things (again) isn't easy, which is why you can use the search and filter functions in MindNode Next to find what you’re looking for in seconds.
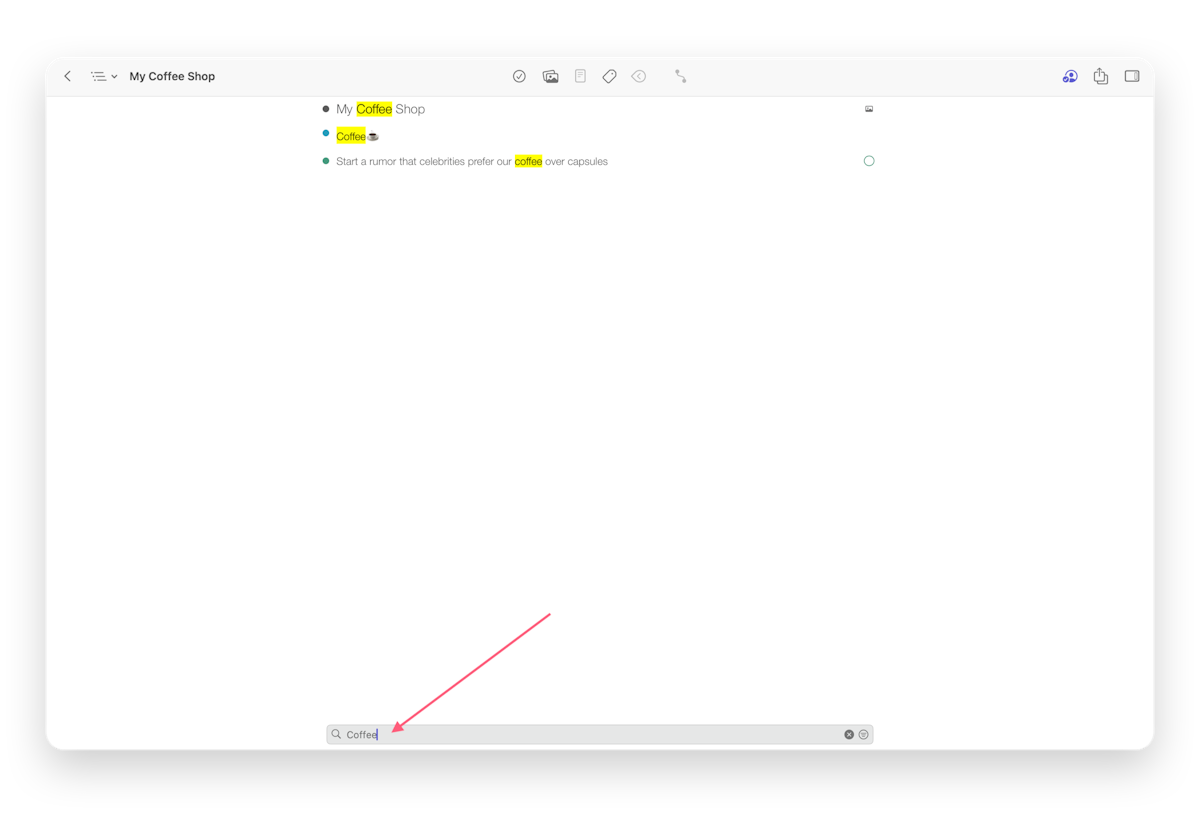
- Go ahead and use the filter bar at the top (iOS)/bottom (Mac) of the outline to search for specific words. You can also search the mind map via Command ⌘ + F on your Mac or iPad.
Immersive Brainstorming
Immersive Brainstorming
On Apple Vision Pro, Immersive brainstorming allows you to collect all your thoughts as colorful pills that float freely in the space around you. You can literally grab your thoughts, move them around, and even attach related ones together to build groups. When you are ready, convert everything into a mind map and start exploring all aspects of your original idea.

Enter immersive brainstorming by tapping the 🧠 button at the top of the document picker.

A cloud will appear in front of you where you can start to enter your thoughts in the text field in its middle. Tip: Use dictation to get your ideas flowing even faster.
By pressing Return on the keyboard or tapping the Add Idea button you release the idea into the space around you.

Add as many ideas as you want to. Tap and drag them to position them wherever you need them to be in the room surrounding you. When you drag an idea close to another you'll notice the color change. Once this happens you can release the pill you are dragging and it will connect itself to the other idea, creating a stack of related ideas. Drag away an idea from the stack to remove it. Or drag the whole stack by grabbing the idea at the top.

By tapping on an existing idea you'll open the inspector which allows you to change the color of the pill as well as give you the option to delete this idea.
If you tap the x button in the cloud to exit immersive brainstorming, you'll return to the document picker. Once you tap the 🧠 button at the top of the document picker again, you'll be back with your ideas that stayed at exactly the positions you placed them in.

Tap the action button (circle with three dots) on the right of the cloud and get the option to delete all your ideas or to convert them into a mind map with the share button.
Settings & Devices
Settings & Devices
Now that we have all the controls covered let's talk about how you can speed up your workflow. In this section, you'll learn about how to navigate through the Settings and Document Picker in MindNode, customize the appearance to your preferences, and connect MindNode Next to the Apple Pencil and Mouse pointer. You'll also be led through several touch gestures which is a very intuitive way to improve your workflow as well.

Settings
Settings
Now let's dive a little deeper into MindNode Next's Settings.
iOS Settings
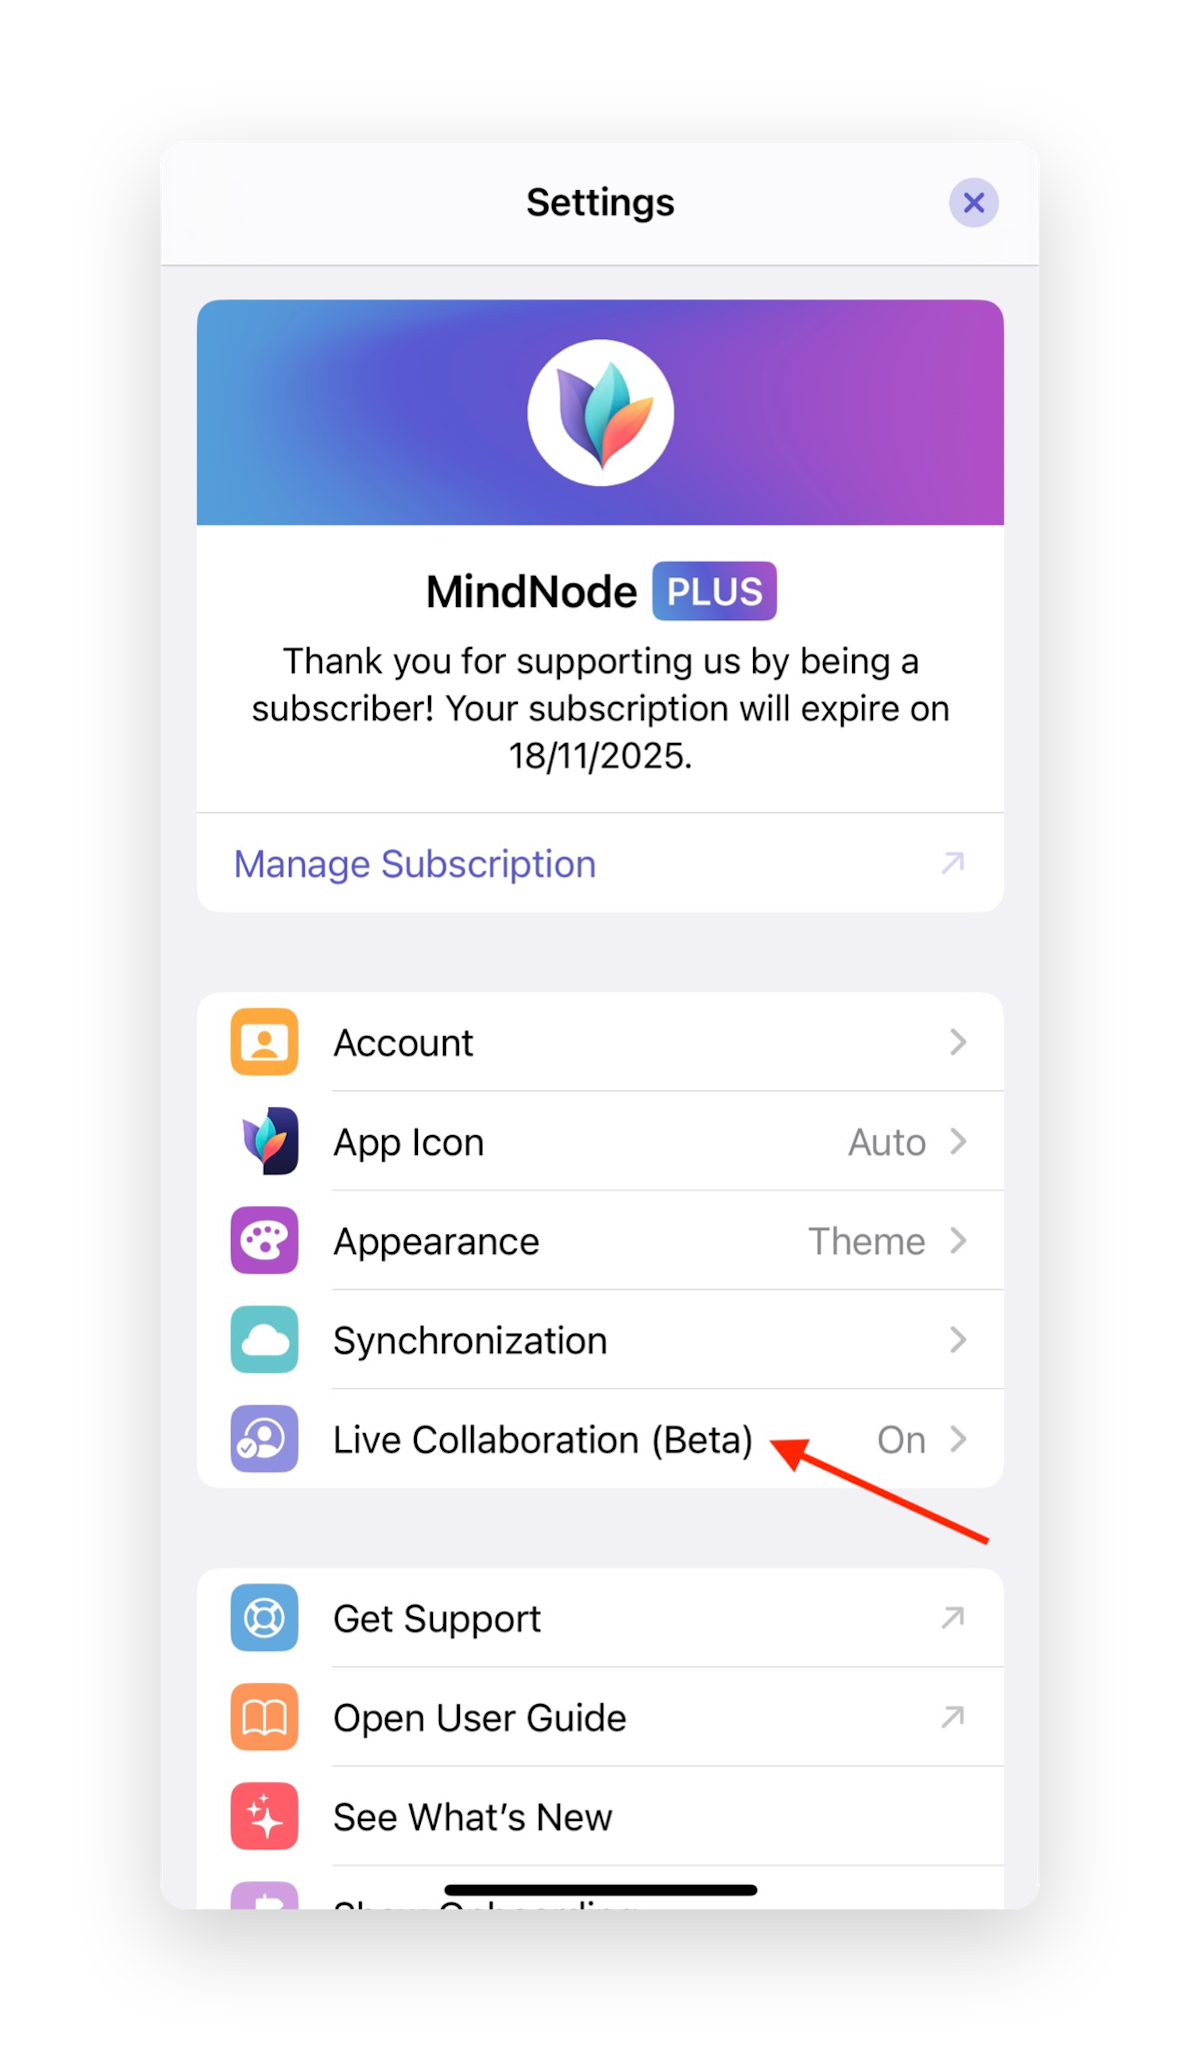
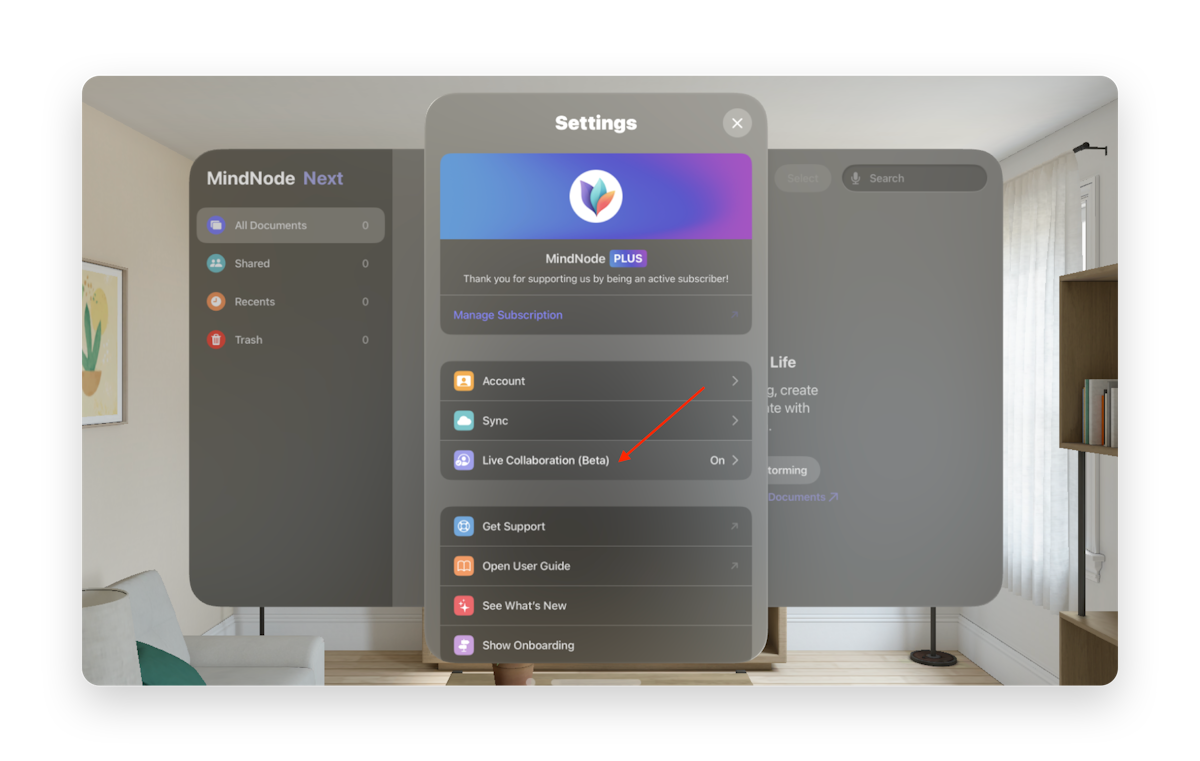
Go ahead and tap on the gear icon in the upper right corner to open the MindNode Next Settings.
Here, you can:
- View your subscription status
- Access your MindNode Account
- Change the Appearance of the app
- See your Sync stats
- Enable or disable the Live Collaboration (Beta) feature
- Get Support on our website
- Open the MindNode Next User Guide
- Open release notes under See What's New
- Show Onboarding again
- Write a Review on App Store
- See the team behind MindNode Next under Credits
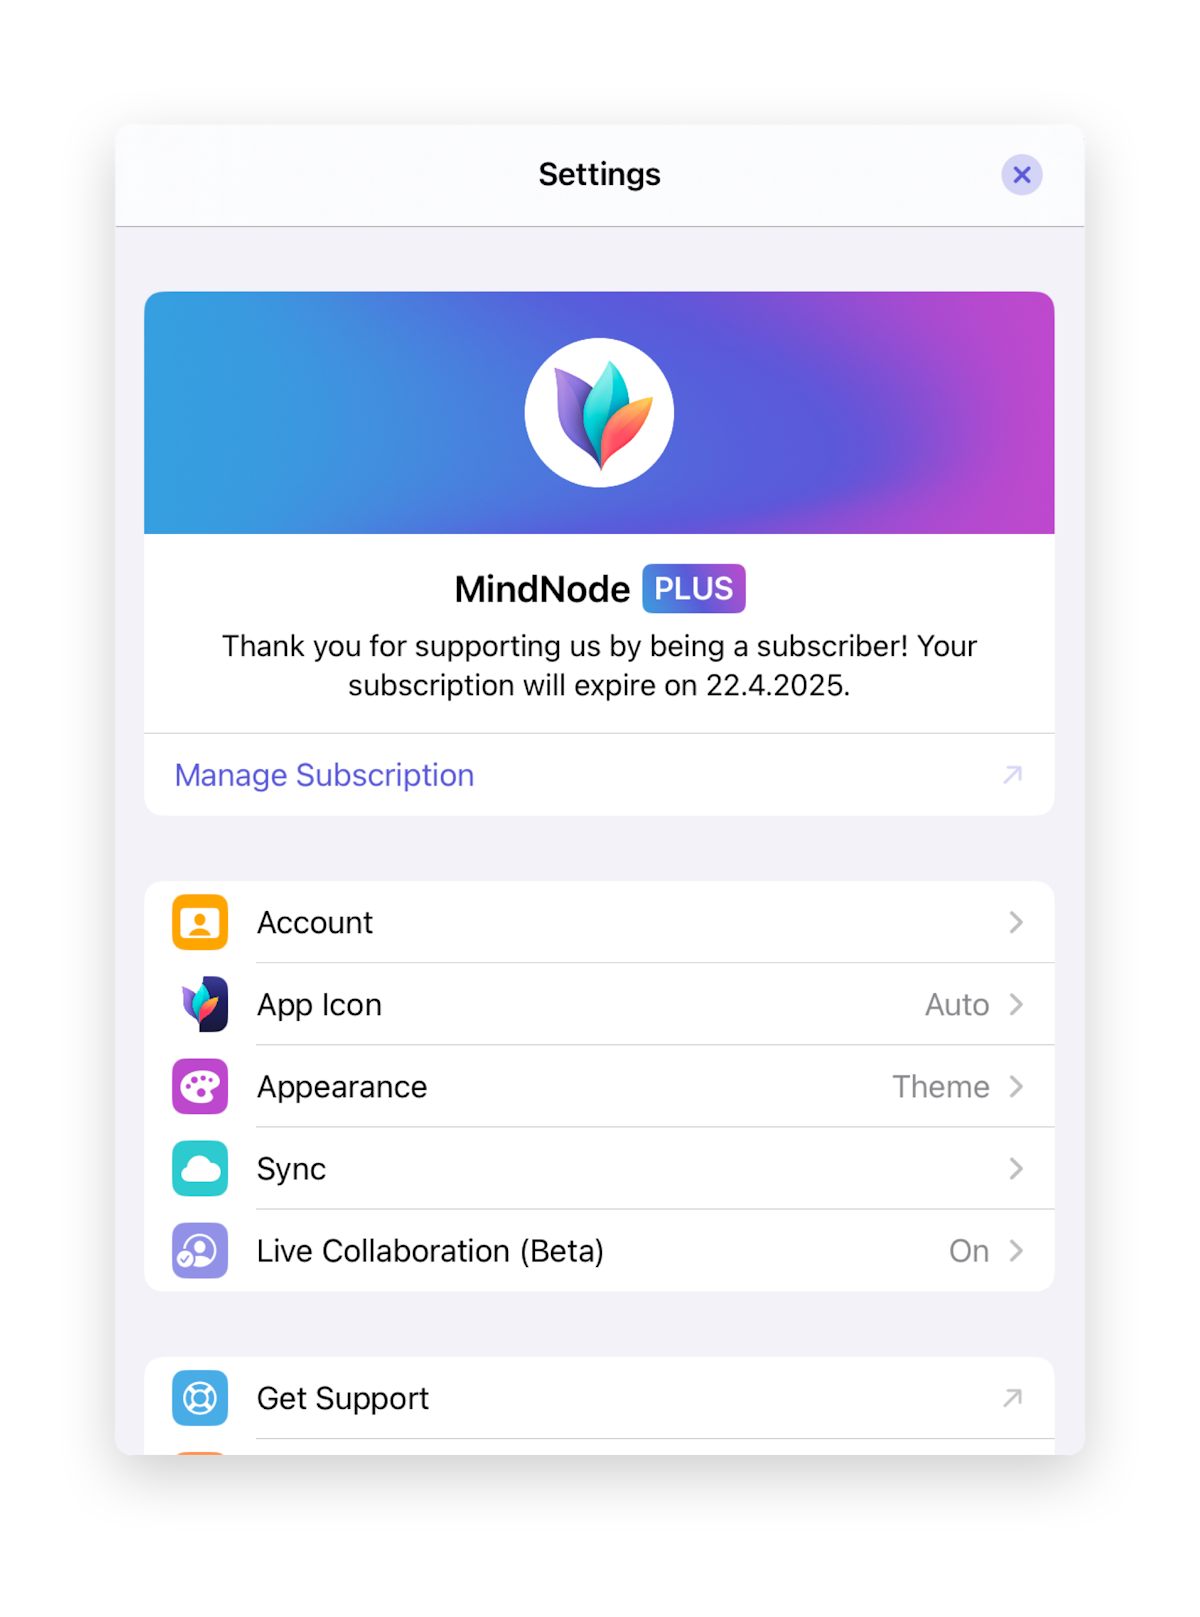
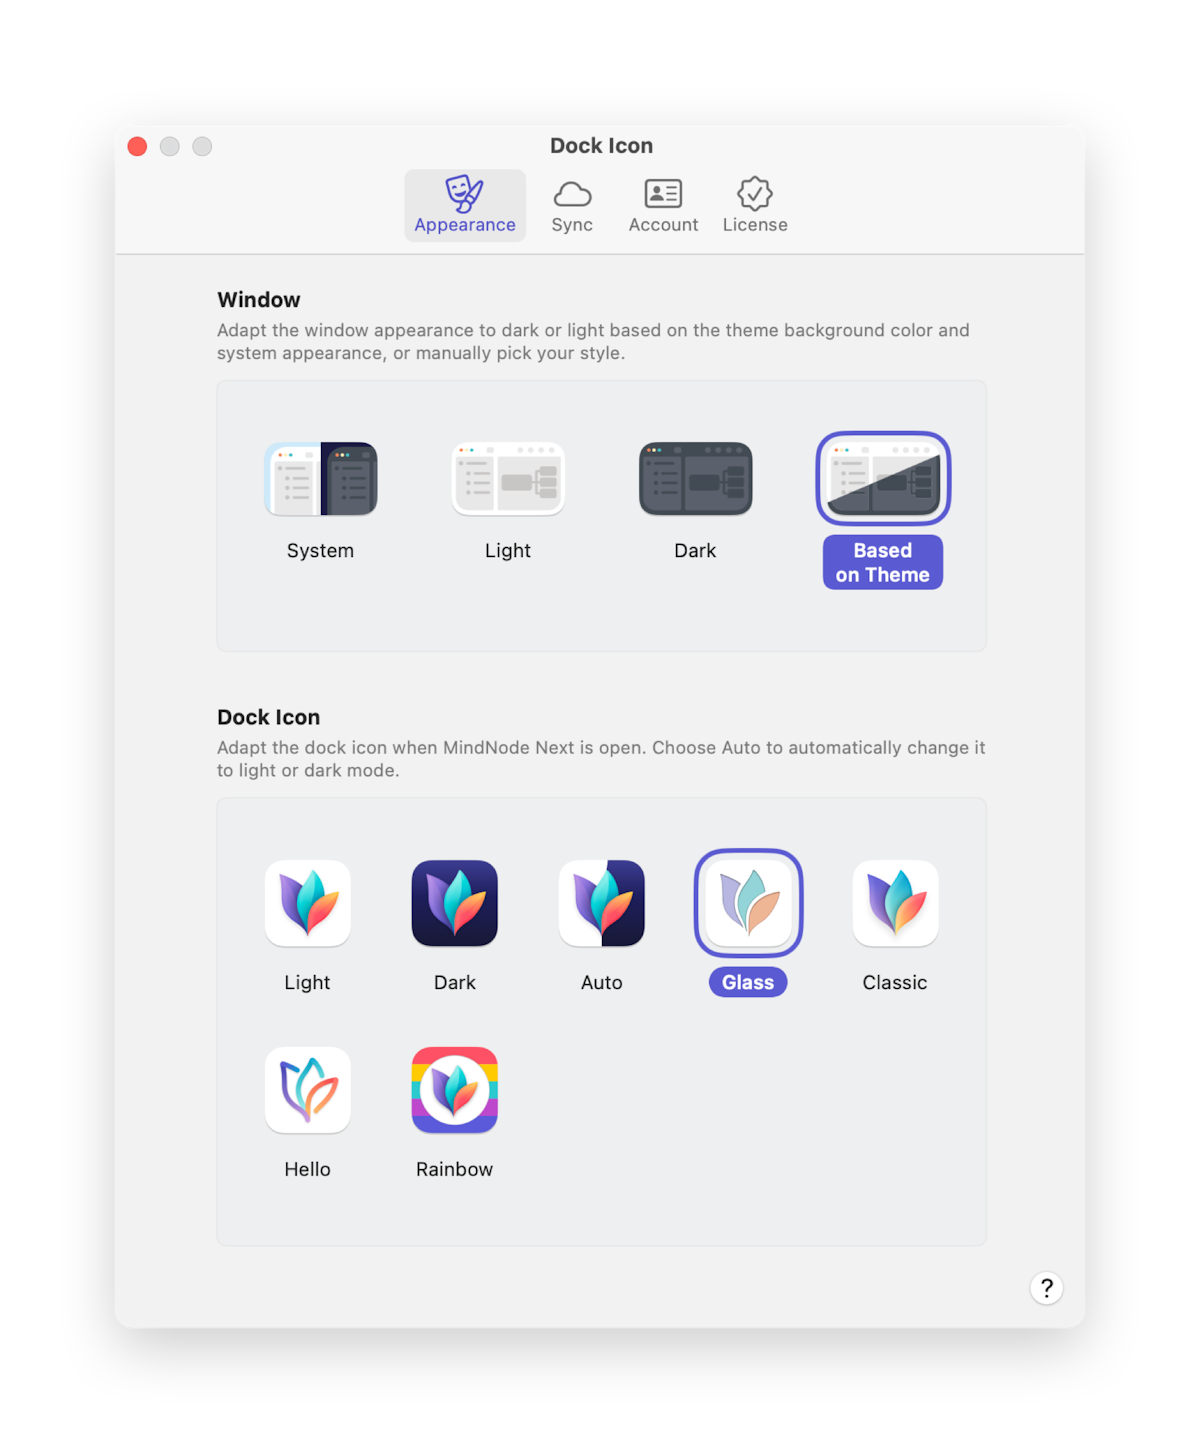
Under Appearance, you can choose whether you want MindNode's user interface to be:
- The same as your System setting
- Light
- Dark
- Based on the Theme
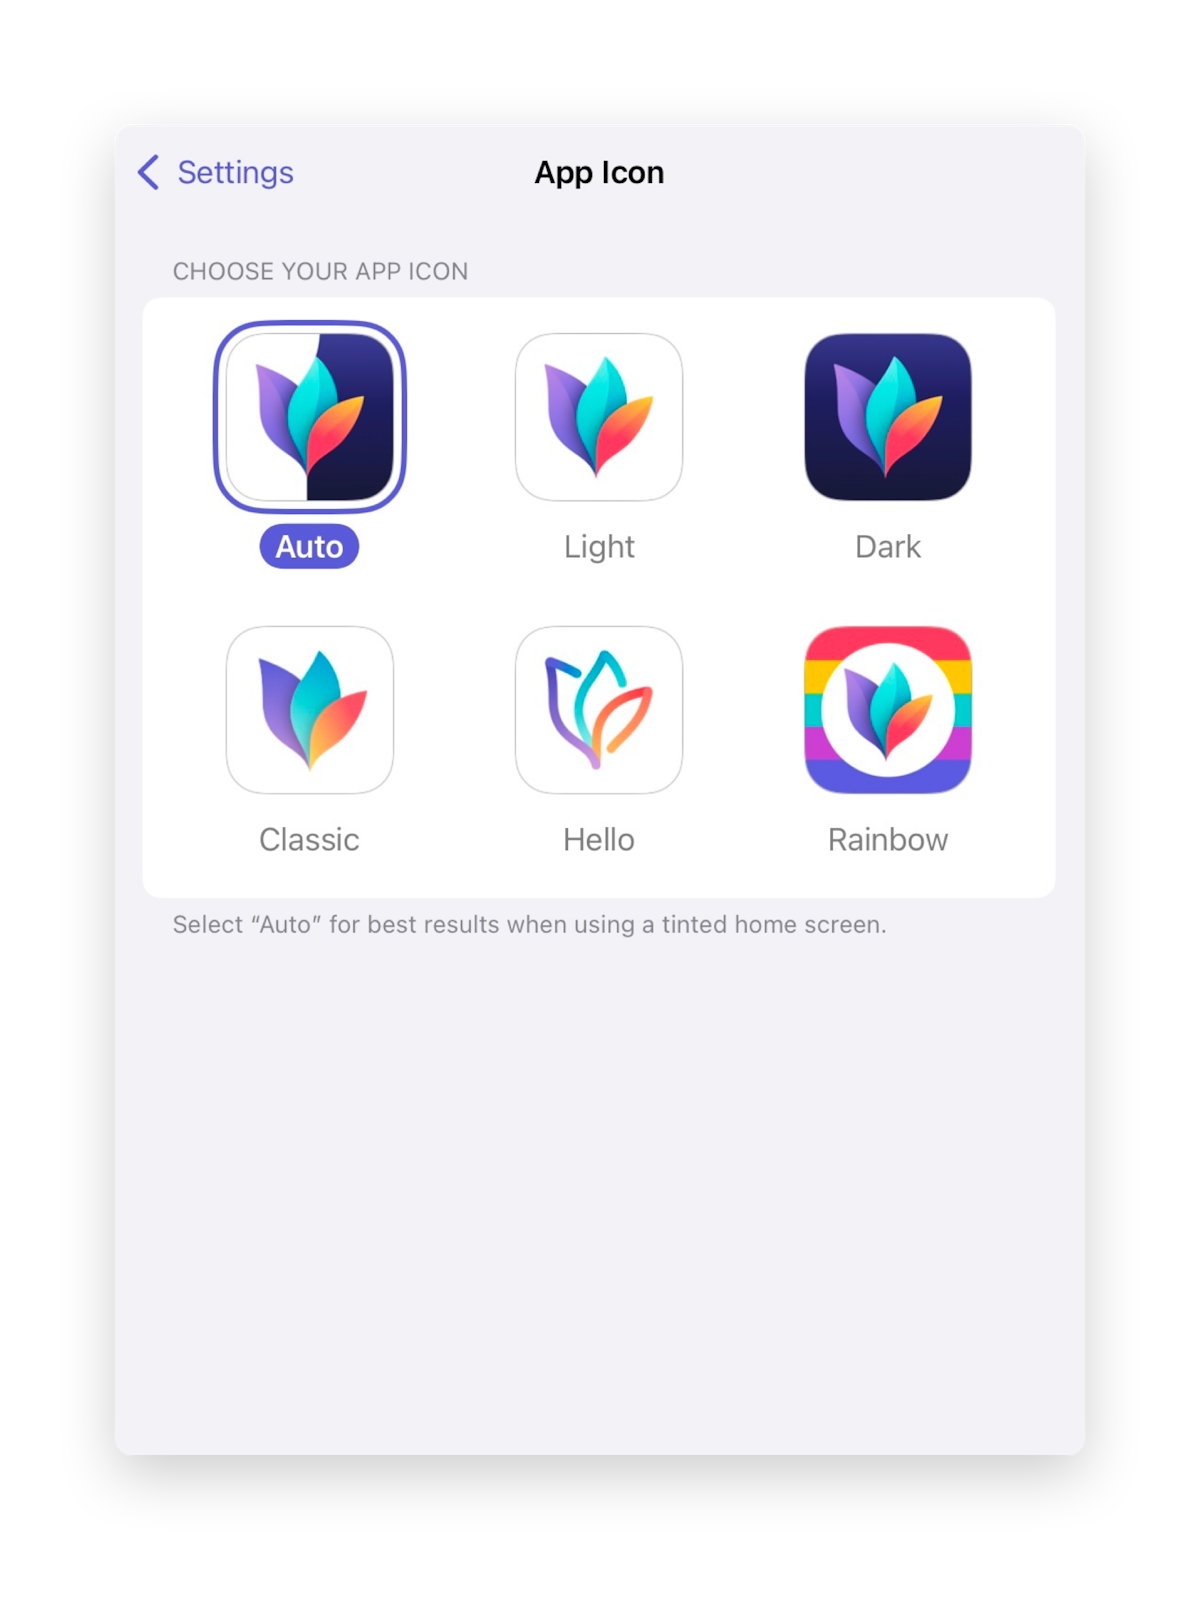
You can also choose between six different App Icons for MindNode Next, including one that automatically switches between light and dark mode with your device.
macOS Settings
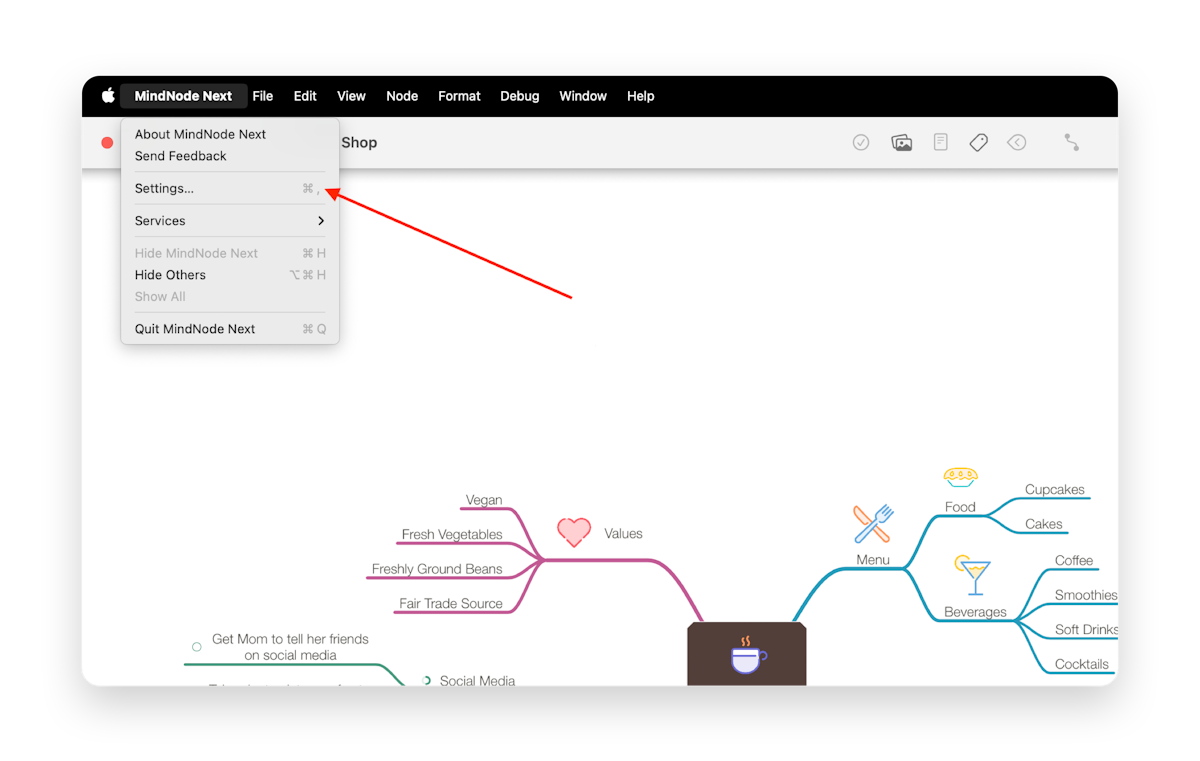
In the main menu on the top of your screen, go ahead and click on MindNode Next.
Select Settings… or use the shortcut Command ⌘ + , comma to open MindNode Next's Settings.
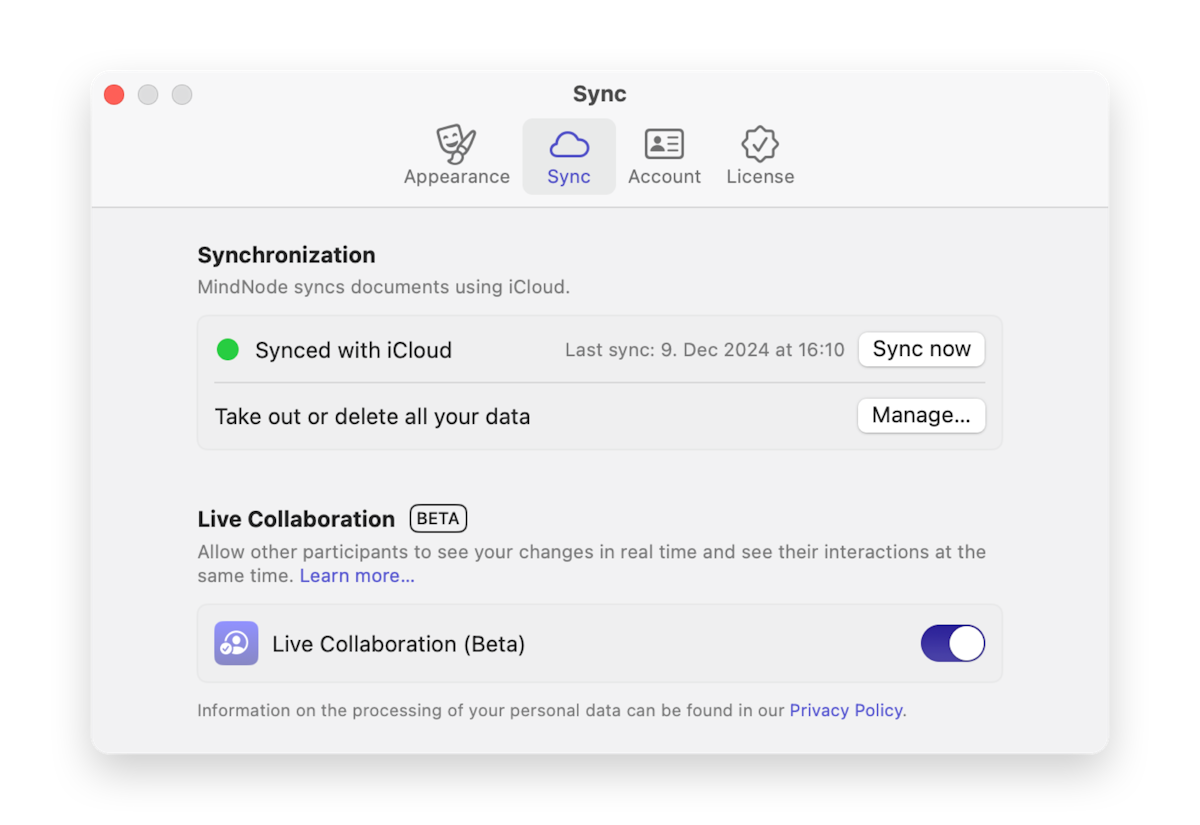
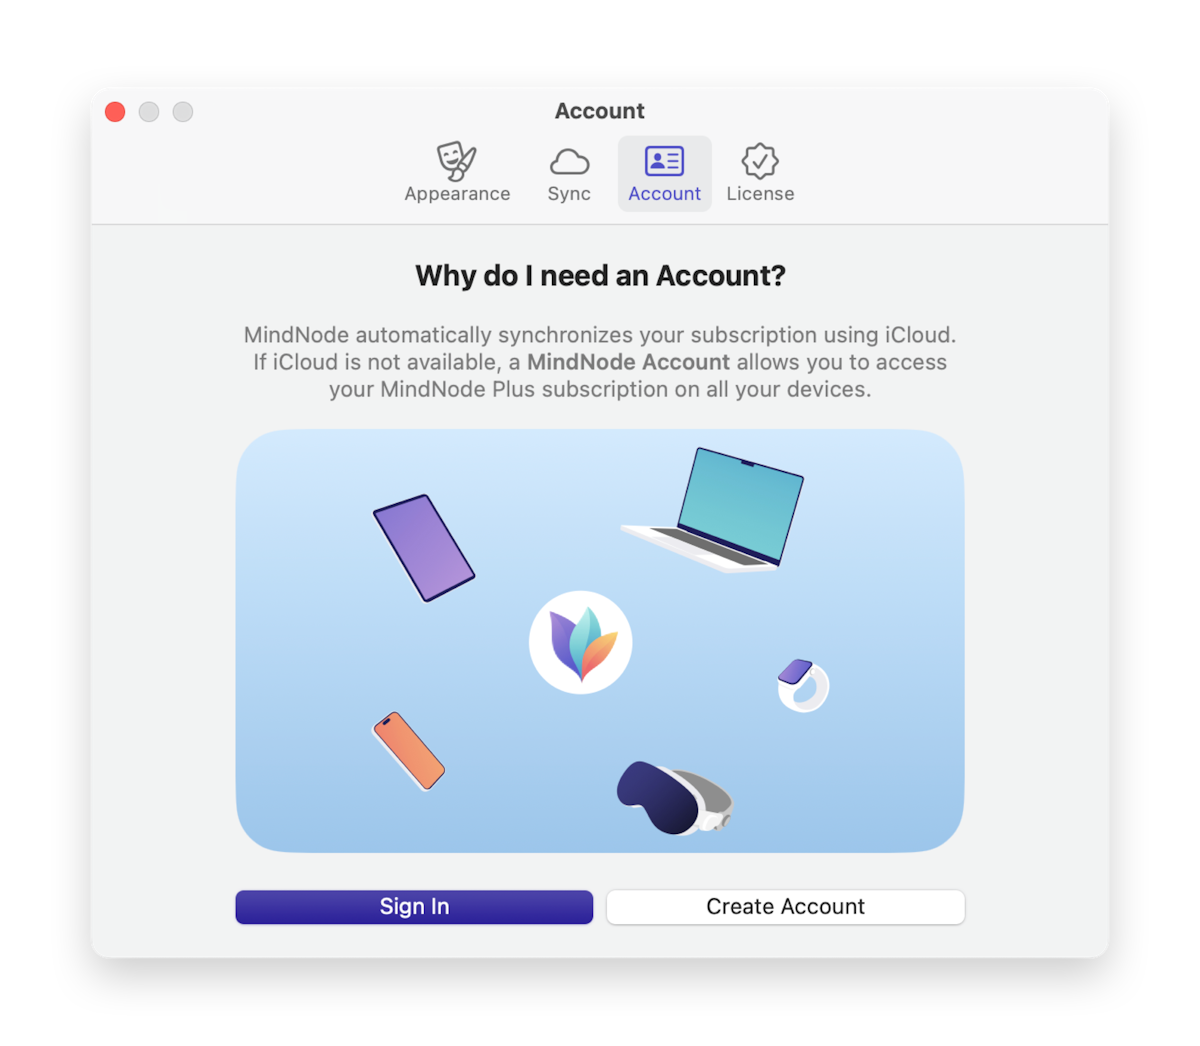
The Settings window has four tabs:
- Appearance, where you can change the Dock Icon.
- Sync, where you can trigger syncing of your MindNode Next documents, access our data bank information, and enable or disable the Live Collaboration (Beta) feature
- MindNode Account, where you can log into your MindNode Account to access your subscription from devices that do not use iCloud.
- License, where you can see your subscription status (including the remaining days) and manage your subscription.

visionOS Settings
Here the user guide is still work-in-progress. The information will be here shortly.
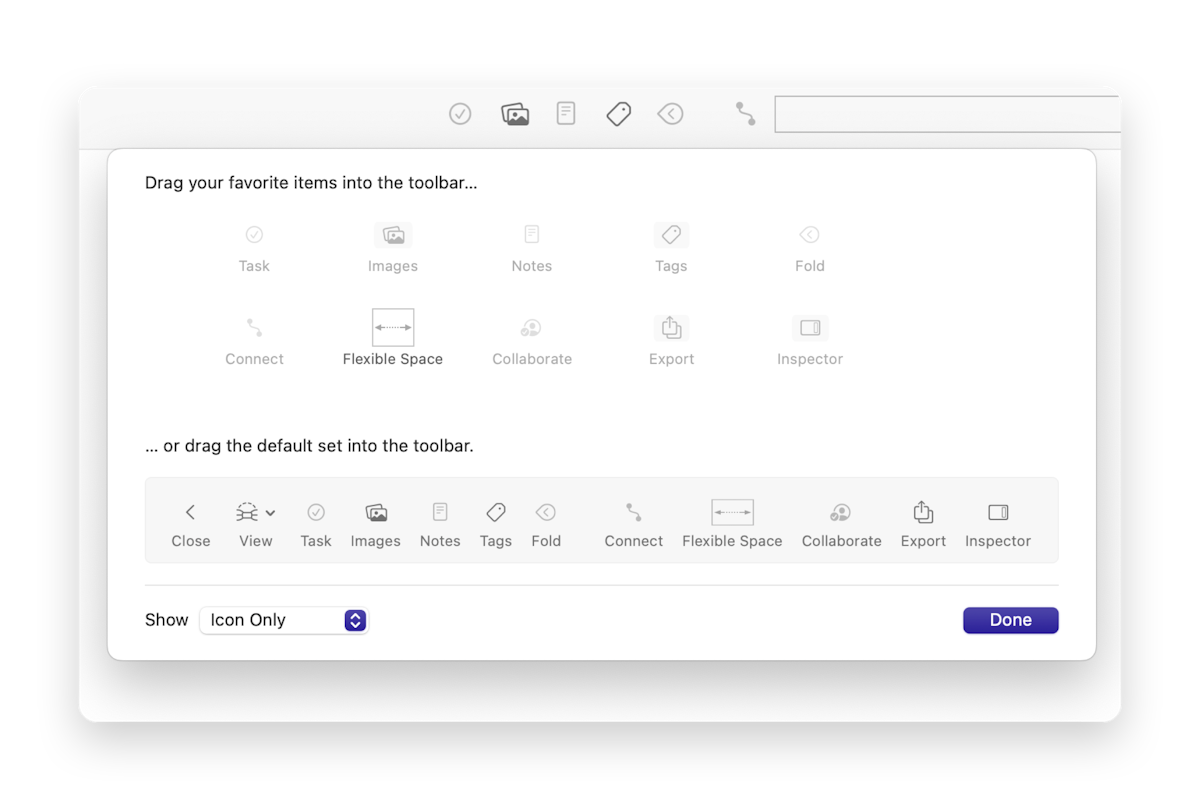
Toolbar Customization
Toolbar Customization
You may find yourself using some actions more often than others or might have some favorites. MindNode Next allows you to drag them onto your toolbar and make them easier to access. To customize your toolbar on your Mac right-click the toolbar and select "Customise Toolbar...". On your iPad search for the action menu (circle with three dots) and tap on "Customize Toolbar".
Storage Location & Sync
Storage location and sync
Here the user guide is still work-in-progress. The information will be updated shortly.
Apple Pencil + Mouse Pointer
Apple Pencil + Mouse Pointer
Here the user guide is still work-in-progress. The information will be updated shortly.
The Apple Pencil does everything a finger does, and more:
- Tap and hold a finger on the canvas + drag the Pencil to start a rubber band selection.
- Drag a node without any hold delay.
- Select node with a tap.
Scribble: You can hand-write directly into a node title's text field, and the Scribble feature will convert it into text.
NOTE: Currently, Scribble is only available in English, German, French, Spanish, Italian, Portuguese, and Chinese.
Pointer interactions:
- Click and drag to start rubber band multi-select.
- 2-finger pan to scroll the canvas.
- 2-finger to pinch and zoom.
- 2-finger + click/tap to open the context menu.
Gestures
Gestures
Touch gestures are such a hidden gem that frequently go overlooked. But using them can make building and creating a MindNode that much more intuitive.
Gestures on Mac
- Create a new main node: Force touch (firmly press down) on the canvas (this will only work on Magic Trackpad 2)
- Bring up the note popup: Force touch (firmly press down) on a node (this will only work on Magic Trackpad 2)
- Change the new node well into the folding indicator: Press Option ⌥ and hover the mouse over the node’s well
- Import a PDF as an image: Drag & drop a PDF onto a node.
- Create a cross-connection: Press Shift ⇧ and click & drag from one node to another
- Extend selection in the Outline: Press Shift ⇧ and click
Gestures on iOS & iPadOS
- Multi-select nodes and connections: Tap & hold the canvas with one finger and tap on nodes & connections with another
- Multi-select via rubber-band selection: Tap & hold the canvas with one finger for half a second and start dragging
- Show the undo/redo menu: 3-finger tap
- Zoom: 2-finger pinch
- Select a node or cross-connection and show the edit menu: Single tap on a node or cross-connection
- Starts text editing: Double-tap the node title
- Clear the selection: Tap on the canvas
- Scroll the canvas: Tap and immediately drag the canvas
- Move a node: Tap, hold, and drag it
- Select a whole subtree: Tap and hold a node with child nodes (without moving your finger)
- Create nodes: Press the node well and drag it. Or tap the node well
- Toggle the task state: Tap on the task indicator of a (un)selected node
- Reset/straighten a connection: Double-tap its waypoint knob
- Add a title to a connection: Select and Double-tap the connection line
- Edit the title of a connection: Double-tap it
- Move/reattach a connection to another node: Drag connection waypoint
- Automatically resize the node width: By double-tapping on the nodes' resize knob (upper right corner)
Share
Share
We’re pretty sure that MindNode Next is not the only app you use to capture your ideas and bring them to life, which is why we’ve also made it easy for you to share your mind maps with your colleagues or export and upload them to other apps.
Here's a list of all the file formats MindNode Next can import from and/or export to:
Import + Export
- MindNode Classic documents
- Markdown - supported by Markdown editors
- Plain Text
Export only
- PNG image
- SVG image

Import
Import
Maybe you’ve started your project in another app or received a file from someone in your team. You can easily open and continue working on these files by importing them into MindNode Next. Here's how:
- On Mac, there are multiple ways you can open a document that has a compatible format in MindNode. One is right-clicking the file and then selecting Open With > MindNode Next from the context menu. Another, drag the file onto the MindNode icon in the Dock.
- On iOS, to import your documents, long-press the document, then select Share > MindNode Next. [If MindNode Next is not among the first few suggested apps, tap the More button (three dots in a rounded square) to get a full list of all potential apps, and look for MindNode Next there.]
Once you’ve imported a copy of a document on one device, it will automatically be available in MindNode Next on all other devices associated with your iCloud Account.
Different formats
Currently, MindNode Next is able to import MindNode Classic, Plain Text, iThoughts and Markdown documents. We hope to add other formats shortly. Learn more here.
For now, as a workaround, you can download MindNode Classic, import the document you want there, and then import it into MindNode Next.
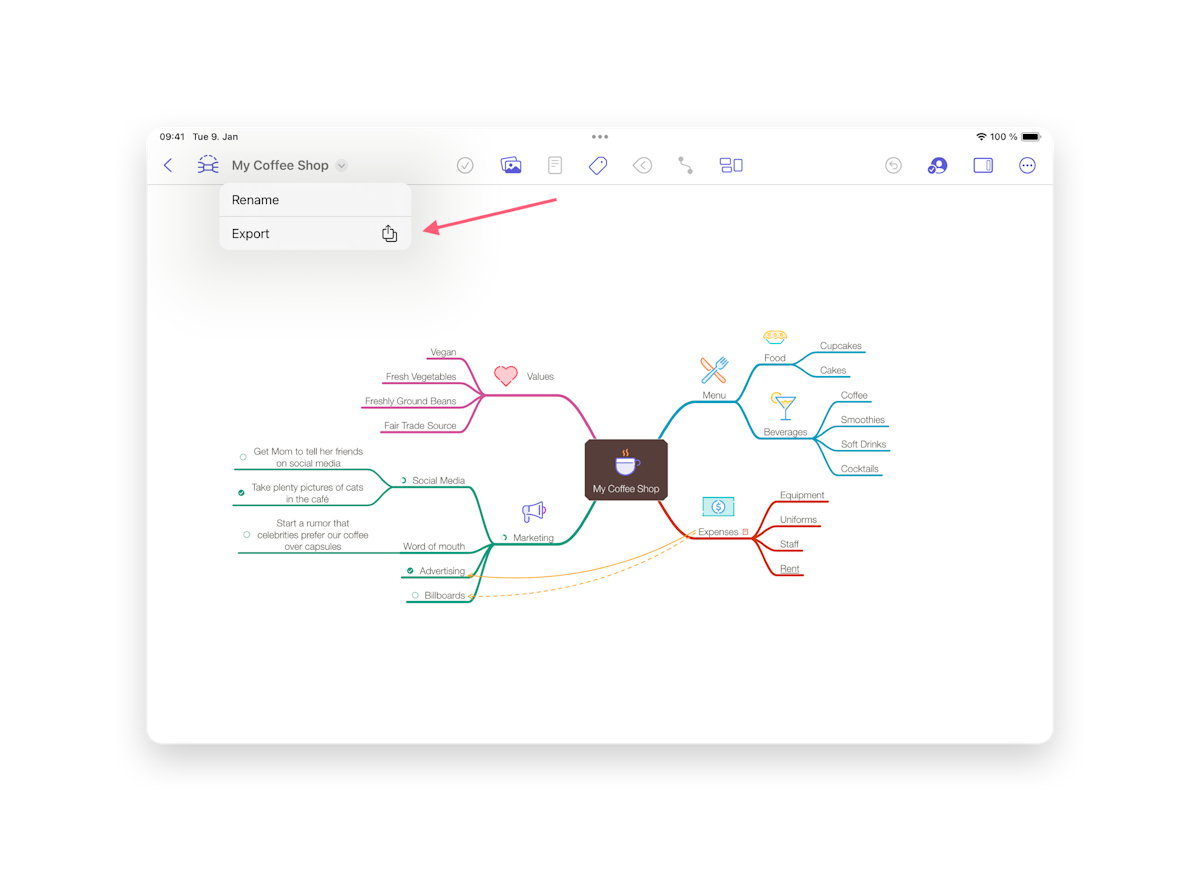
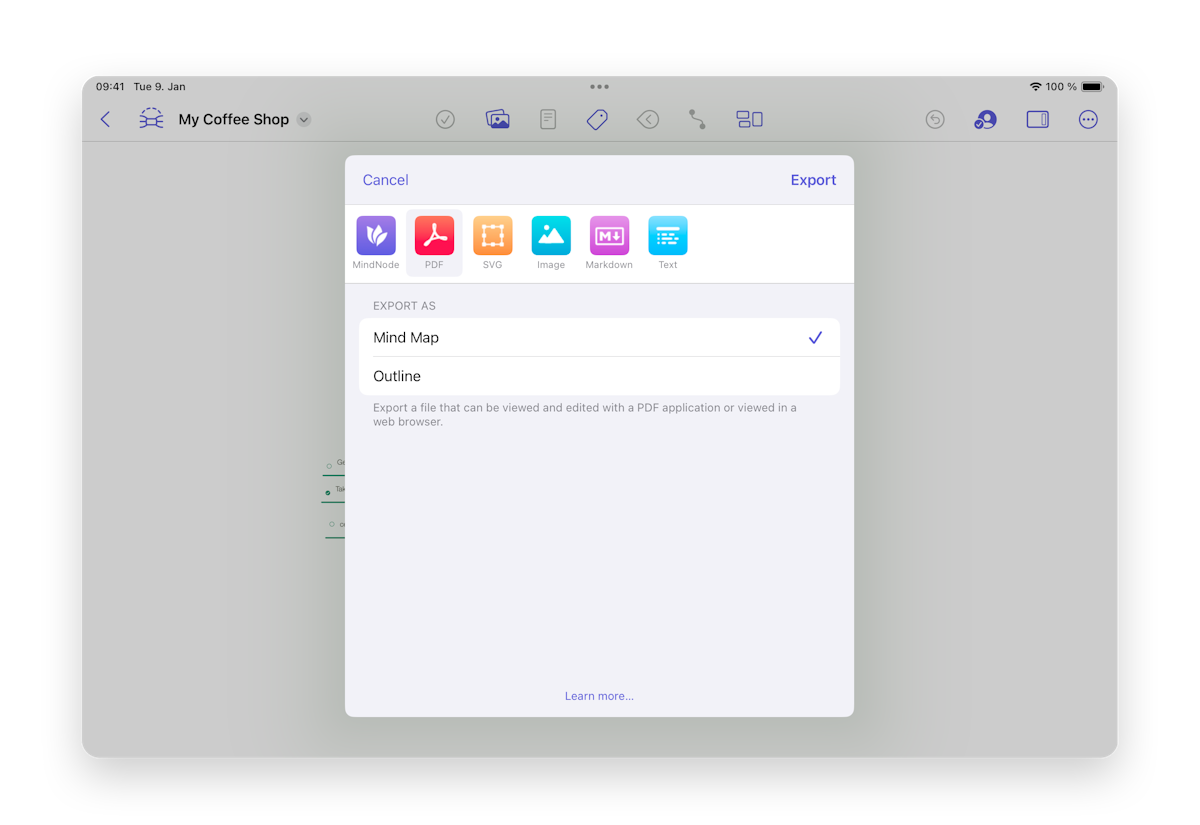
Export
Export
Sometimes, MindNode Next is not the final destination for your document and you need to convert it to something else. Therefore, you have a variety of document formats to choose from. You can export as MindNode Classic, PDF, SVG, Image, Markdown, and Text.
Follow these steps to export a document:
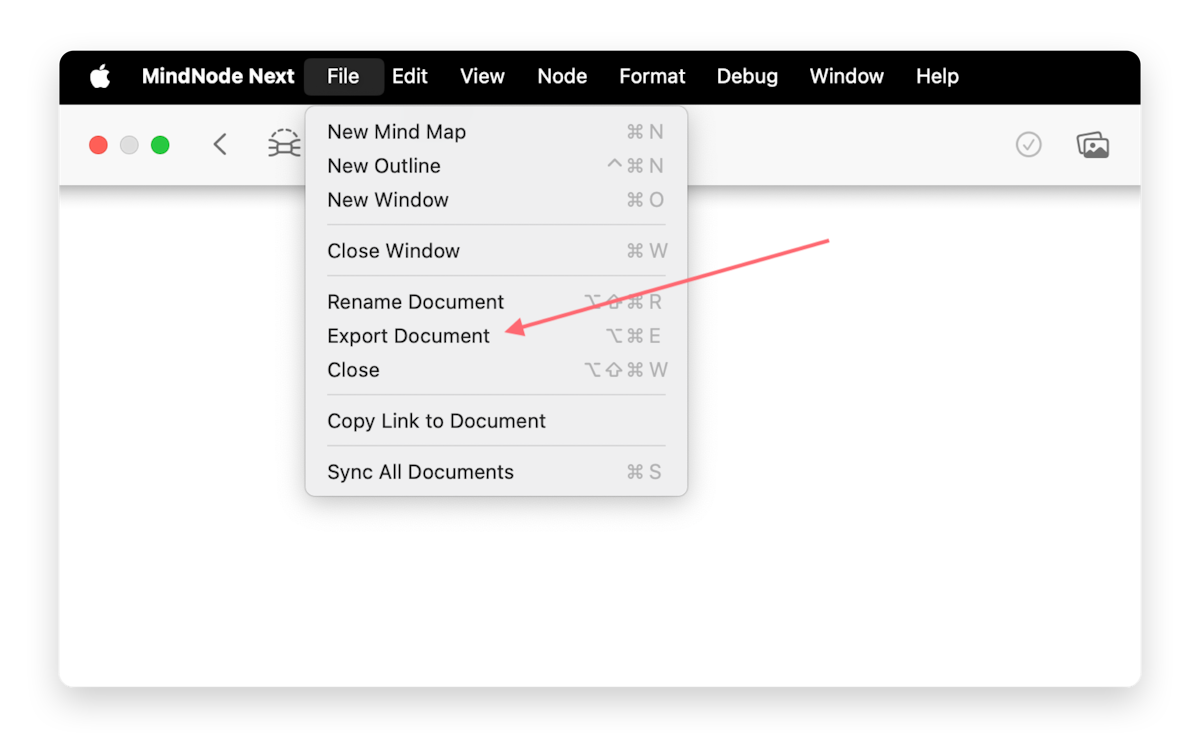
On Mac, to export a document, go ahead and click on Export Document in the File menu on the top of your screen and select your preferred file format.
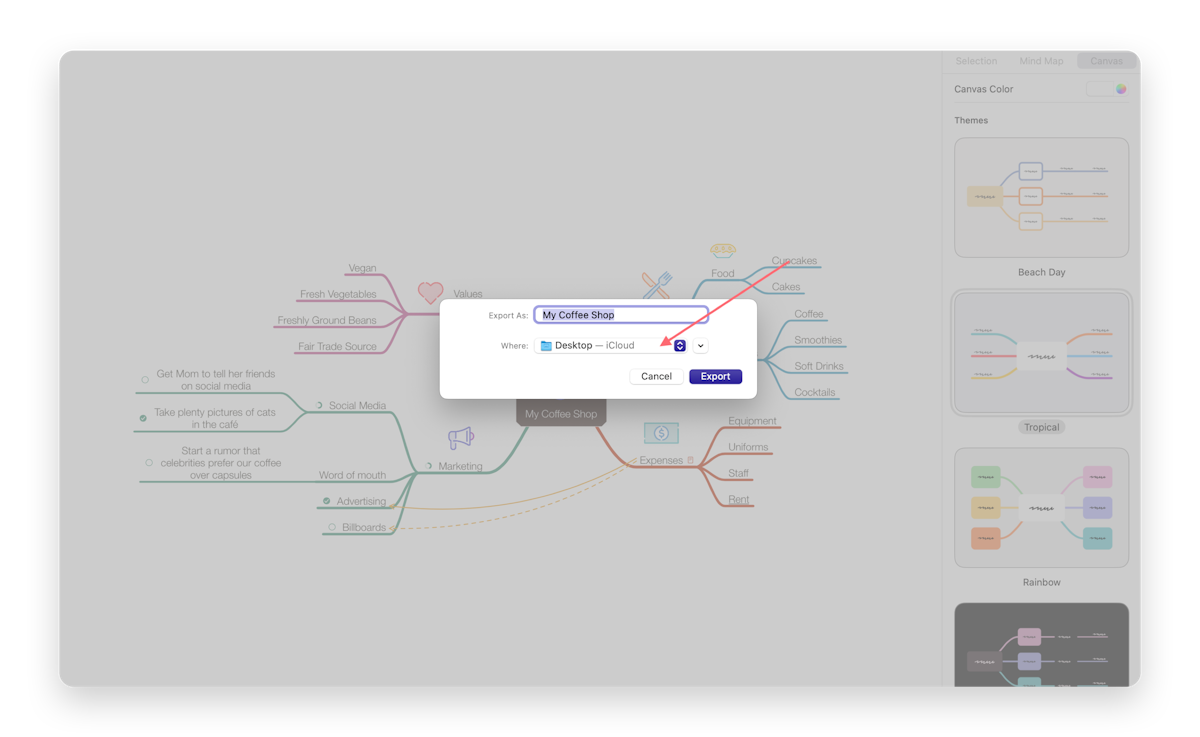
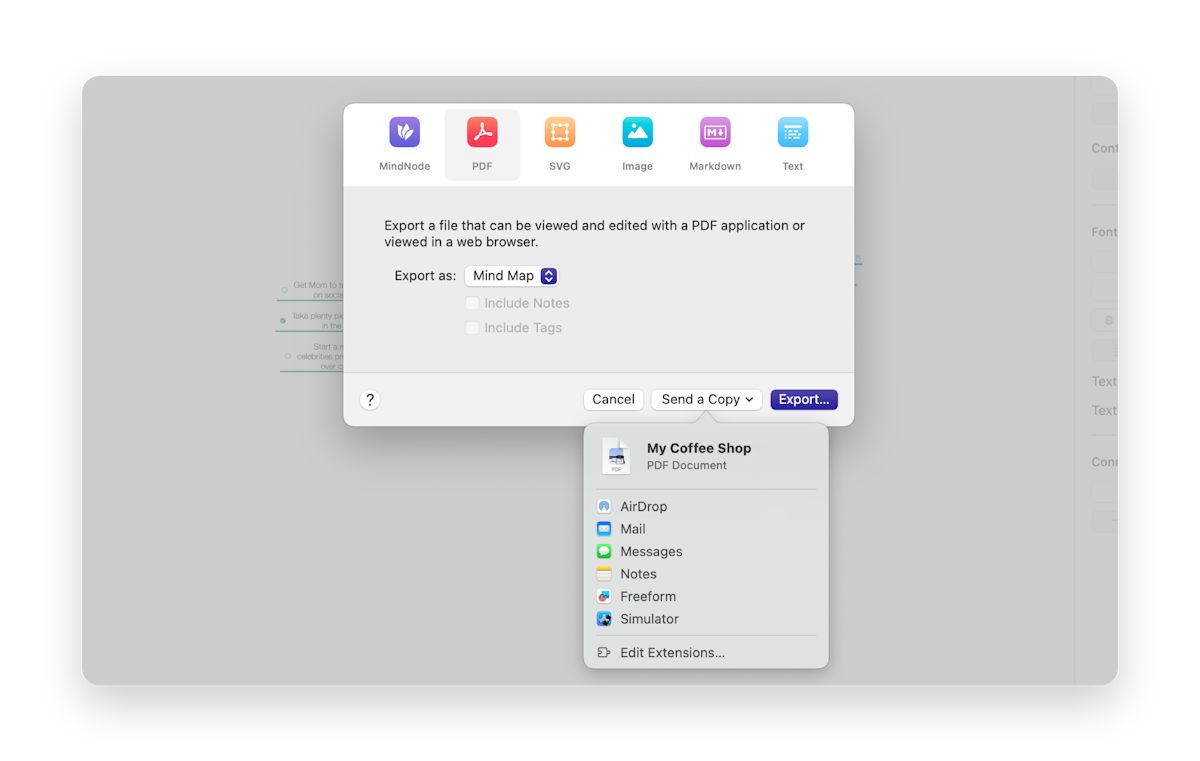
After adjusting the settings in the export window, open and click the Export… button. Now you can choose where to save your exported document to.
You can also click the Send a Copy button to share your document directly via Mail, Messages, or AirDrop.
On iOS, exporting a document depends on whether you use an iPad or an iPhone.
On the iPhone, tap the action button in the toolbar (it's the circle with the three dots), and from the drop-down menu, select Export.
Select the file format to which you want to export your document and adjust the settings. Then, tap on "Export" and select how you want to share your document(AirDrop, Messages, etc.) or save it to your preferred location.

On the iPad, tap the document name, and from the drop-down menu, select Export.
Now select the file format you want to export to and adjust the settings. Tap on "Export" and choose the app you want to send it to (AirDrop, Messages, etc.) or save it to your preferred location.
Different formats
MindNode Next documents can be exported to different formats. Here, we'll learn more about them and how they handle different features in MindNode.
MindNode Classic File format
Firstly, you can export a MindNode Next document as a MindNode Classic single file document. If you have an older device running a legacy version of MindNode, the legacy export options ensure the compatibility of your exported file and the legacy app.
Please note that not all MindNode Classic features are supported.
Exporting to other formats via MindNode Classic
If you want to export your document to a format that MindNode Next, currently, does not support you can export it as a MindNode Classic document and then from MindNode Classic export it to the format of your choosing.
You can choose whether you want to export the Mind Map or the Outline for those files. For the outline you can then again select whether Notes and/or Tags should be included.
SVG
SVG export will allow you to view and edit your document with an SVG application or in a web browser.
Images
Images will create a PNG file of your mind map. For those files, you can choose whether you want the background to be included or transparent.
Markdown
Markdown allows you to export your file to all applications supporting the Markdown document format. Also, most text editors. Here, you can choose whether images should be included in TextBundle.
Text
Text will create a text outline that can be viewed and edited with a text editor.
Once you're ready to bring your ideas to paper, please follow these steps to print your document:
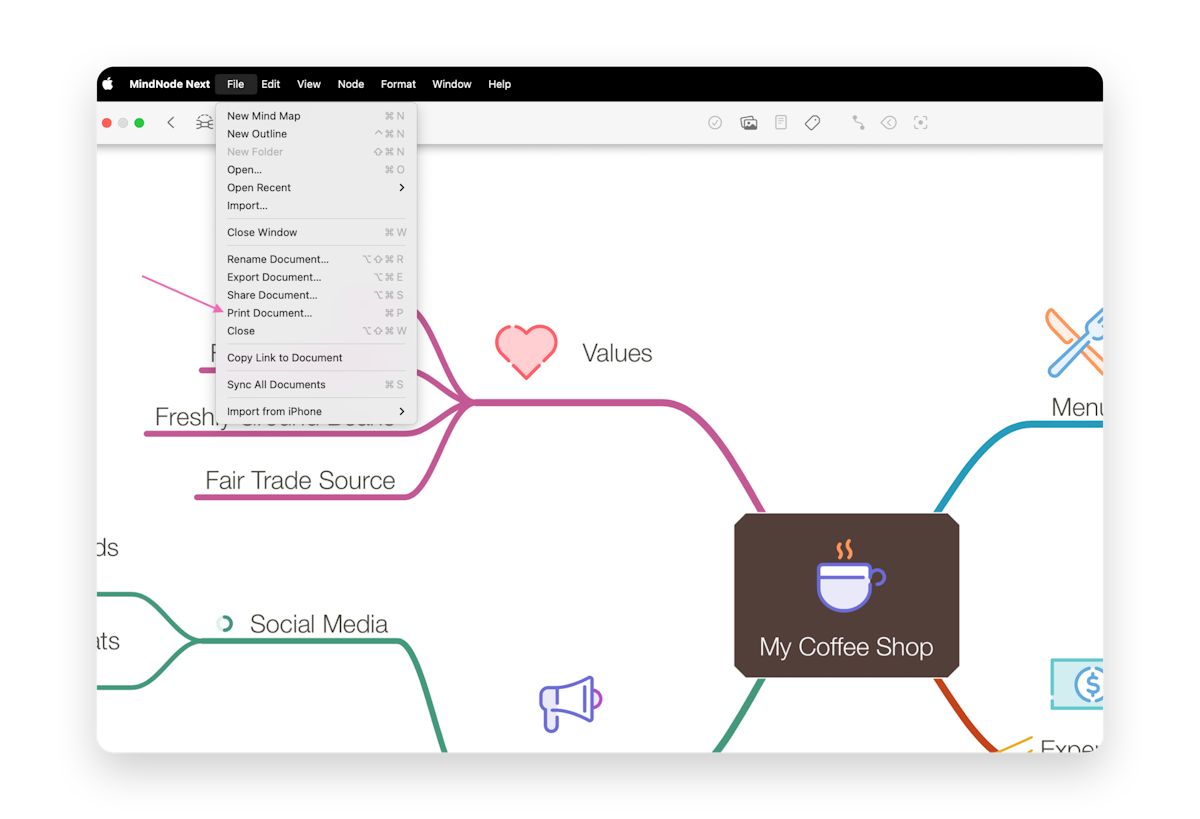
On macOS:
- Click on File in the top-left corner of the screen.
- Select Print Document... from the dropdown menu.
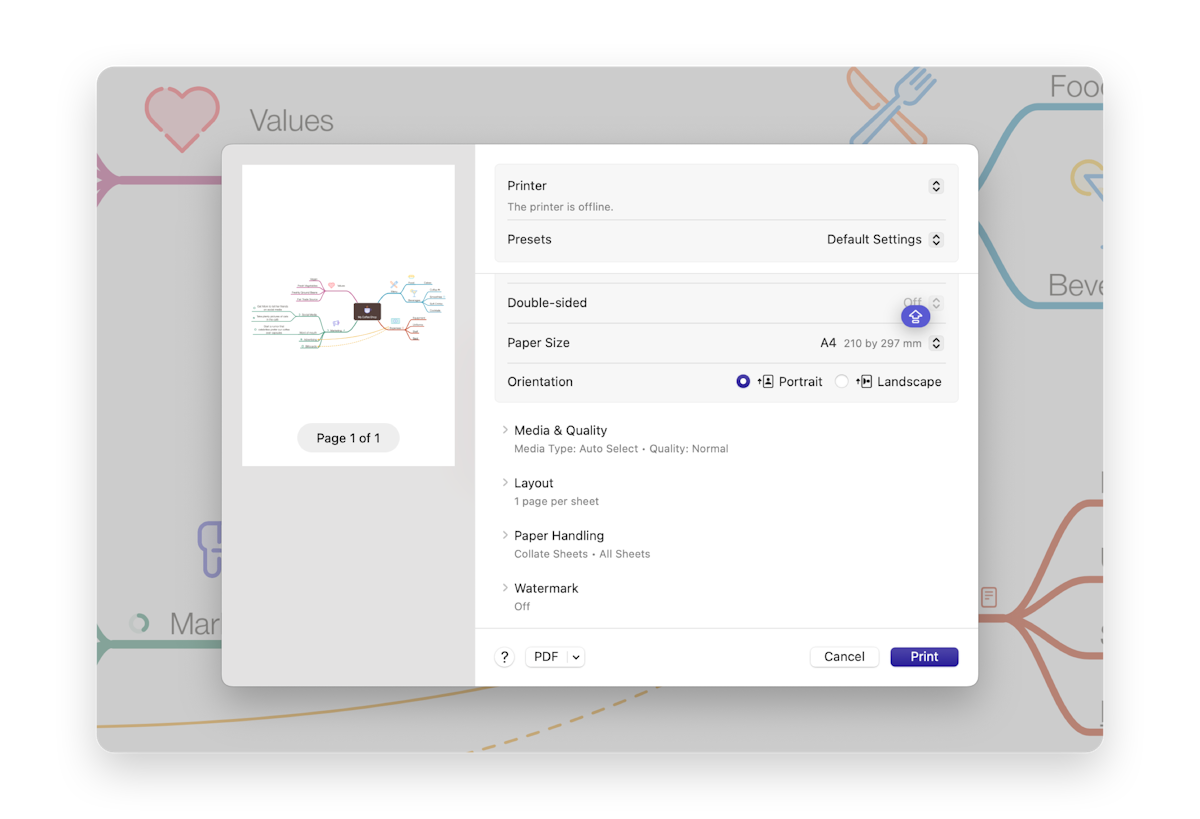
In the print dialogue, you can customise various options:
- Colour or Black & White
- Paper Size
- Orientation (Portrait or Landscape)
- Media and Quality
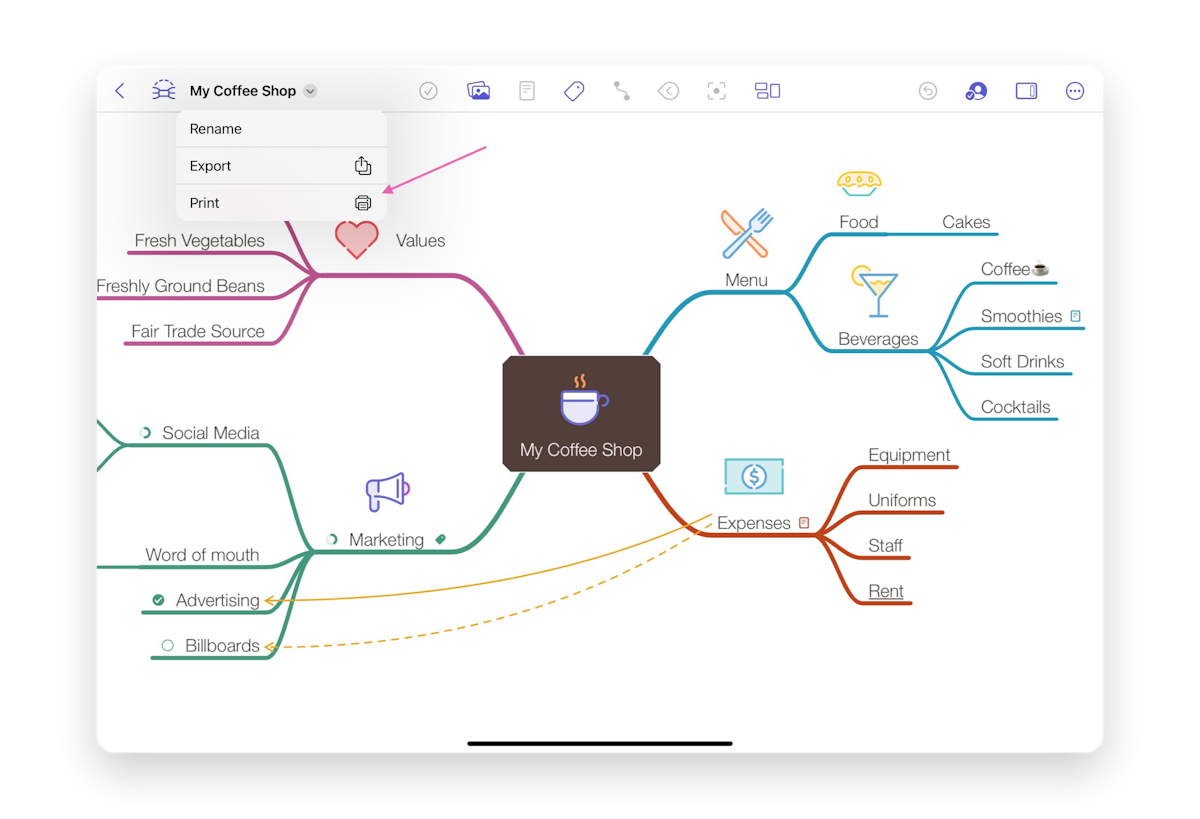
On iOS:
- Tap on the three dots in the upper right corner.
- Select Print from the dropdown menu.
You can customise various options in the print dialogue, such as the paper size and layout.
Collaboration
Whether you’re brainstorming ideas with colleagues, editing projects, or managing tasks with your family, Live Collaboration ensures that everyone stays on the same canvas—literally.
All participants can edit the document simultaneously, like any shared document in MindNode Next. However, with Live Collaboration enabled, everyone can see changes happening in real time, along with each other's current position and activity within the document.
Enabling Live Collaboration:
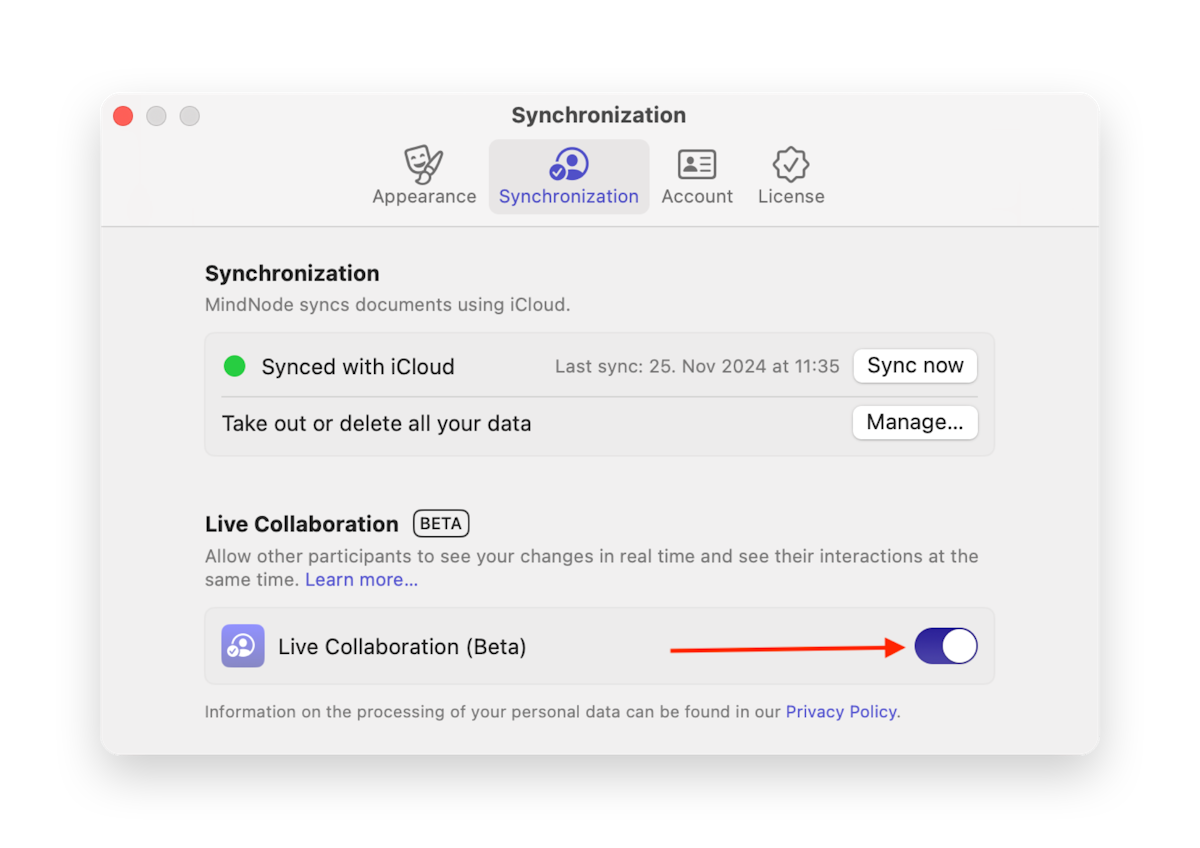
To enable Live Collaboration on your macOS:
- Open MindNode Next Settings
- Click the Sync tab
- Toggle on Live Collaboration
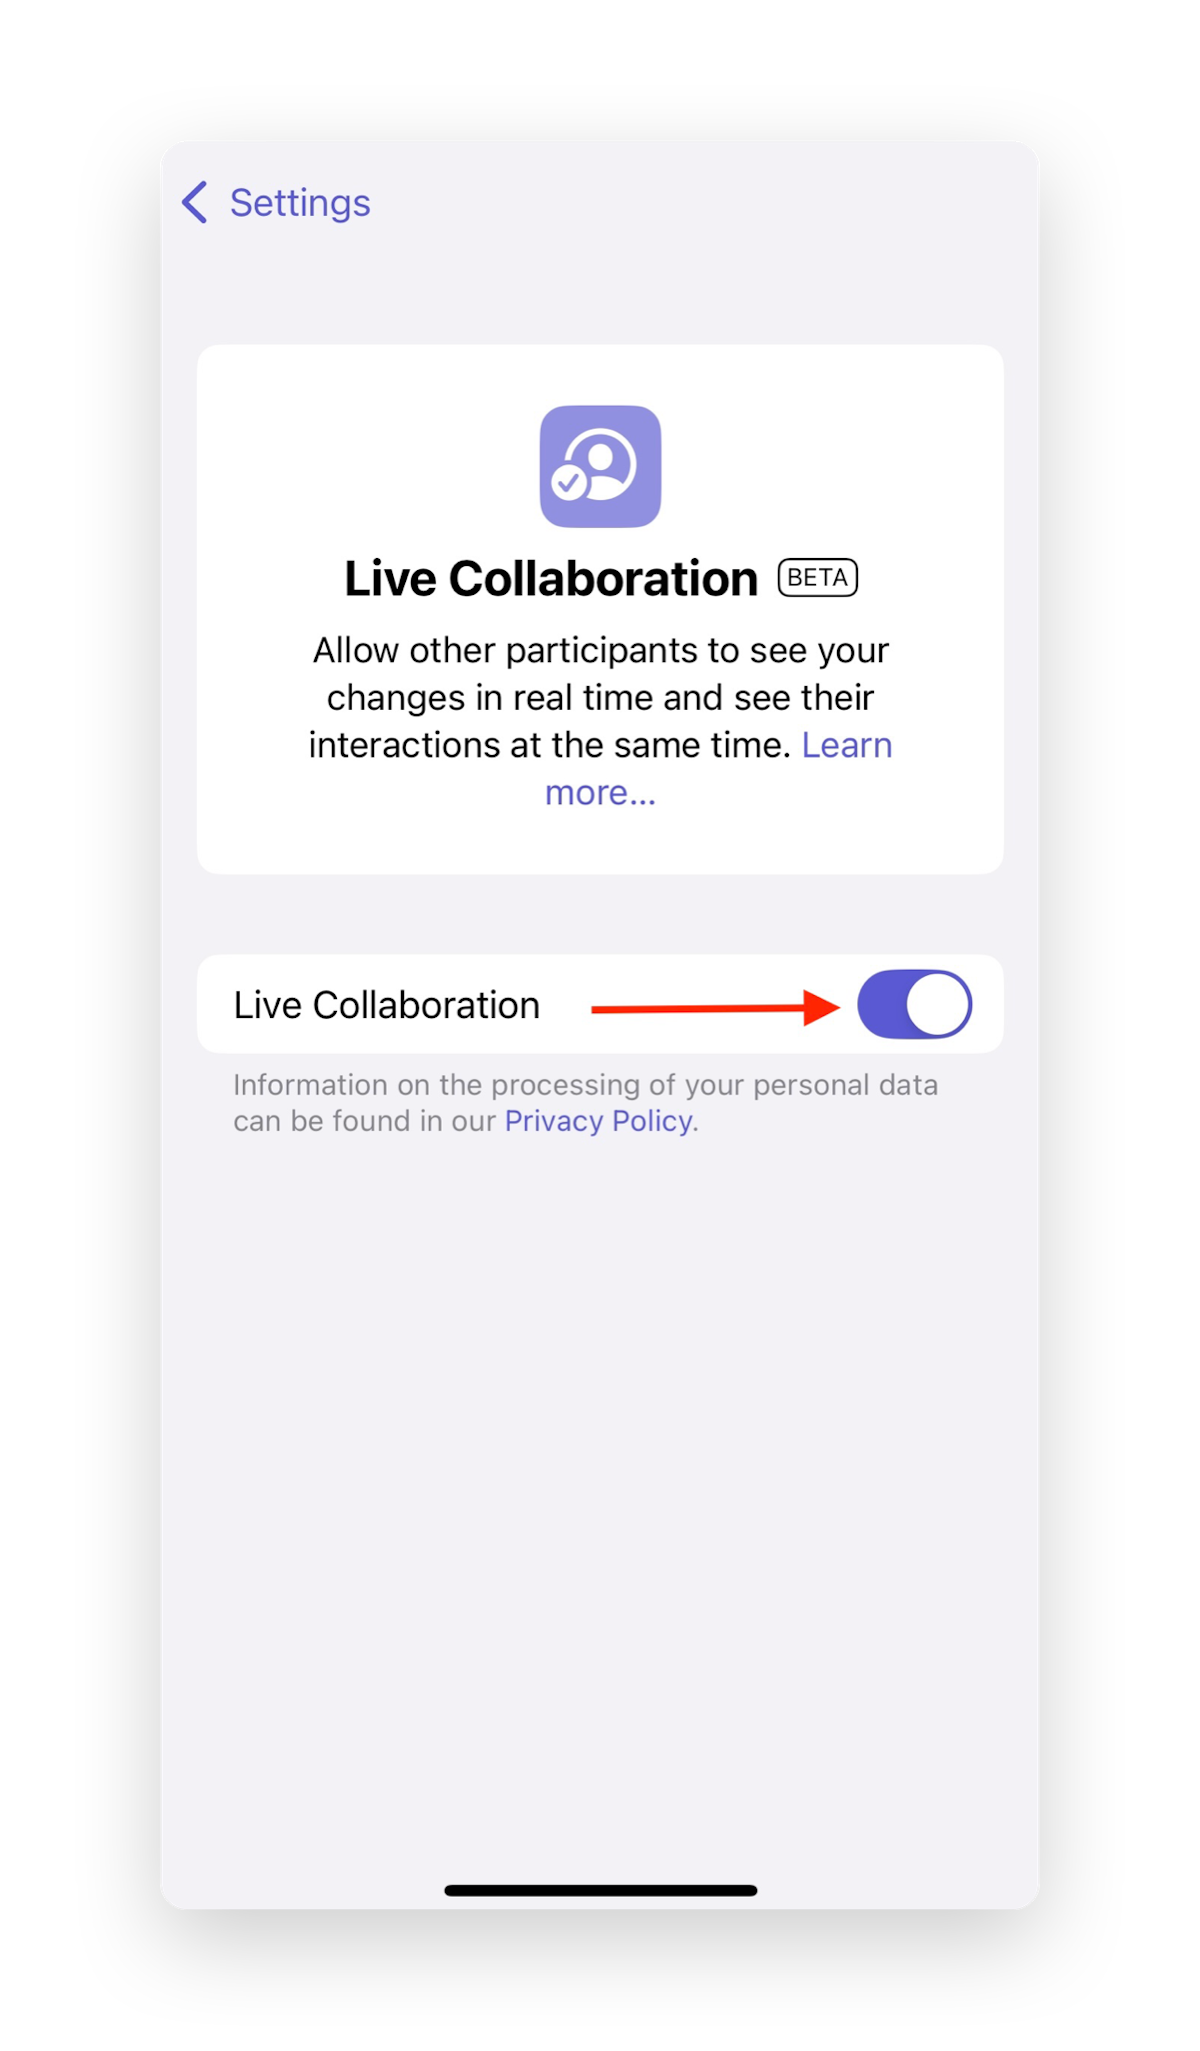
If you'd like to collaborate via iOS:
- Open the Settings in MindNode Next
- Click on Live Collaboration (Beta)
- Toggle it on.
To enable Live Collaboration on your visionOS:
- Go to MindNode Next Settings
- Tap the Live Collaboration
- Toggle it on.
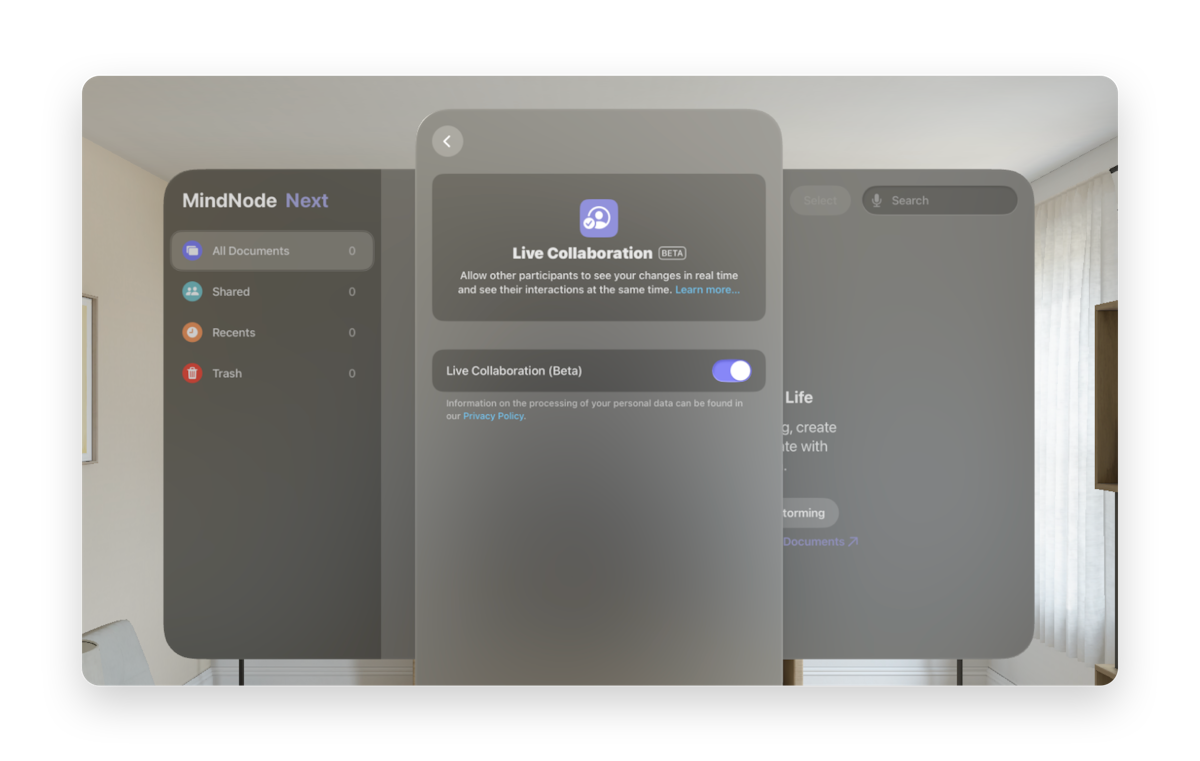
Note:
Please remember that the MindNode Next Live Collaboration feature is still in Beta. Meaning there's still a lot of work and active development being put into it. So, some things might not work as seamlessly as you're used to from MindNode; at times, we might have to disable it, and some behaviours might still change. On the other hand, we especially appreciate your feedback, experience, and thoughts on the matter. So feel free to send us an email to beta@mindnode.com! We'd love to hear from you.
All collaborators must use MindNode Next, as collaboration does not work with MindNode Classic.
Automation
Automation
Using the Shortcuts app you can automate specific recurrent tasks and make MindNode Next part of a larger workflow. Automation requires advanced knowledge and is only recommended for power users.

Apple Shortcuts
Apple's Shortcuts app
Use MindNode together with Apple Shortcuts to create powerful shortcuts that combine MindNode with other apps. You can create shortcuts that work with documents, nodes and tags.

Document Actions
Document Actions are actions that operate on a document itself and not its content. You can use it to create, delete and export documents.
Create Document
Creates a new document with the given title.
Parameter:
- Document Title
Delete Documents
Deletes the specified document(s) from your library.
Parameter:
- Documents
Export Document
Exports the specified document to the selected format.
Parameter:
- Document
- Export Type (PNG, SVG, plain text, MindNode, MindNode Classic, Markdown)
Find Documents
Finds documents matching the given filters, such as title, modification date, or folder name.
Filter:
- Last Modified Date
- Document ID
- Title
- Folder Name
Get Current Document
Returns the document currently viewed in the app if it's running.
Returns:
- Document
Import Document
Imports a file into the app. Supports formats such as MindNode Classic, RTF, plain text, TextBundle, FreeMind, Xmind, OPML, and iThoughts X.
Open Document
Opens the specified document in the app.
Parameter:
- Document
Open Recent Document
Opens the most recently accessed document in the app.
Rename Document
Renames the specified document to the new name.
Parameter:
- Document
- New Name
Node Actions
Node actions interact directly with the contents of your documents. They include actions to create, filter or edit nodes.
Create Node
Creates a new main node or subnode in the given document.
Parameter:
- Document
- Related Node (Optional: defines the parent or sibling for the new node)
Delete Node
Deletes the specified node(s) from a document.
Parameter:
- Nodes
Edit Node
Modifies a node’s attributes such as title, shape, or notes.
Editable Fields:
- Title
- Shape
- Fill Color
- Notes
- Tasks
- Links
Find Nodes
Finds nodes in a document that match the given filters such, as title, level, or task state.
Filters:
- Document ID
- Node Title
- Level
- Node ID
- Task State
- Tag IDs
Tag Actions
Tag actions include an action to find tags in a specific document.
Find Tags
Finds tags in a document that match the given filters, such as name or ID.
Filters:
- Document ID
- Tag Name
- Tag ID
Welcome to MindNode Next
Welcome to MindNode Next
MindNode Next is our new Apple Vision Pro app. It is a brand-new version of MindNode built for the new age of spatial computing and collaboration. MindNode Next is built on a new foundation that allows for conflict-free syncing of documents. Now with MindNode Next documents are managed directly in MindNode itself using iCloud and are no longer stored in files on disk or third-party storage locations.
Requirements
MindNode Next requires a Vision Pro running visionOS 1.0 or later.
Languages
MindNode Next is currently available in Chinese Simplified and Traditional, English, French, German, and Japanese.
Support
Check out our Support Articles and read the answers to the most common questions if you have any questions. You can also email us at support@mindnode.com.
For general questions on how to use Apple Vision Pro you can find its user guide here.

Document Picker
New Document Picker
Here the user guide is still work-in-progress. The information will be updated shortly.
With MindNode Next all your documents are now stored directly in iCloud. If iCloud is not available the documents will be stored on your device.
You can access your MindNode Next documents from the newly designed document picker.
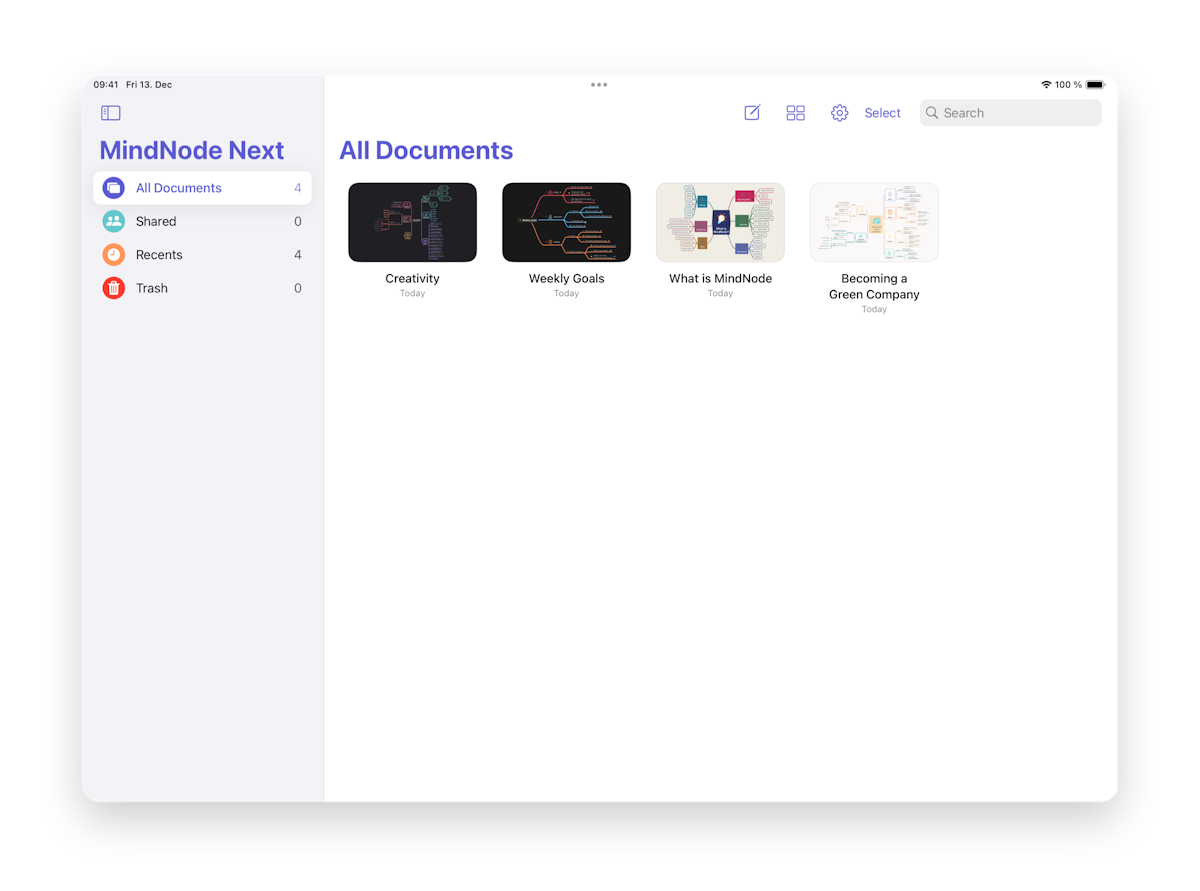
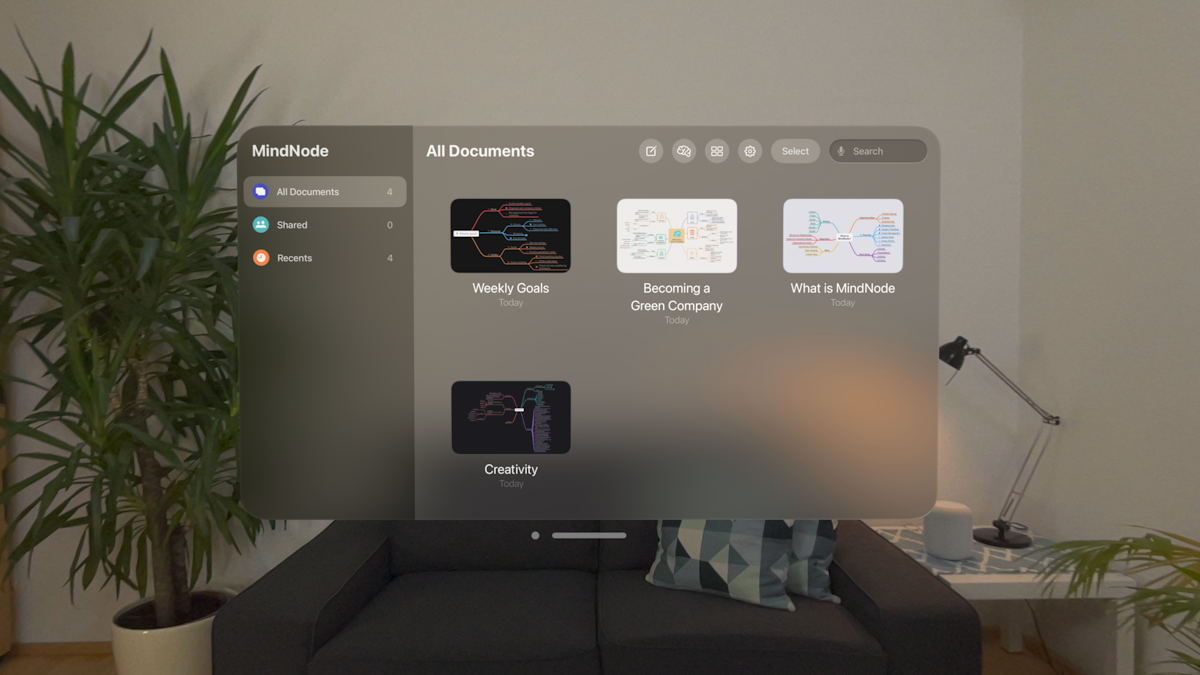
The sidebar on the left has four categories:
- All Documents - well, the name speaks for itself.
- Shared - here you can find all documents in which you collaborate with others.
- Recents - which is where all documents you interacted with in the last 14 days live.
- Trash - shows your deleted documents and enables you to recover them
When you first start MindNode Next or don't have any documents, the document picker will give you the options to Create Document (which starts a new mind map)or Add Sample Documents (which add 4 mind map documents we created for you to explore). We also added a new feature exclusively for the Vision Pro called Start Brainstorming (which brings you to the immersive brainstorming mode).
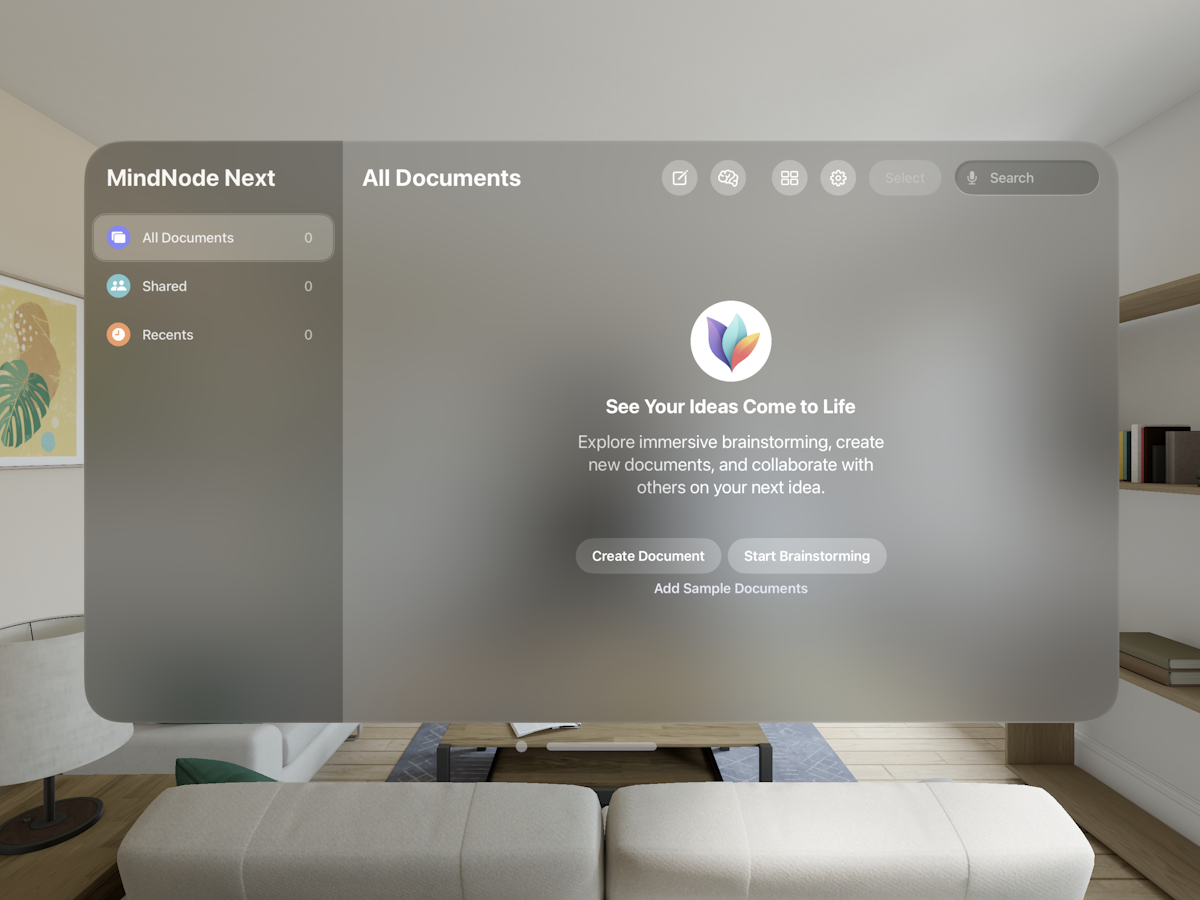
You can also find the button to start a new mind map at the top of the document picker (pencil sign). On the Vision Pro there will also be the Start Brainstorming icon.
Next to the creat new document button you'll also find the option to switch between Gallery or List view for your documents. As well as determine the Sort by option (Name, Last Viewed, or Last Modified).
Furthermore, on visionOS and iOS you can find the MindNode Next settings at the top of the document picker. On your Mac open MindNode Next > Setting in the Menubar.
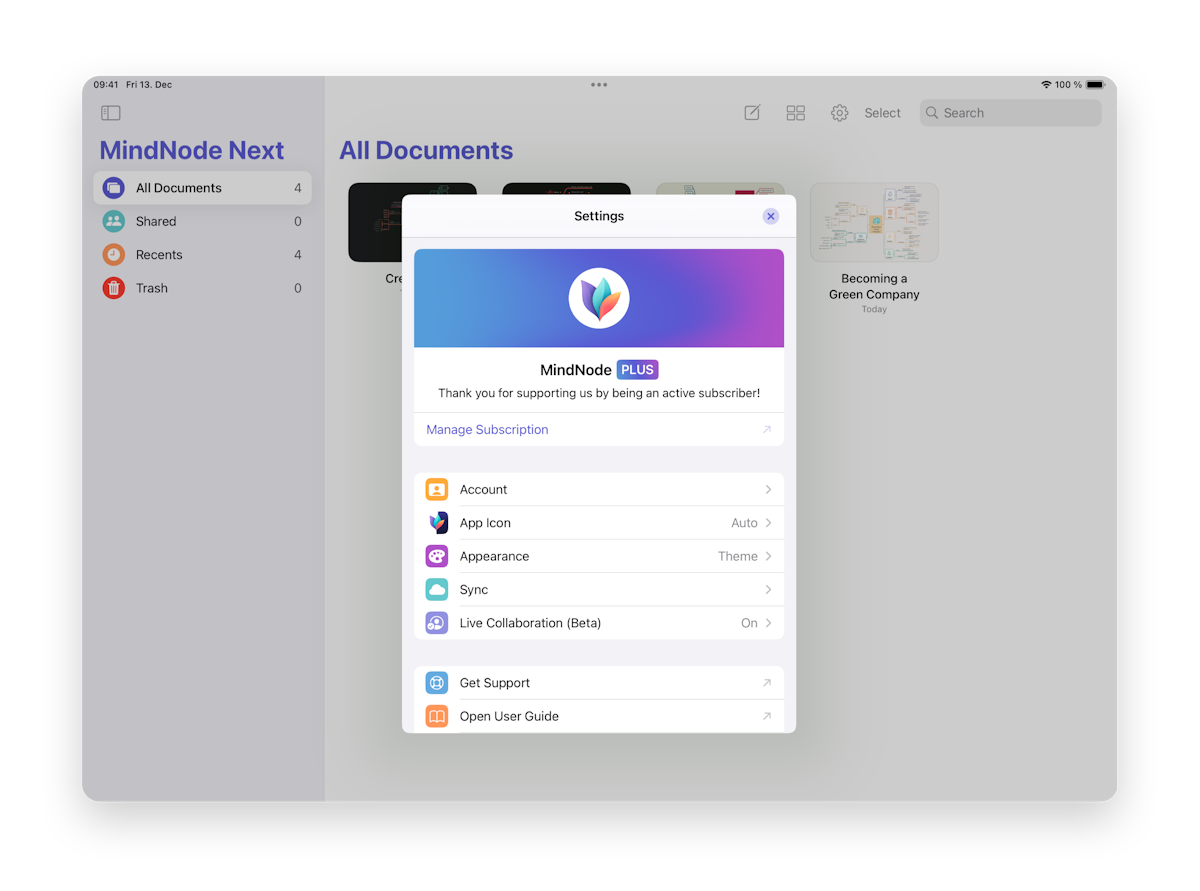
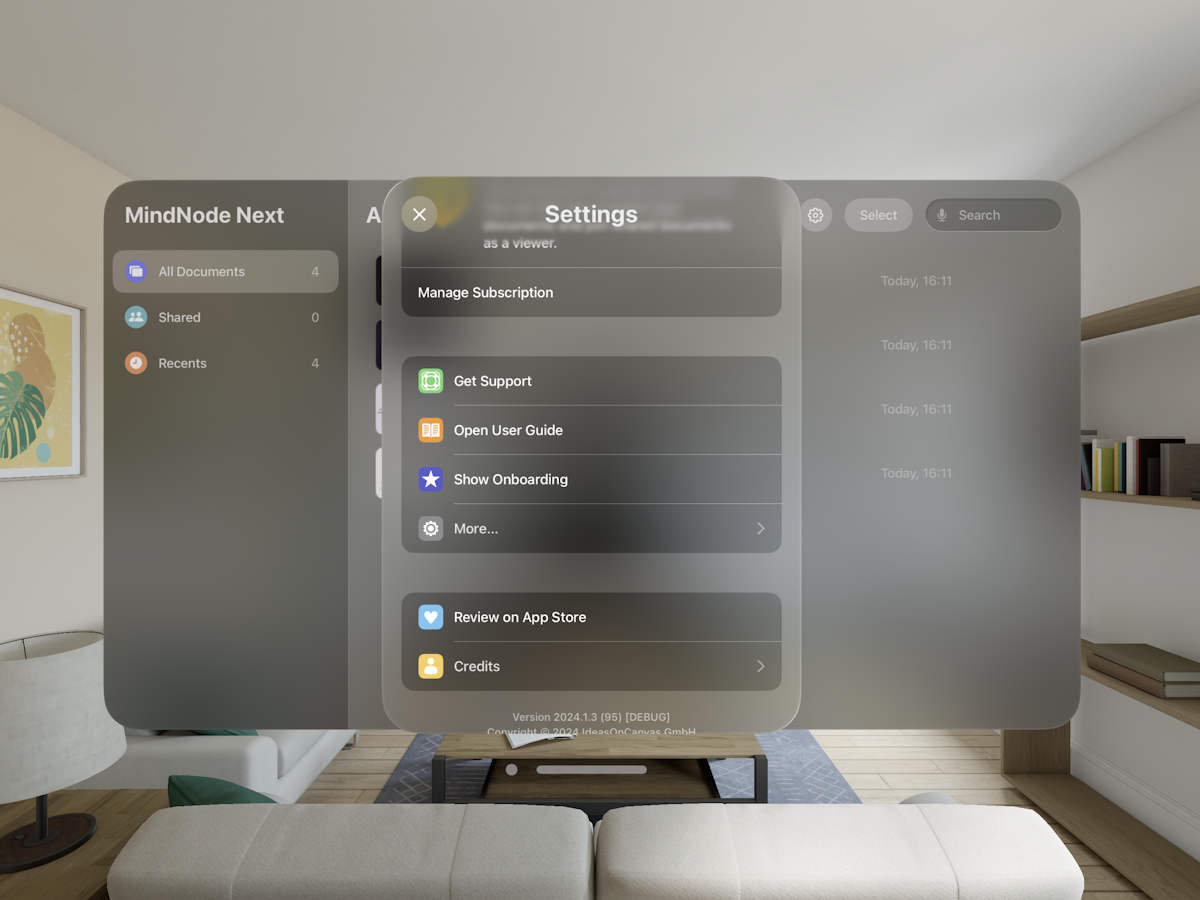
Here you can see your subscription status as well as Manage your Subscription, Get Support, Open the User Guide and Show the Onboarding again. By shaking your iPad or iPhone there appear further options that customer support might need for you to access. With Review on the App Store you can do just that, and under Credits, you can see who works on MindNode Next. On your Mac you an acces Manage your Subscription via the Menubar > License.
Lastly, on your Mac and VisionPro with Select enabled, you can select multiple documents at once. If you delete a document you can search Trash to recover it.
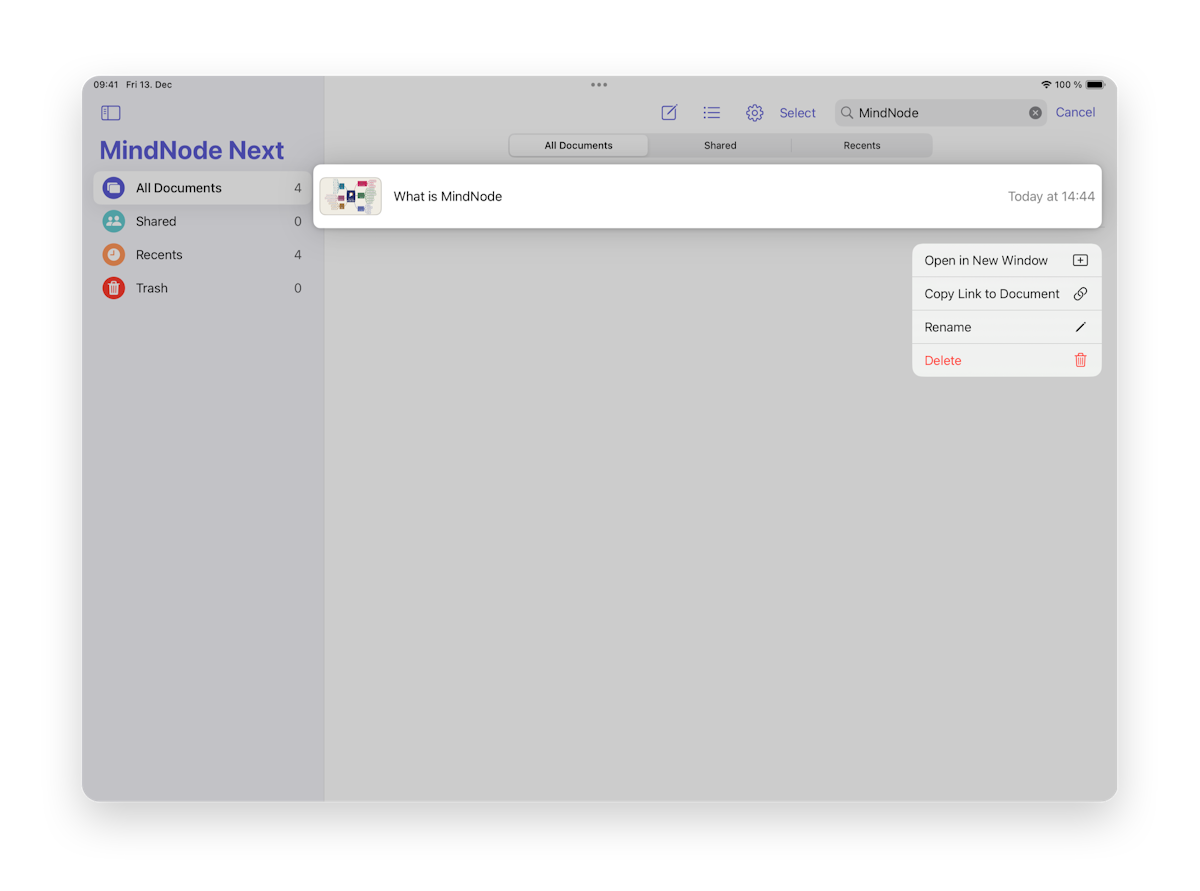
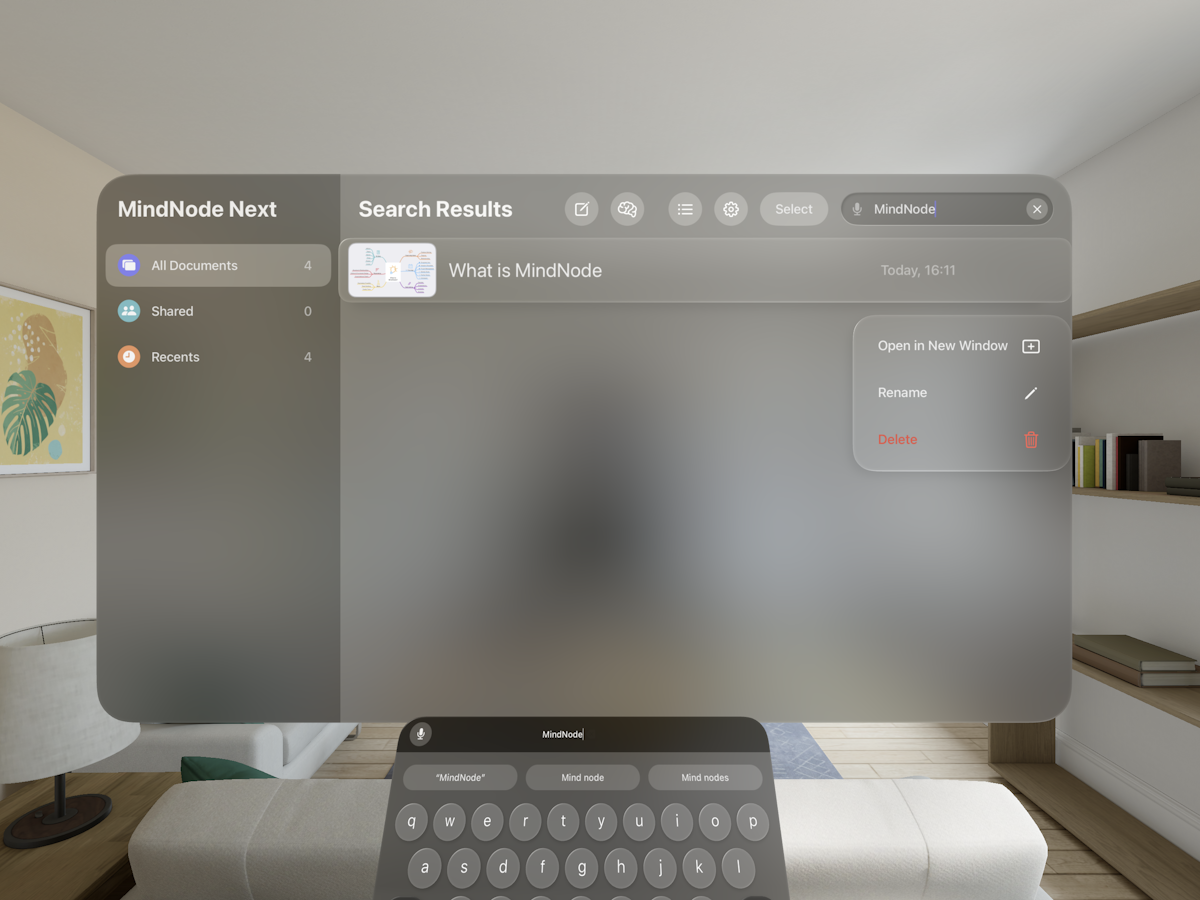
The Search field can be used to search documents by title.
Long tap on a document and you can choose Open in New Window, Copy Link to Document, Rename, or Delete.
Import, Export & Share
Import
At the moment it is possible to import classic MindNode documents into MindNode Next. For this open the Files app, navigate to the file you want to open in MindNode Next, and double-tap it. This will open it in MindNode Next.
Export
Currently, the only export option is PDF. Support for MindNode Classic documents will be added shortly. To export a PDF copy open a mind map, tap the name of the mind map at the top, and then tap Export as PDF.
On the window that opens up select the storage location you'd like for the PDF, if you want give it a new name at the bottom, and then select Move in the top right corner to save it.

Share
With MindNode Next you can now also share your documents with others to collaborate on them. Changes are saved in iCloud, so everyone with access to the mind map sees the latest version whenever they open it.
Everyone you share with must be signed in to iCloud with their Apple ID to edit or view the mind map.
For this:
- Open a board, tap the name of the mind map at the top, then tap Share.
- Choose who can access the board, the level of access you want them to have, and how you want to send it.
- To make changes to sharing settings or copy the link after you start sharing, tap the collaboration button in the bottom ornament, then tap Manage Shared Document.
If you stop sharing, the board no longer appears on the devices of the other participants, but you still have access to it. You can also remove yourself from boards that others have shared with you.
Enjoy MindNode Next!
Enjoy MindNode Next!
That's a wrap on the complete MindNode Next User Guide. We hope it has helped you discover and master your mind-mapping skills and bring your ideas to life. Got feedback? Drop us a line at support@mindnode.com — we'd be happy to hear from you.
